


Welcome to  -
Marg Books
-
Marg Books
Home > Marg Books > Inventory Master > What is the process of Rate Info Settings for an Item in Marg Books ?
What is the process of Rate Info Settings for an Item in Marg Books ?

Overview of Rate Info in Item in Marg Books
Process to Rename MRP and Rate-A Fields in Item in Marg Books
OVERVIEW OF RATE INFO IN ITEM IN MARG BOOKS
- With the help of this option in Marg Books, the user can enable the other Rates for the item i.e. Rate-B, Rate-C, Rate-D, etc.
- The user can also rename the headings of MRP and Rate-A as per the requirement in item master.
PROCESS TO RENAME MRP AND RATE-A FIELDS IN ITEM IN MARG BOOKS
- Go to Master >> Inventory Master >> Item.

- An 'Item List' window will appear.
- Click on 'Create' tab.

- A ‘Create Item’ window will appear.
- Click on ‘Settings’ icon.

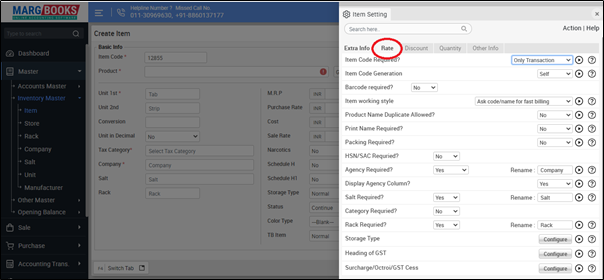
- Select 'Rate' section in order to do the rate info settings.

- Now in ‘Rate Info’ option, the user will click on 'Configure' tab.
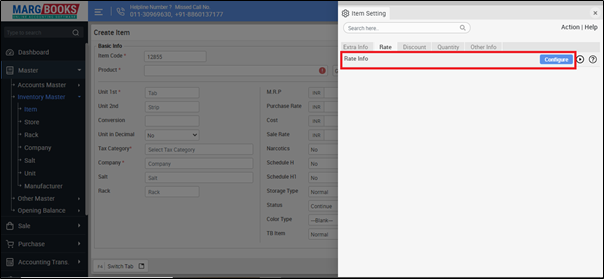
- A 'Rate info Settings' window will appear.
1. MRP: In this option, the user can rename the heading of MRP (If required), otherwise keep it as default.
Suppose, rename 'M.R.P.'.
2. Rate-A: In this option, the user can rename the heading of Rate-A (If required), otherwise keep it as default.
Suppose rename 'Sale Rate'.
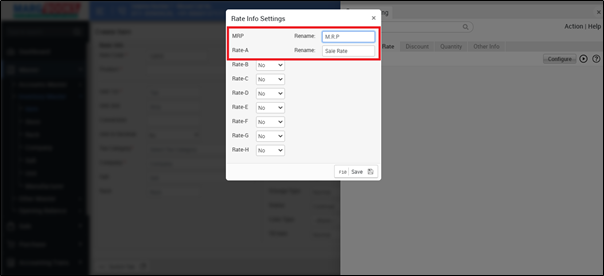
- Click on 'Save' to save the changes.

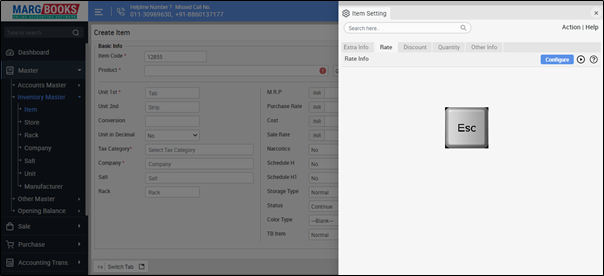
- Then press 'ESC' key to save the changes.

PROCESS TO ENABLE OR DISABLE OTHER RATE IN ITEM IN MARG BOOKS
- Go to Master >> Inventory Master >> Item.
- An 'Item List' window will appear.
- Click on 'Create' tab.
- A ‘Create Item’ window will appear.
- Click on ‘Settings’ icon.
- Select 'Rate' section in order to do the rate info settings.
- Now in ‘Rate Info’ option, the user will click on 'Configure' tab.

- Then a 'Rate info Settings' window will appear, in which:
1. Rate-B: In this option, the user will select 'Yes' in order to enable Rate-B in the item master, otherwise keep it as default.
2. Rate-C: In this option, the user will select 'Yes' in order to enable Rate-C in the item master, otherwise keep it as default.
3. Rate-D: In this option, the user will select 'Yes' in order to enable Rate-D in the item master, otherwise keep it as default.
4. Rate-E: In this option, the user will select 'Yes' in order to enable Rate-E in the item master, otherwise keep it as default.
5. Rate-F: In this option, the user will select 'Yes' in order to enable Rate-F in the item master, otherwise keep it as default.
6. Rate-G: In this option, the user will select 'Yes' in order to enable Rate-G in the item master, otherwise keep it as default.
7. Rate-H: In this option, the user will select 'Yes' in order to enable Rate-H in the item master, otherwise keep it as default.
- Suppose select 'Yes' in Rate-B field.

- Click on 'Save' to save the changes.

- Then press 'ESC' key to save the changes.
After following the above steps, the Rate-B will get enabled in the item master.


