Welcome to  -
eBusiness App
Search by Category
Home > Ebusiness App > General Queries > MY SHOP QRCode, Distance based Ordering on shop in Marg ERP Software !
MY SHOP QRCode, Distance based Ordering on shop in Marg ERP Software !
My Shop QR Code
Overview/Introduction to My Shop QRID In Marg ERP Software
Process to Generate QRID In Marg ERP Software
Process to Scan Generated QRID
Process of Billing through QRID
OVERVIEW/INTRODUCTION TO MY SHOP QRID IN MARG ERP SOFTWARE
- Marg ERP has introduced a very beneficial option of My Shop QR Code to ensure contact less business.
- The user can simply print the QR code from the software and paste it outside their shop/counter to experience a new way of doing business with ease.
- My Shop QR Code option is designed for distributors and retailers for ordering from a safe distance.
- This option enables the customer to easily view the items which are available within a range, their Prices, Schemes etc. and can generate the order as per the requirement.
PROCESS TO GENERATE QRID IN MARG ERP SOFTWARE
- Go to Masters > Shop QRID & eBusiness. Press Enter.

Fig. 1.1 Menu View to Shop QRID & eBusiness in Marg ERP Software
- An eBusiness Setup Window will appear.
- The user will click on ‘Generate SHOP QRID’.
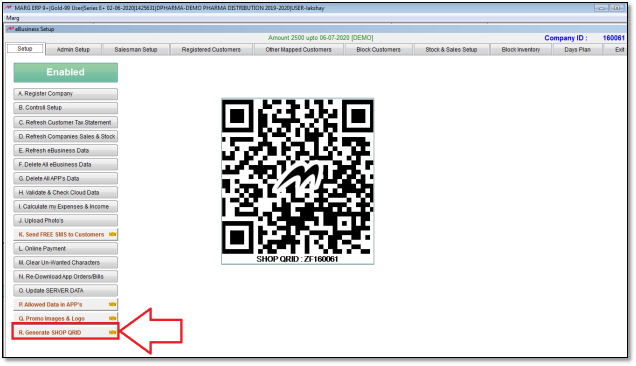
Fig. 1.2 View of eBusiness Setup Window in Marg ERP Software
- A ‘SHOP QRID SETTINGS’ window will appear.
- The user will click on ‘Edit’ tab.
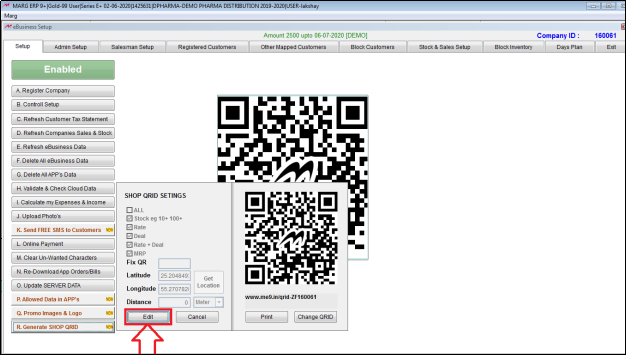
Fig. 1.3 View of Shop QRID Settings Window in Marg ERP Software
- Now the user will select the details of the item i.e. MRP, Rate, Deal etc. which needs to be displayed to the customer.
- Suppose, select ‘All.
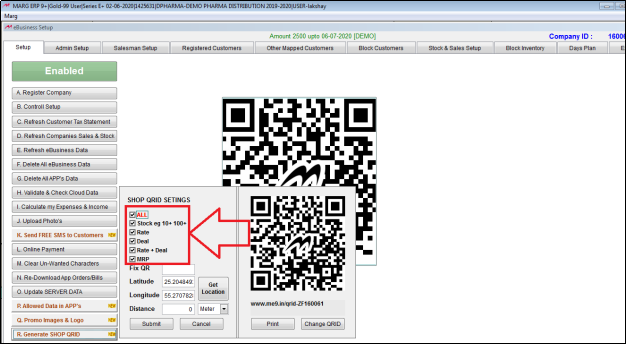
Fig. 1.4 View of Shop QRID Settings Window in Marg ERP Software
- In ‘latitude’ and ‘Longitude’, the software will automatically pick the distance of the area in which the QRID is being generated.
- In order to get the accurate ‘Latitude’ and ‘Longitude’, the user will click on ‘Get Location’.
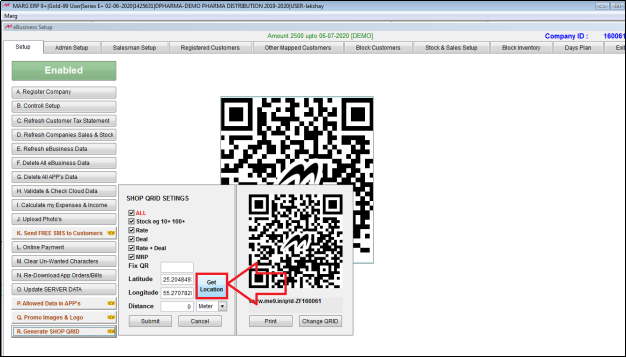
Fig. 1.5 View of Shop QRID Settings Window in Marg ERP Software
- A ‘Get Geo Location’ window will appear.
- The user will select ‘As per Address/Current Location’ as per the requirement.
a. As per Address: In this case, the software will automatically pick the distance as per the address mentioned in the details.
b. Current Location: In this case, the software will check the current location of the software and will automatically pick the accurate longitude and latitudes.
- Suppose, select ‘Current Location’.
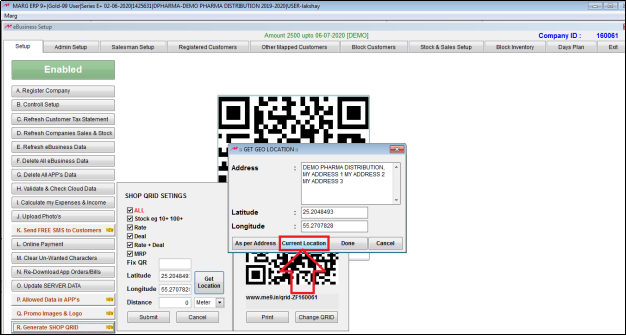
Fig. 1.6 View of GET GEO Location Window in Marg ERP Software
- Now the software will redirect to the Google Map and pick the Current location of the user.

Fig. 1.7 View of Current Location on Google Map
- Then the user will click on ‘Done’.
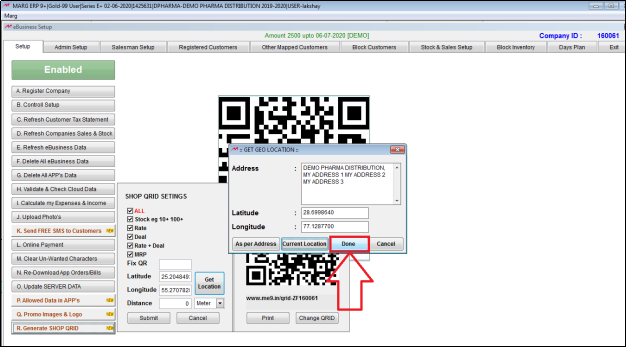
Fig. 1.8 View of GET GEO Location Window in Marg ERP Software
- Now in ‘Distance’ field, the user will define the distance within which the customer can scan the code.
- Suppose, define 500 Meter.
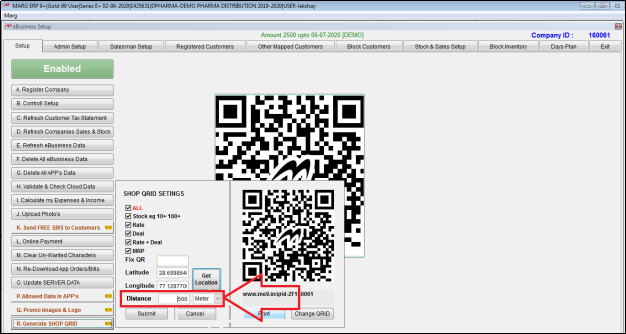
Fig. 1.9 View of Shop QRID Settings window in Marg ERP Software
- Click on ‘Submit’.

Fig. 1.10 View of Shop QRID Settings window in Marg ERP Software
- Now the user will click on ‘Print’ to print the SHOP QRID.

Fig. 1.11 View of Shop QRID Settings window in Marg ERP Software
- Here, the user can also mention a special note which needs to be printed along with the QRID.
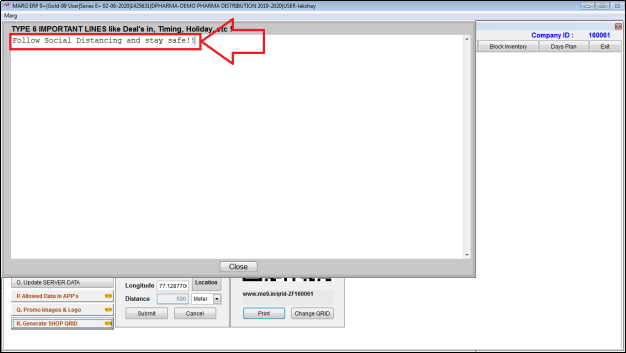
Fig. 1.12 View of Shop QRID Settings window in Marg ERP Software
- Then an alert window of ‘Ready to Print’ will appear in which the user will select ‘Yes’.
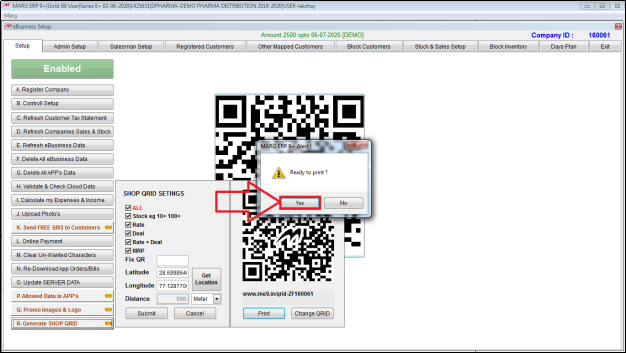
Fig. 1.13 View of an Alert window in Marg ERP Software
- Now a Printer Port window will appear.
- The user will select the printer port as per the requirement.
- Suppose, save the QRID in the PDF.
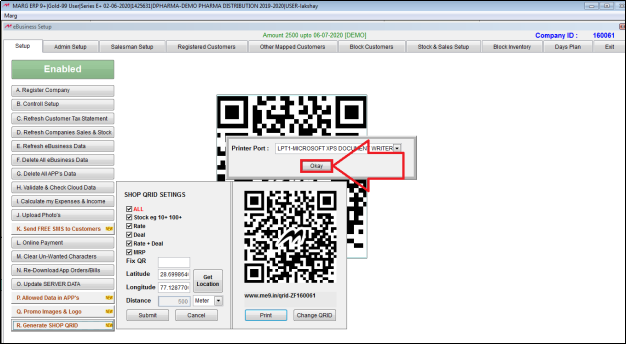
Fig. 1.14 View of Printer Port Window in Marg ERP Software
- A ‘Save the file as’ window will appear.
- The user will select the path where the PDF of QRID needs to be saved.
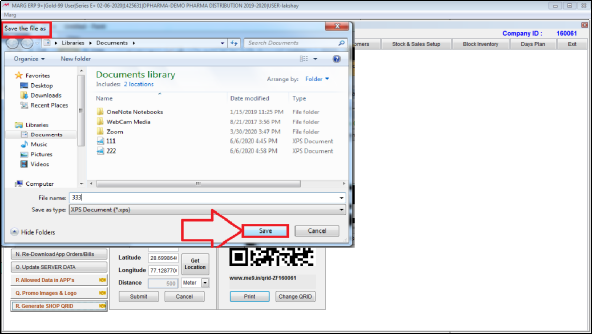
Fig. 1.15 Process to Save the File
Once the process in the software is being done then the user must ensure that the data of e-Business should be uploaded on the server.
PROCESS TO SCAN GENERATED QRID
- The customer can view that the generated QRID will be displayed in PDF.
- Suppose, the customer will scan this QR Code.
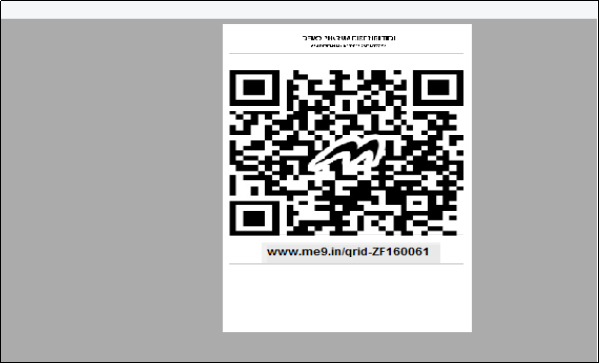
Fig. 1.16 Process to Scan the Generated QR Code
- After scanning the QR Code, the link of the QR Code will get displayed.
- The customer will click on ‘Go to Website’.

Fig. 1.17 Process to Scan the Generated QR Code
1. If the window of 'Distance Pass code' (as shown in Fig 1.8) will appear to the customer, then the customer needs to enter the pass code which will be provided by the billing person.
Also, check the process to view distance bypass code, by clicking on the given link https://bit.ly/2CfSOwJ
2. This window appears when the customer scans QRID outside the distance which has been mentioned in the settings of QRID (as shown in Fig 1.9)
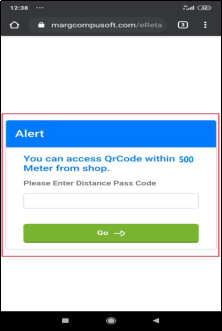
Fig 1.18 View an alert of ‘Distance pass code’

Fig 1.19 Process to Mention Distance in the ‘SHOP QRID’ settings
- A ‘New Order for My QR Code’ window will appear where the customer will place the order as per the requirement.
This link will either open in Google chrome or in any other browser, if it opens in any other browser then the customer will open it in Google chrome only.
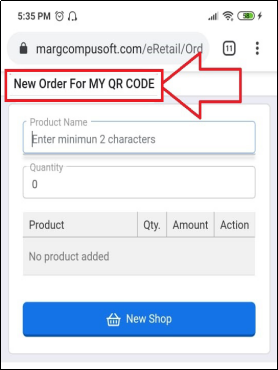
Fig 1.20 View of New Order For My QR Code Window
- Then the customer will select the item as per the requirement and can also view all the details of the selected item along with its Rate, Deal etc.
- Suppose, select ‘AMIFRU 40, 10T’.
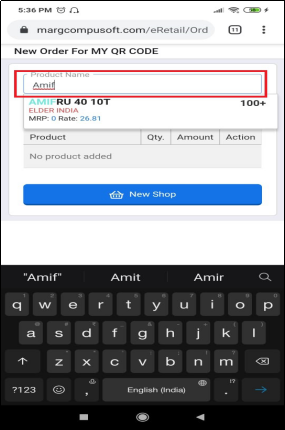
Fig 1.21 View of New Order For My QR Code Window
- After selecting the item, the customer will click on ‘Add’.
- Similarly, the customer can add multiple items into cart as per the requirement.
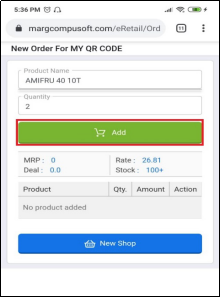
Fig 1.22 Process to Add Items
- Now the customer can view item which were added in the cart.
- Then click on the ‘Place order’.

Fig 1.23 Process to Place Order
- An alert of ‘Submitted Successfully’ will get displayed where the customer will get the‘Token No’ of the Cart.
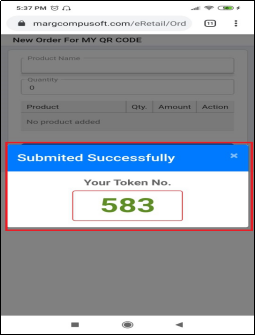
Fig 1.24 View of Alert Message of Successfully Submitted
PROCESS OF BILLING THROUGH QRID
- The order which were received from the customer that will be saved on the server.
- The Marg user can also view the received order on the server file.
- Now the Billing Person/Marguser will click on the QRID which appears at the bottom of the ‘Sale Entry’ window.
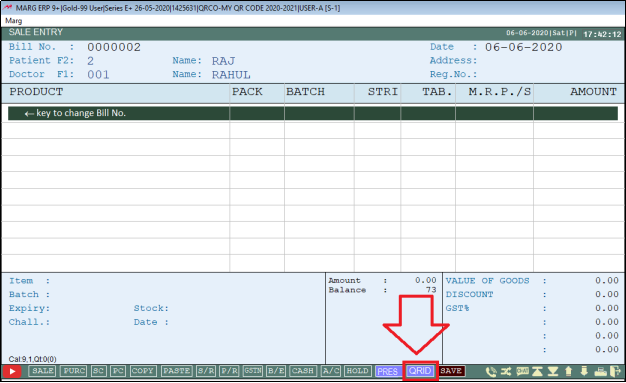
Fig 1.25 Process to Generate the Bill through QRID
- A ‘QRID Order Token’ window will appear in which the user will mention the token no. of the cart.
- The Billing Person /Marg user will get this token no. from the customer who had placed the order through QR Code.
- Suppose, enter 583.
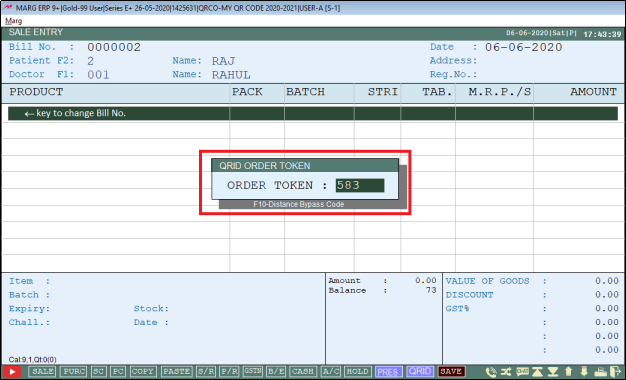
Fig 1.26 Process to Generate the Bill through QRID
- Once the token no. is submitted then the software will automatically load the order which is been placed by the customer.

Fig 1.27 Process to Generate the Bill through QRID
- In order to save the transaction, the user will press CTRL+W key.
- A ‘Save Changes’ window will appear.
- The user will select ‘Yes’ to save the sale bill.

Fig 1.28 Process to Generate the Bill through QRID


