

Welcome to  -
HRXpert
-
HRXpert
Home > Hrxpert > General Queries > How to create New Company in HRXpert Software ?
How to create New Company in HRXpert Software ?

Overview of Company Creation in HRXpert Software
Process to Create New Company in HRXpert Software
OVERVIEW OF COMPANY CREATION IN HRXPERT SOFTWARE
-
In Marg HRXpert Software, Company Creation is the most vital/crucial part in order to keep record & maintain the complete details of own company i.e. Name of the Company, Company Registration No:, Address of the Company, ESI Details, License No:, etc. for future purpose.
PROCESS TO CREATE NEW COMPANY IN HRXPERT SOFTWARE
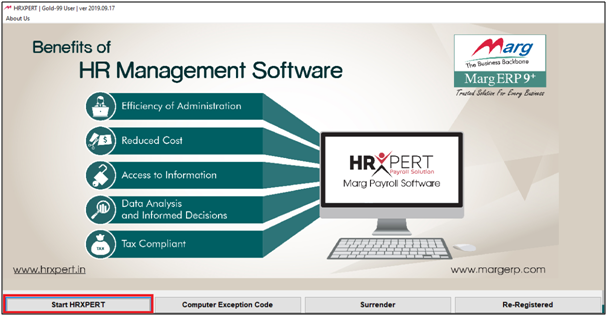
- Go to 'Start HRXpert'.
- A 'Company Creation' window will appear.
- The employer will select 'Create a New Company'.
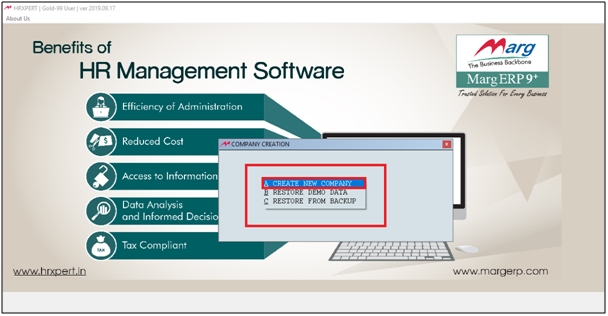
- The employer can view Company creation is processing.

- A 'Company Master' window will appear.
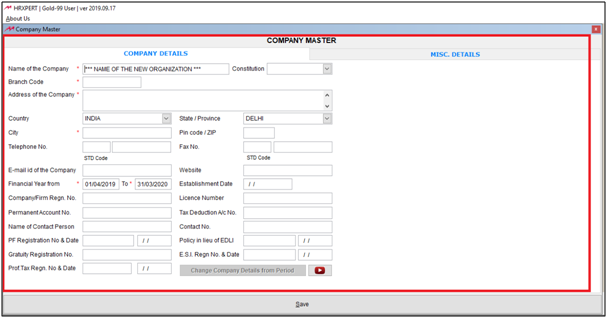
The Employer will mention the Company Details as per the requirement.
a. Name of the Company: Here, mention the name of the company.
b. Constitution: Select the type of organization that the employer is running i.e. Company, Partnership firm, Proprietorship firm, etc. Let’s select Company.
c. Branch Code: The Employer will define the Company’s branch code.
d. Address of the Company: The Employer will define the Address of the Company.
e. Country: The Employer will define in which Country the company is located.
f. State: The Employer will define Name of the State where Company is located
g. City: The Employer will define Name of the city where our company is located.
h. Pin Code: The Employer will define Pin Code of the area where Company is located
i. Telephone No: The Employer will define Telephone number with STD code of the company.
j. Fax No: The Employer will define Fax Number with STD code.
k. Email Id of the Company: The Employer will define Email Id of the Company.
l. Website: The Employer will define Name of the official website of Company.
m. Financial year from: The Employer will define Period for which we need to enter details.
n. Establishment Date: The Employer will define Establishment Date of the Company/Firm.
o. Company/Firm Regn. No: The Employer will mention Company or Firm’s Registration No.
p. Licence Number: The Employer will mention the Licence Number (Factory Estd.)
q. Permanent Account No: The Employer will mention the Permanent Account Number (PAN) of the company.
r. Tax Deduction A/c No: The Employer will mention Tax Deduction A/c No. (TIN No :) provided by Income-Tax dept.
s. Name of the Contact Person: The Employer will mention Name of the Contact Person who takes care of the Tax Returns i.e. CA, Accountant.
t. Contact No: The Employer will mention Contact No of the responsible person.
u. PF Registration No & Date: The Employer will mention EPF Registration No & Date of registration.
v. Policy in Lieu of EDLI: The Employer will mention Medical Policy taken in lieu of EDLI.
w. Gratuity Registration No: The Employer will mention Gratuity Registration No.
x. ESI Regn No & Date: The Employer will mention the ESI Regn No & Date.
y. Prof Tax Regn. No & Date: The Employer will mention Professional Tax Registration No & Date.

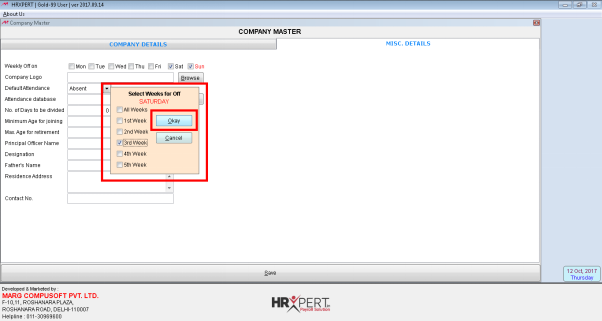
- The employer will click on 'Misc. Details'.

- In 'Weekly Off On', the employer will place the Check Mark on the day which needs to be set as Weekly off(s) of the Company.
- Suppose click on 'Sun' (Sunday).
- A 'Select Weeks For off', the employer will place the Check Mark on the Week in which sunday will be treate as an Off.
- Suppose sunday is for all weeks so click on 'All Week'.
- Click on 'Okay'.

- Now suppose place check mark on 'Sat'.
- In 'Select Weeks For off', place check mark on the week in which Saturday will be Off.
- Suppose select '3rd Week' and '4th Week'.
- Click on 'Okay'.
Now the employer will add other details in other options as per the requirement.
a. Company Logo: The Employer will Scan logo of the Company or Browse the company logo from the browse button.
b. Default Attendance: Select at what default attendance the employer needs to prepare monthly salary for the employees.
c. Attendance Database: In case of biometric system in the organization the employer can import that attendance from the desktop to Marg HRXpert Software. The employer needs to just define the path of the report here.
d. No of Days to be divided for Leave Encashment: When earned leaves of an employees is encashed then define that particular cash amount that is being payed to the employee against encashment of their earned leaves must be divided with what no: like 26. This is only applicable if earned leaves are applicable in the company.
e. Minimum Age for Joining: The Employer will mention Minimum age of the employees is required to join Company.
f. Max. Age for Retirement: The Employer will mention Maximum age for retirement of the employees.
g. Principle Officer Name: The Employer will mention Name of the Principal Officer of the Company who takes care of the Tax Returns like the details of CA or Accountant.
h. Designation: The Employer will mention the Designation of the person.
i. Father’s Name: The Employer will mention Mention the Father’s Name of the person.
j. Residence Address: The Employer will mention Residential address of the person.
k. Contact No: The Employer will mention the Contact details of the person.
Now the employer will click on 'Save'.

After following the above stesp, the Employer can create New Company in HRXpert Software.
