Search by Category
- Marg Digital Health
- Marg Nano
- Swiggy & Zomato
- ABHA - Ayushman Bharat
- Marg Cloud
-
Masters
- Ledger Master
- Account Groups
- Inventory Master
- Rate and Discount Master
- Refresh Balances
- Cost Centre Master
- Opening Balances
- Master Statistics
- General Reminder
- Shortage Report
- Supplier Vs Company
- Temporary Limit
- Shop QRID and eBusiness
- Cloud Backup Setup
- Password and Powers
- Marg Licensing
- Marg Setup
- Target
- Budget
- Credit Limit Management
- Change ERP Edition
- Ease Of Gst Adoption
-
Transactions
- ERP To ERP Order
- Sale
- Purchase
- Sale Return
- Purchase Return
- Brk / Exp Receive
- Scrap Receive
- Brk / Exp Issue
- Scrap Issue
- GST Inward
- GST Outward
- Replacement Issue
- Replacement Receive
- Stock Issue
- Stock Receive
- Price Diff. Sale
- Price Diff. Purchase
- BOM
- Conversion
- Quotation
- Sale Order
- Purchase Order
- Dispatch Management
- ERP Bridger
- Transaction Import
- Download From Server
- Approvals
- Pendings
- Accounts
- Online Banking
-
Books
- Cash and Bank Book
- All Ledgers
- Entry Books
- Debtors Ledgers
- Creditors Ledger
- Purchase Register
- Sale Register
- Duties & Taxes
- Analytical Summaries
- Outstandings
- Collection Reports
- Depreciation
- T-Format Printing
- Multi Printing
- Bank Reconcilation
- Cheque Management
- Claims & Incentives
- Target Analysis
- Cost Centres
- Interest and Collection
- Final Reports
-
Stocks
- Current Stock
- Stock Analysis
- Filtered Stock
- Batch Stock
- Dump Stock
- Hold/Ban Stock
- Stock Valuation
- Minimum Level Stock
- Maximum Level Stock
- Expiry Stock
- Near Expiry Stock
- Stock Life Statement
- Batch Purchase Type
- Departments Reports
- Merge Report
- Stock Ageing Analysis
- Fast and Slow Moving Items
- Crate Reports
- Size Stock
-
Daily Reports
- Daily Working
- Fast SMS/E-Mail Reports
- Stock and Sale Analysis
- Order Calling
- Business on Google Map
- Sale Report
- Purchase Report
- Inventory Reports
- ABC Analysis
- All Accounting Reports
- Purchase Planning
- Dispatch Management Reports
- SQL Query Executor
- Transaction Analysis
- Claim Statement
- Upbhogkta Report
- Mandi Report
- Audit Trail
- Re-Order Management
- Reports
-
Reports Utilities
- Delete Special Deals
- Multi Deletion
- Multi Editing
- Merge Inventory Master
- Merge Accounts Master
- Edit Stock Balance
- Edit Outstanding
- Re-Posting
- Copy
- Batch Updation
- Structure/Junk Verificarion
- Data Import/Export
- Create History
- Voucher Numbering
- Group of Accounts
- Carry Balances
- Misc. Utilities
- Advance Utilities
- Shortcut Keys
- Exit
- Generals
- Backup
- Self Format
- GST Return
- Jewellery
- eBusiness
- Control Room
- Advance Features
- Registration
- Add On Features
- Queries
- Printing
- Networking
- Operators
- Garment
- Hot Keys
-
GST
- E-Invoicing
- Internal Audit
- Search GSTIN/PARTY
- Export Invoice Print
- Tax Clubbing
- Misc. GST Reports
- GST Self-Designed Reports
- GST Return Video
- GSTR Settings
- Auditors Details
- Update GST Patch
- Misc. GST Returns
- GST Register & Return
- GST RCM Statement
- GST Advance Statement
- GST Payment Statement
- Tax Registers and Summaries
- TDS/TCS Reports
- Form Iss./Receivable
- Mandi
- My QR Code
- E-Way Bill
- Marg pay
- Saloon Setup
- Restaurant
- Pharmanxt free Drugs
- Manufacturing
- Password and Power
- Digital Entry
Home > Margerp > Breakage Expiry Receive > How to create BRK/EXP Receive entry in Marg Software?
How to create BRK/EXP Receive entry in Marg Software?
Brk/Exp Receive in Marg ERP Software
Overview of Brk/Exp Receive in Marg ERP Software
Process of Brk/Exp Receive in Marg ERP Software
OVERVIEW OF BRK/EXP RECEIVE IN MARG ERP SOFTWARE
- Breakage Expiry stock is the stock which has been damaged/expired or is not used.
- In Marg ERP Software, Breakage Expiry Receive entry is generated when the customer returns the damaged or expired products.
PROCESS OF BRK/EXP RECEIVE IN MARG ERP SOFTWARE
- Firstly, Go to Transactions >> Brk/Exp Receive >> Receive. Press Enter.
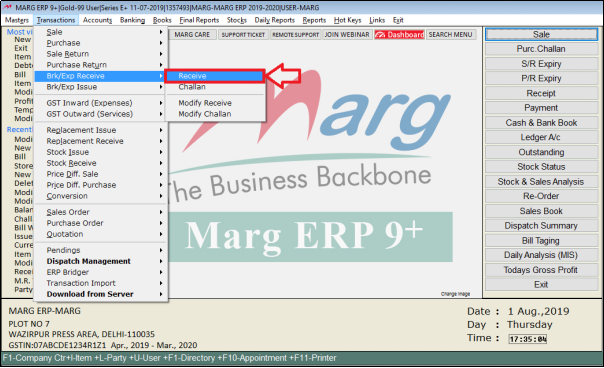
Fig 1.1 Menu view to Brk/Exp Receive in Marg ERP Software
- A Brk/Exp Receive Entry window will appear.
- In ‘Date’ the user will enter the date.
- Suppose, enter “01-08-2019”.
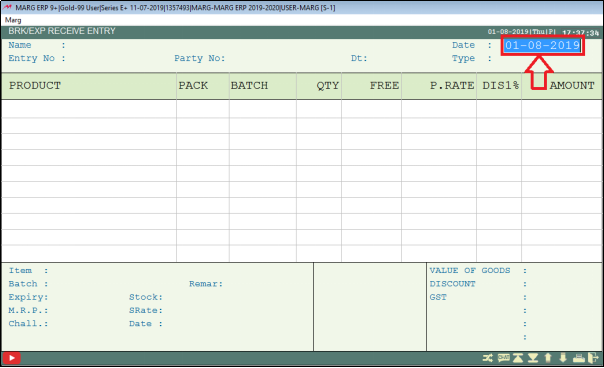
Fig 1.2 View of Brk/Exp Receive Entry window in Marg ERP Software
- A Ledgers window will appear.
- The user will select the ledger.
- Suppose, select ‘Abhay Singh’.
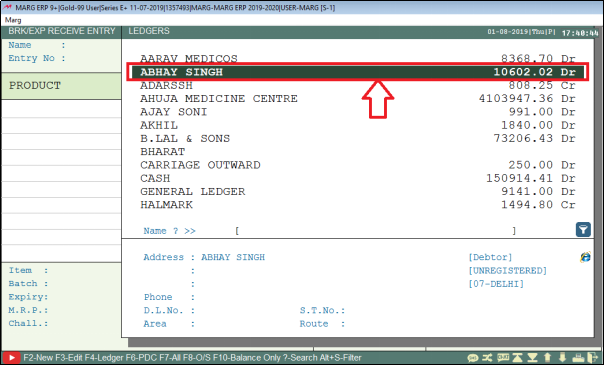
Fig 1.3 View of Ledgers window in Marg ERP Software
- The user can view that the software has auto picked Entry No. by default.
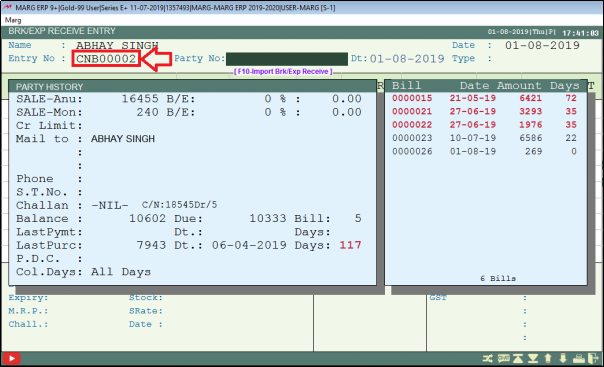
Fig 1.4 View of Brk/Exp Receive Entry window in Marg ERP Software
- In ‘Party No.’ the user will enter the party number.
- Suppose, enter “001”.
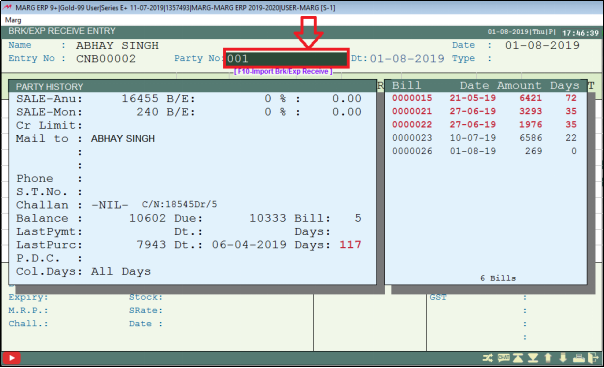
Fig 1.5 View of Brk/Exp Receive Entry window in Marg ERP Software
- In ‘Dt.’ Enter the date on which breakage expiry note is to be created.
- Suppose, enter “27-06-2019”.
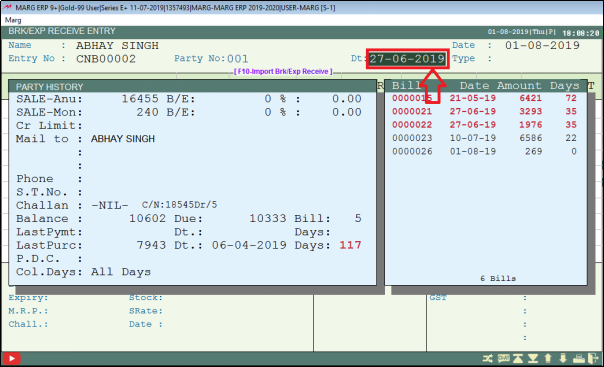
Fig 1.6 View of Brk/Exp Receive Entry window in Marg ERP Software
- In ‘Tax’ the user will select ‘Yes’.
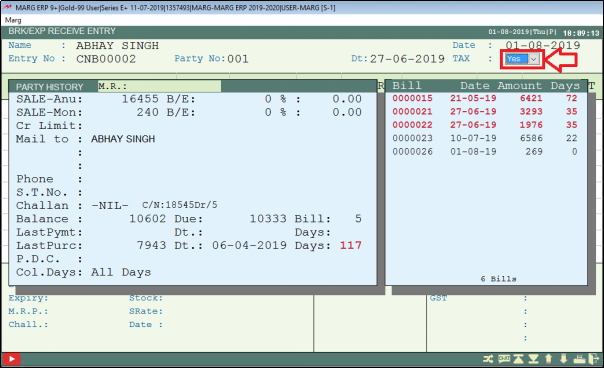
Fig 1.7 View of Brk/Exp Receive Entry window in Marg ERP Software
- The software will now automatically pick Local or Central Type as per the selected party.
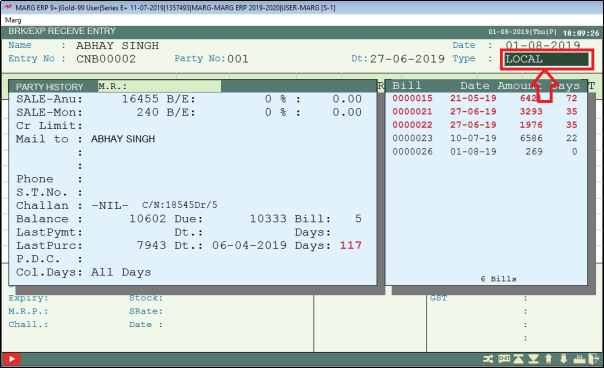
Fig 1.8 View of Brk/Exp Receive Entry window in Marg ERP Software
- A Bill Details window will appear.
- In ‘Replacement Issue’ if the user wants to give replacement to the customer against this breakage expiry then select ‘Yes’ otherwise select ‘No’.
- Suppose, select ‘Yes’ to give replacement against this breakage expiry.
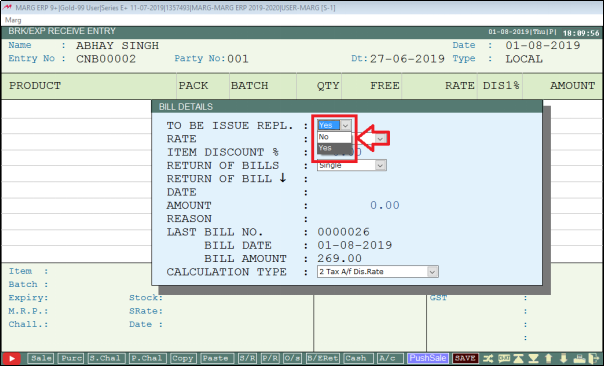
Fig 1.9 View of Bill Details window in Marg ERP Software
- In ‘Rate’ the user will select on which rate to return the items.
- Suppose, select ‘A- Rate’.
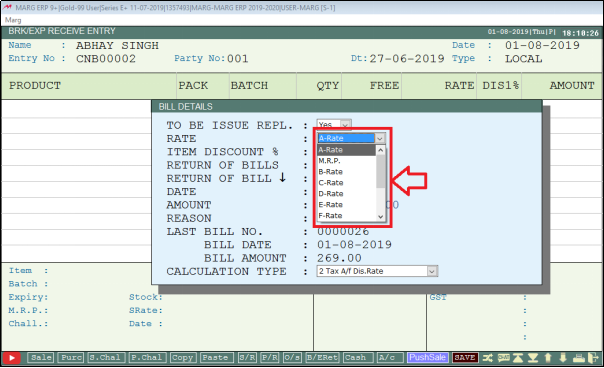
Fig 1.10 View of Bill Details window in Marg ERP Software
- In ‘Item Discount%’ if the user wants to give item discount on damaged or expired item then mention the discount percentage.
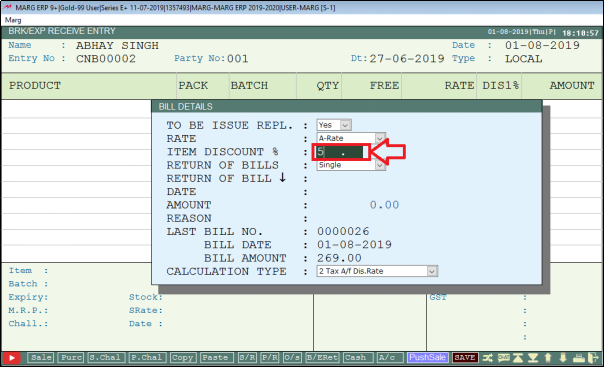
Fig 1.11 View of Bill Details window in Marg ERP Software
- In ‘Return of Bills’ the user will select that the bill of return number is ‘Single’ or ‘Multiple’.
- Suppose, select ‘Single’
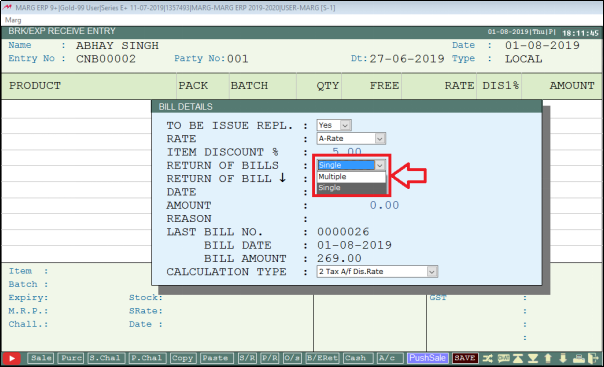
Fig 1.12 View of Bill Details window in Marg ERP Software
- The user will now enter the return of bill number.
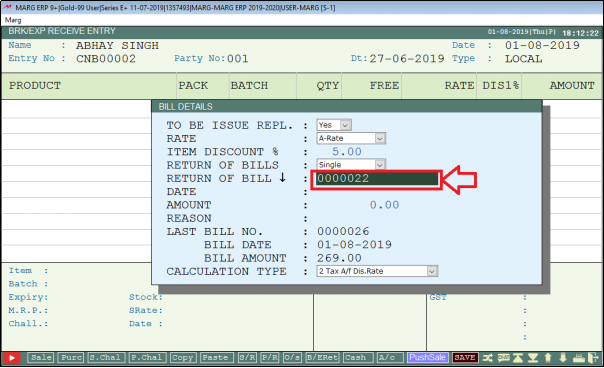
Fig 1.13 View of Bill Details window in Marg ERP Software
- The software will auto pick the date on which the bill was created and the amount.
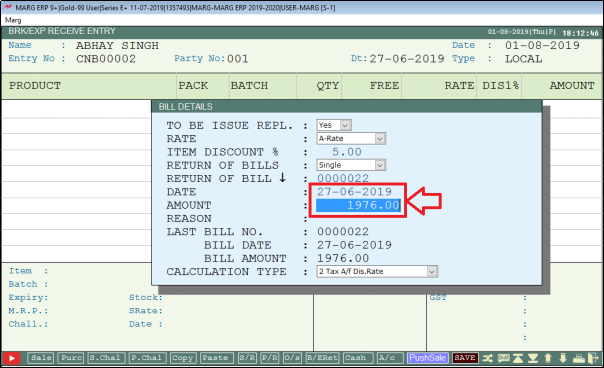
Fig 1.14 View of Bill Details window in Marg ERP Software
- In ‘Reason’ the user will enter the reason as per the requirement.
- Suppose, enter “Damaged Goods”.
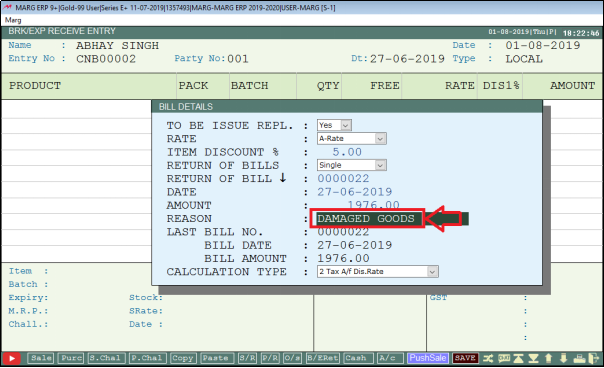
Fig 1.15 View of Bill Details window in Marg ERP Software
- The cursor will now shift to Calculation Type.
- The user will now select the Calculation Type.
- Suppose, select ‘Tax/B.f Dis. Rate’.
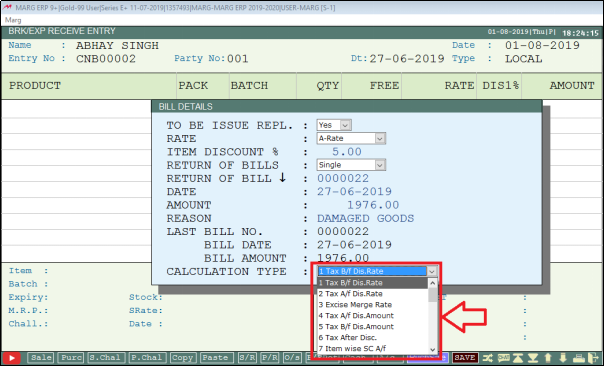
Fig 1.16 View of Bill Details window in Marg ERP Software
- The items in the bill will be displayed. Press Space bar to select the item.
- Then, press Enter.
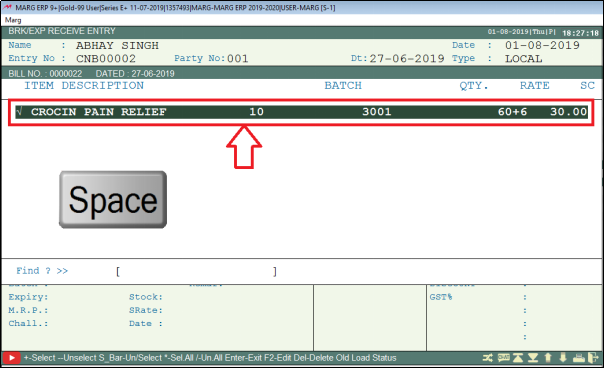
Fig 1.17 View of Brk/Exp Receive Entry window in Marg ERP Software
- The user will now press Tab key.
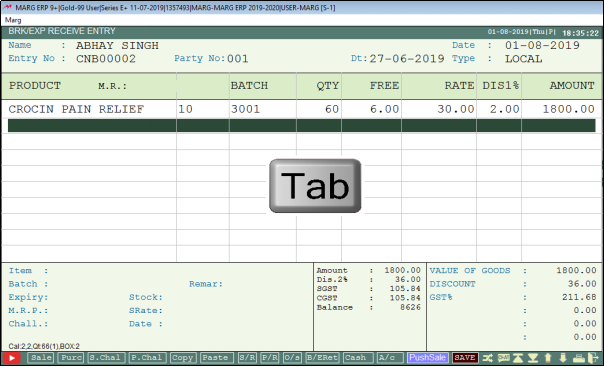
Fig 1.18 View of Brk/Exp Receive Entry window in Marg ERP Software
- A Save in window will appear.
- The user will select ‘Save In -Bill/Cr/Debit Note’. Press Enter.
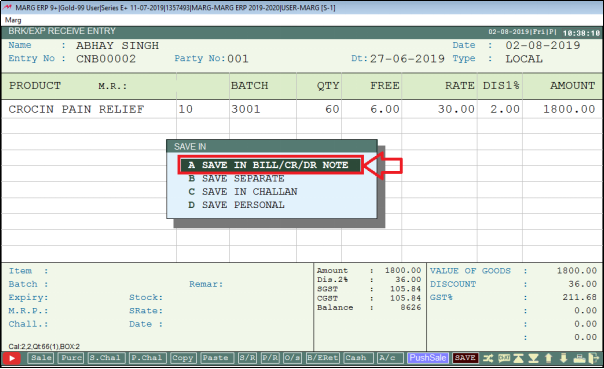
Fig 1.19 View of Save In window in Marg ERP Software
- The user will now keep pressing Tab key to save.
- A Want’s to Check window will appear.
- Select ‘Tax Summary’ to view the tax summary.
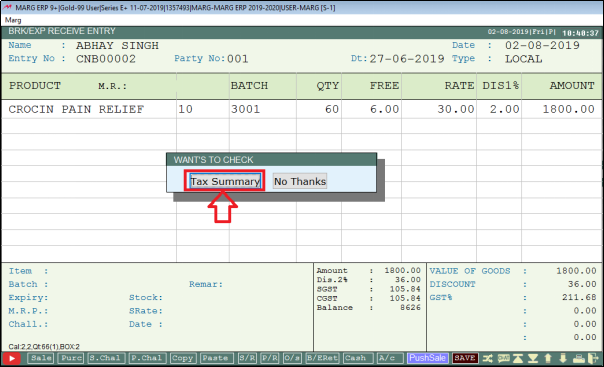
Fig 1.20 View of Want’s to check window in Marg ERP Software
- A GST Summary window will appear in which the user can view the tax summary.
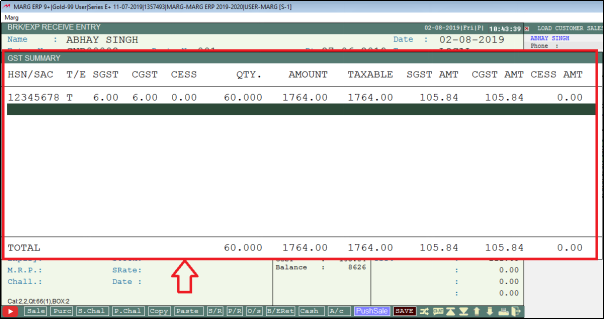
Fig 1.21 View of GST Summary window in Marg ERP Software
- Press Escape key and then press Tab key to save the changes.
- A Save Changes window and Adjustment Detail window will appear.
- To save changes, the user will click on ‘Yes’.
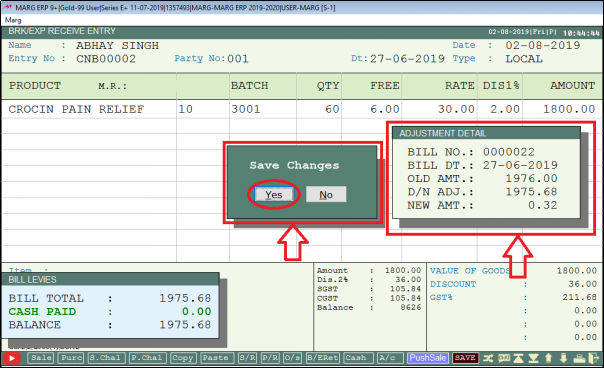
Fig 1.22 View of Save Changes window & Adjustment Detail window in Marg ERP Software


 -
Marg ERP 9+


