

Welcome to  -
Marg ERP 9+
-
Marg ERP 9+
Home > Margerp > Collaborative Commerce > What is the process of Collaborative Commerce on the basis of GSTIN in Marg Software ?
What is the process of Collaborative Commerce on the basis of GSTIN in Marg Software ?

Overview/Introduction to Collaborative Commerce in Marg ERP Software
Process of Collaborative Commerce on the basis of GSTN in Supplier’s Software
Process of Collaborative Commerce on the basis of GSTN in Retailer’s Software
OVERVIEW/INTRODUCTION TO COLLABORATIVE COMMERCE IN MARG ERP SOFTWARE
- It is a two way communication through which both the supplier and the retailer can carry out the transactions via business talk on GST number basis/one.
- When a bill is generated, the time taken by the supplier (to create a Sale bill) & retailer (to convert the bill into purchase bill) is same. But the question arises is that when the supplier generates a sale bill then why there is a need for a retailer to put more efforts.
- So, in order to save time and efforts, Marg ERP has developed an option “Collaborative Commerce”. With the help of this option, the invoices get imported automatically for the sale bill generated by the supplier through GSTIN, Mobile No., email address, E-business Code. This can be done in 4 ways i.e. on GSTIN Number & on E Code basis, on Mobile No. basis, on email Address basis.
- The Retailer and the Supplier should be Marg users and are registered with their respective GSTN no.
- The supplier generates a Sale bill for the retailer with the Bill no entered in it. This bill is further uploaded through the internet and is automatically received in the Marg Software of the retailer as Purchase bill in which the same Bill no is entered automatically.
PROCESS OF COLLABORATIVE COMMERCE ON THE BASIS OF GSTN IN SUPPLIER’S SOFTWARE
Additional Tip 1 : Before using the option of collaborative commerce both Supplier & Retailer needs to set base on which the collaborative commerce needs to be done i.e. on GSTN bases, Mobile No, Email etc.
Additional Tip 2 : Also, both the Supplier and Retailer needs to make sure that they are "Active for Online Purchase" in each other's software.
- Suppose in the software of the supplier, the name of his company is “Marg ERP LTD” and the GSTIN No. of the supplier is say for e.g. 24AAACC4175D1Z4 .
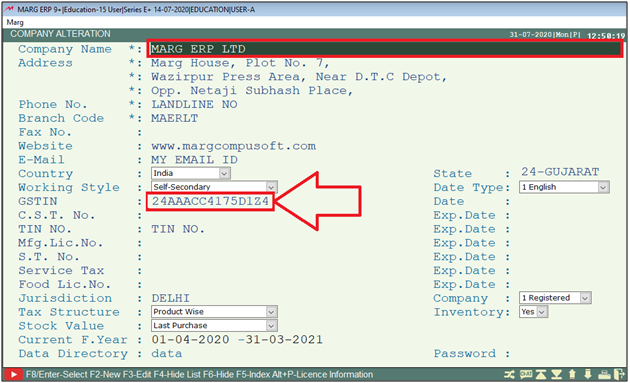
Fig. 1.1 View of List of Companies & GSTN No. in Software of Supplier
- Let’s generate a Sale Bill. In order to create a Sale Bill, Go to Transactions >> Sale >> Bill.Press Enter.
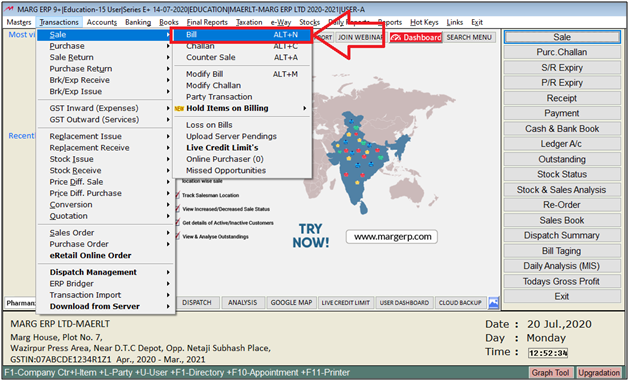
Fig. 1.2 View of Ledger Window in Marg ERP Software
- In order to view the details of the ledger, press F3 Function key. Then enter on Ledger Detail.
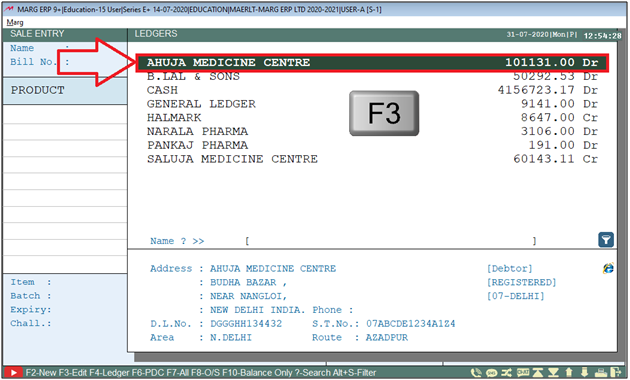
Fig. 1.3 View of Ledger Window in Marg ERP Software
- Then a Modify Ledger window will appear.
- The user can view the GSTIN no. of the retailer.
Note 1 : The Supplier needs to make sure that he has select the 'GSTIN' in 'Bill Export field' in retailer's Ledger.
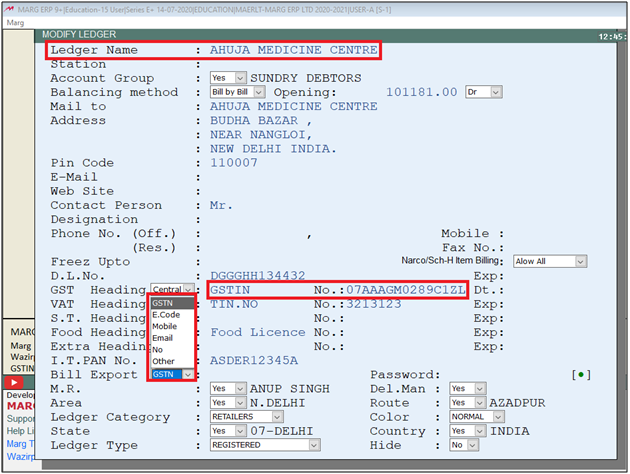
Fig. 1.4 View of GSTIN of retailer in supplier's software.
- Suppose, load 3 items into bill and then save the bill by press CTRL+W key.
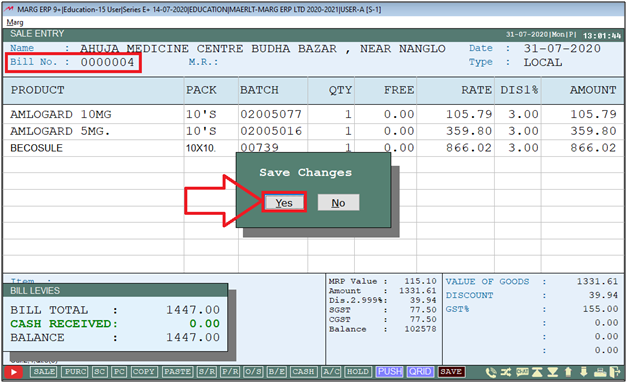
Fig. 1.5 Creation & Saving the Sale Bill in Marg ERP Software
- After saving the bill, go on Transactions > Sale > Upload on Server Pending in order to upload the invoices to the server.
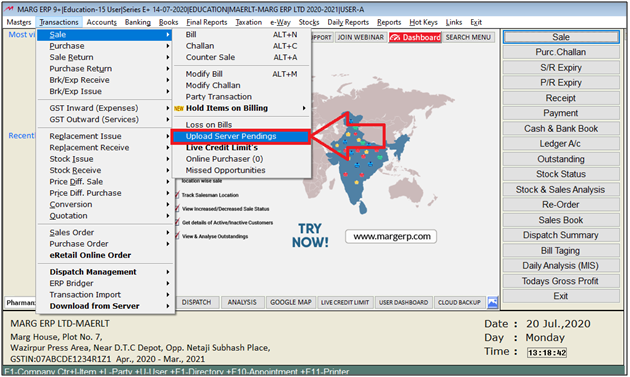
Fig. 1.6 Menu View to Upload Invoices on Server in Marg ERP Software
- When the user will enter on Upload on Server, a window will appear of the entire Sale bills which have been generated for the Registered Customers.
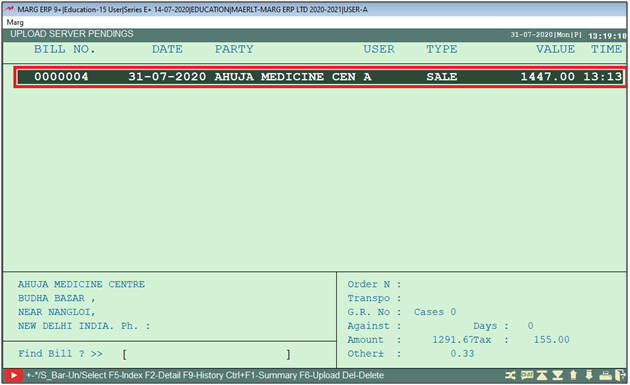
Fig. 1.7 View of List of Invoices created for Registered Customers in Marg ERP Software
- Now Select the bill which needs to be uploaded on the server.
Note 2 : A Single bill can be selected by space bar key and multiple bills can be selected by Asterisk key (*).
- Thereafter press F6 key to upload the invoice on the server.
- Then click on 'Yes' to confirm the uploads.
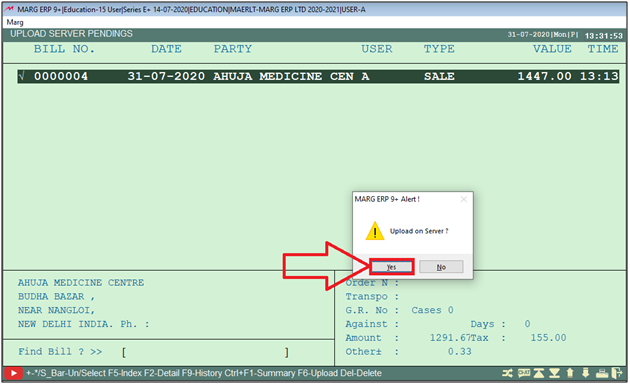
Fig. 1.8 Process of Uploading all the Invoices in Marg ERP Software
PROCESS OF COLLABORATIVE COMMERCE ON THE BASIS OF GSTN IN RETAILER’S SOFTWARE
- Now, in the software of the Retailer (Ahuja Medicine Centre) , the GSTIN No. of the firm is say for e.g. 07AACPA1072C1ZL .
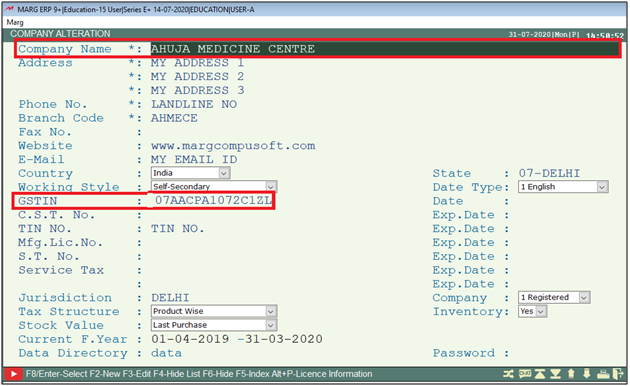
Fig. 1.9 View of GSTIN No: in Retailer’s Software
- In order to Import Bill no: 0000004, go to Transactions > Purchase > Bill.Press Enter.
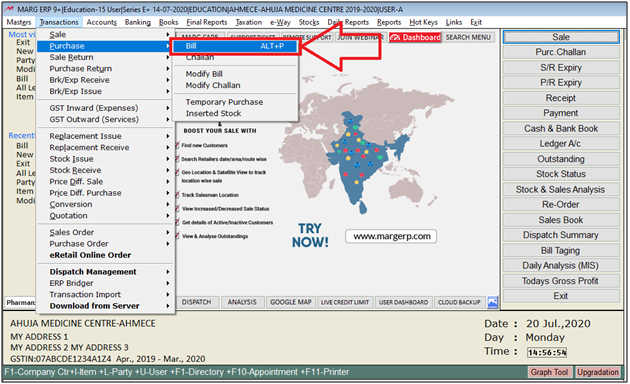
Fig. 1.10 Menu View to Purchase Bill in Marg ERP Software
- Then select the Ledger of the supplier and pres F3 to view the GSTIN of the supplier.
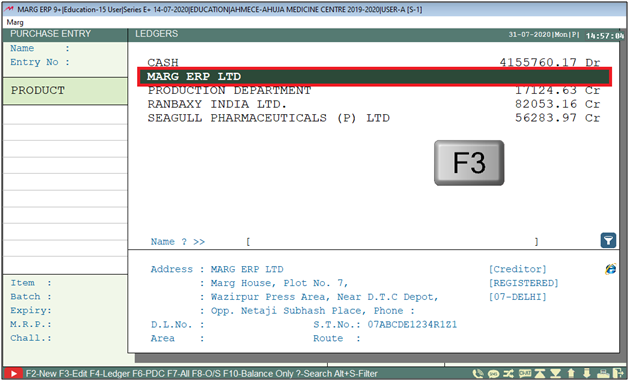
Fig. 1.11 Selecting the Ledger of the Supplier in Marg ERP Software
- Here, the user needs to select the 'Ledger Detail'.

Fig. 1.12 View of GSTIN No: in the Ledger of the Supplier
- Here the user can view the GSTIN of the supplier.
Note 3 : The Retailer needs to make sure that he has select the 'GSTIN' in 'Bill Export field' in Supplier's Ledger.
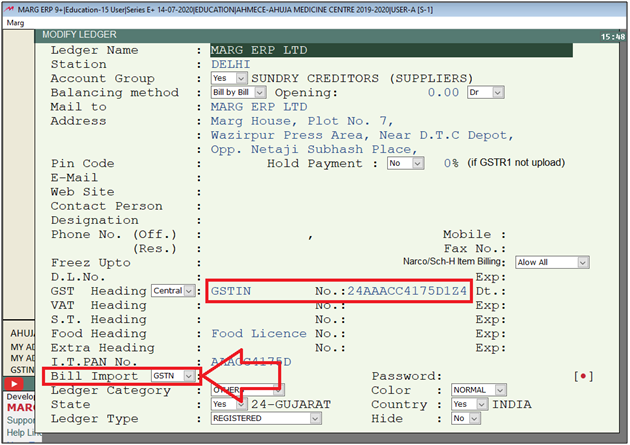
Fig. 1.13 View of GSTIN No: in the Ledger of the Supplier
- Once the ledger is selected, the Retailer needs to Press F10 key to import the bill.
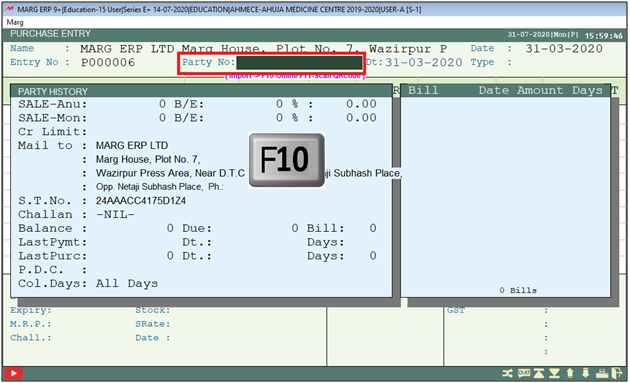
Fig. 1.14 Process of importing bill in Retailer’s Software
- Now a select bill to import window will appear.
- The user will press Enter on the bill which needs to be imported.
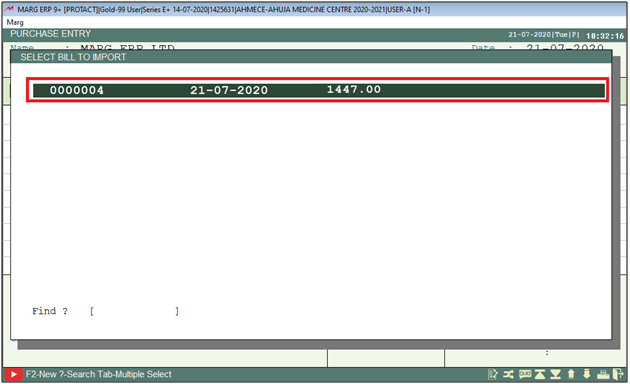
Fig. 1.15 Process view bill in Retailer’s Software
- Then an import Maping window will appear.
- The user will select the options as per the requirement.
a. In ‘Item Search Base’ the user will select the base for item search from the drop down.
Suppose, select 'Name'.
b. Now in ‘Show un-matched’ the user will select whether unmatched items will be displayed or all items that are also mapped will be displayed along with the un-matched.
Suppose, select ‘All’.
c. In 'Replace A-Rate/Replace G-Rate', the user needs to select with which rate user needs to replace A/G- Rate.
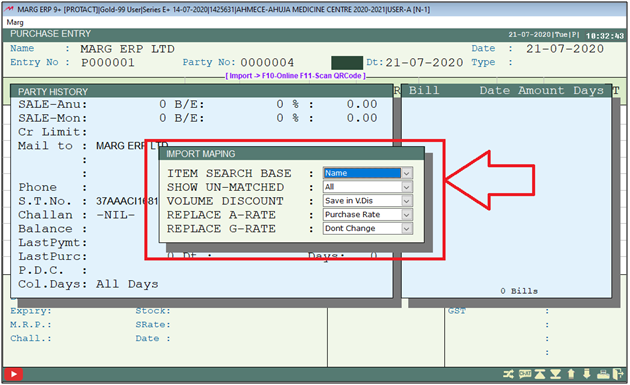
Fig. 1.16 View of Unmatched Items in Retailer’s Software
- Then an ‘Item Mapping Total Records’ window will appear.
- Here, all the item of that bill will get displayed which needs to be imported in the software.
a. If item is not been created in the software then the user needs to create it first by pressing (+) on this window.
b. If item is already been created in the software then the software will automatically mapped the existing items or if user needs to map it with other item then can map by pressing Enter key on it.
Suppose, in our case the item is already been already created so software has automatically mapped the items.
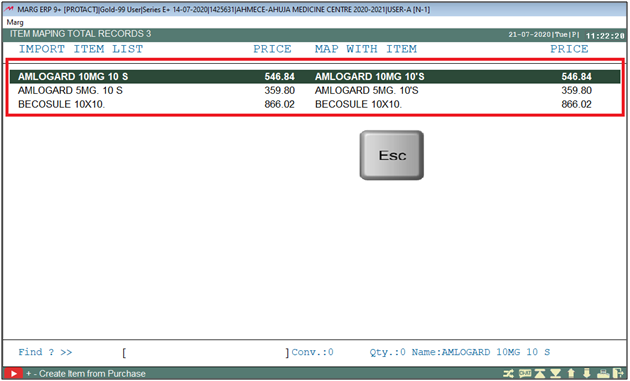
Fig. 1.17 Process of Mapping the Items in Retailer’s Software
- Thereafter a save changes window will appear in which the user needs to click on 'Yes' to save the details.
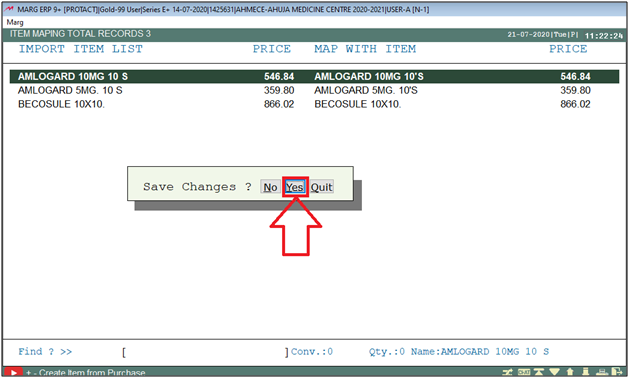
Fig. 1.18 Process of Mapping the Items in Retailer’s Software
- Now, the software is indicating that all the items have been matched.
- So, Enter on “Accept” to continue.
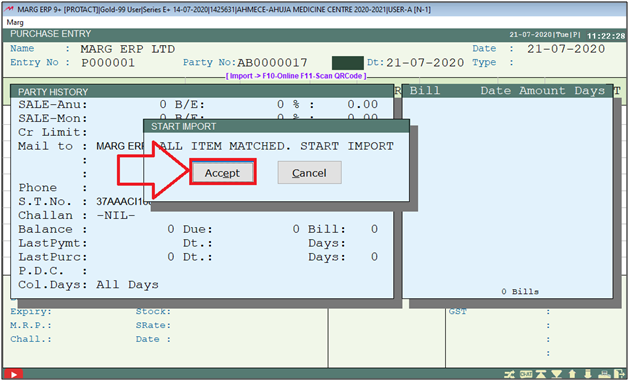
Fig. 1.19 Process of Matching the Items in Retailer’s Software
- Once, the process is being completed, the user can view the item that has been loaded into the bill.
- Now save the bill by pressing CTRL+W key.
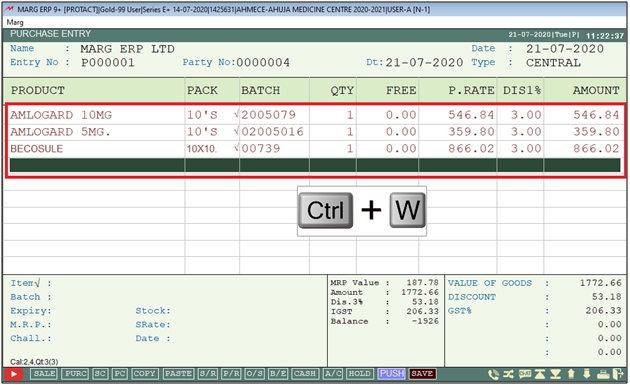
Fig. 1.20 View of List of Items in the Bill of Retailer’s Software
- Now, A Save Changes window will appear.
- The user will select 'Yes' to save the changes.
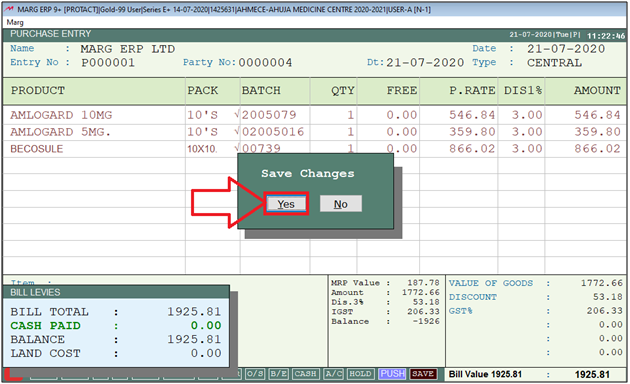
Fig. 1.21 Saving the Bill in the Retailer’s Software

In This Page


