Search by Category
- Marg Nano
- Swiggy & Zomato
- ABHA - Ayushman Bharat
- Marg Cloud
-
Masters
- Ledger Master
- Account Groups
- Inventory Master
- Rate and Discount Master
- Refresh Balances
- Cost Centre Master
- Opening Balances
- Master Statistics
- General Reminder
- Shortage Report
- Supplier Vs Company
- Temporary Limit
- Shop QRID and eBusiness
- Cloud Backup Setup
- Password and Powers
- Marg Licensing
- Marg Setup
- Target
- Budget
- Credit Limit Management
- Change ERP Edition
- Ease Of Gst Adoption
-
Transactions
- ERP To ERP Order
- Sale
- Purchase
- Sale Return
- Purchase Return
- Brk / Exp Receive
- Scrap Receive
- Brk / Exp Issue
- Scrap Issue
- GST Inward
- GST Outward
- Replacement Issue
- Replacement Receive
- Stock Issue
- Stock Receive
- Price Diff. Sale
- Price Diff. Purchase
- BOM
- Conversion
- Quotation
- Sale Order
- Purchase Order
- Dispatch Management
- ERP Bridger
- Transaction Import
- Download From Server
- Approvals
- Pendings
- Accounts
- Online Banking
-
Books
- Cash and Bank Book
- All Ledgers
- Entry Books
- Debtors Ledgers
- Creditors Ledger
- Purchase Register
- Sale Register
- Duties & Taxes
- Analytical Summaries
- Outstandings
- Collection Reports
- Depreciation
- T-Format Printing
- Multi Printing
- Bank Reconcilation
- Cheque Management
- Claims & Incentives
- Target Analysis
- Cost Centres
- Interest and Collection
- Final Reports
-
Stocks
- Current Stock
- Stock Analysis
- Filtered Stock
- Batch Stock
- Dump Stock
- Hold/Ban Stock
- Stock Valuation
- Minimum Level Stock
- Maximum Level Stock
- Expiry Stock
- Near Expiry Stock
- Stock Life Statement
- Batch Purchase Type
- Departments Reports
- Merge Report
- Stock Ageing Analysis
- Fast and Slow Moving Items
- Crate Reports
- Size Stock
-
Daily Reports
- Daily Working
- Fast SMS/E-Mail Reports
- Stock and Sale Analysis
- Order Calling
- Business on Google Map
- Sale Report
- Purchase Report
- Inventory Reports
- ABC Analysis
- All Accounting Reports
- Purchase Planning
- Dispatch Management Reports
- SQL Query Executor
- Transaction Analysis
- Claim Statement
- Upbhogkta Report
- Mandi Report
- Audit Trail
- Re-Order Management
- Reports
-
Reports Utilities
- Delete Special Deals
- Multi Deletion
- Multi Editing
- Merge Inventory Master
- Merge Accounts Master
- Edit Stock Balance
- Edit Outstanding
- Re-Posting
- Copy
- Batch Updation
- Structure/Junk Verificarion
- Data Import/Export
- Create History
- Voucher Numbering
- Group of Accounts
- Carry Balances
- Misc. Utilities
- Advance Utilities
- Shortcut Keys
- Exit
- Generals
- Backup
- Self Format
- GST Return
- Jewellery
- eBusiness
- Control Room
- Advance Features
- Registration
- Add On Features
- Queries
- Printing
- Networking
- Operators
- Garment
- Hot Keys
-
GST
- E-Invoicing
- Internal Audit
- Search GSTIN/PARTY
- Export Invoice Print
- Tax Clubbing
- Misc. GST Reports
- GST Self-Designed Reports
- GST Return Video
- GSTR Settings
- Auditors Details
- Update GST Patch
- Misc. GST Returns
- GST Register & Return
- GST RCM Statement
- GST Advance Statement
- GST Payment Statement
- Tax Registers and Summaries
- TDS/TCS Reports
- Form Iss./Receivable
- Mandi
- My QR Code
- E-Way Bill
- Marg pay
- Saloon Setup
- Restaurant
- Pharmanxt free Drugs
- Manufacturing
- Password and Power
- Digital Entry
Home > Margerp > Daily Working > What is the process of Dispatch Management in Marg Software ?
What is the process of Dispatch Management in Marg Software ?
Overview to Dispatch Management System in Marg Software
Benefits of Dispatch Management System in Marg Software
Process of Dispatch Management in Marg Software
Process to Audit the Bill by Admin/Supervisor in Marg Software
Process of TV Display-Bill Scroll Option in Marg Software
Process of Bill Verification Option in Marg Software
Process to View Dispatch Management Report in Marg Software
OVERVIEW/INTRODUCTION TO DISPATCH MANAGEMENT SYSTEM IN MARG SOFTWARE
- In every business, there is a complete process from product order to delivery which different businessmen manage in different ways.
- For e.g. There are different counters for Bill Printing, Packing, and Delivery of goods. When the user visits big stores/ Distributor/wholesalers/Stockist stores at the time of purchasing products different operators are engaged/involved in the completion of the whole process.
- For this type of business, a feature has been developed, ‘DISPATCH MANAGEMENT SYSTEM’.
BENEFITS OF DISPATCH MANAGEMENT SYSTEM IN MARG SOFTWARE
Dispatch Management System helps to track the status of the customer’s order or the generated bill i.e. at which stage the delivery of the order has been completed along with the color indication.
Dispatch Management includes four steps:
a. Billing
b. Printing
c. Packing
d. Delivery
It easily provides user-wise authority to all the users and maintains the accuracy and the proficiency of the work which results / leads to no chance of any kind of mistakes or omissions from the generation of the bill to the delivery of the product. This allows the user to set priority for any urgent bills.
This option easily manages the whole dispatch process without any misplacement of the bills.
Dispatch Management System easily tracks which bill is completed, and which bill is pending and also allows updating the customers through an e-mail or by sending SMS regarding the status of the order.
PROCESS OF DISPATCH MANAGEMENT IN MARG SOFTWARE
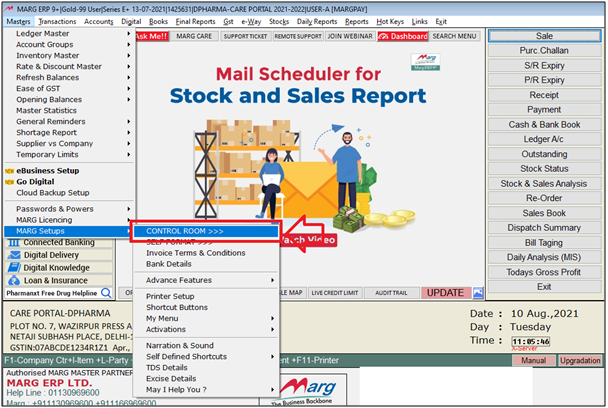
- Go to Masters > Marg Set Ups > Control Room.
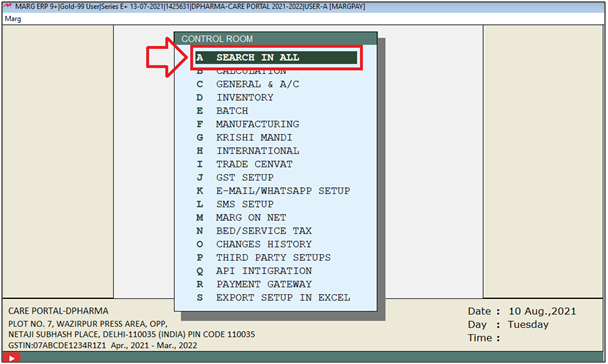
- A ‘Control Room’ window will appear.
- The user will select ‘Search in All’.
- A ‘Controls’ window will appear in which the user will search ‘Dispatch’.
- Click on ‘Accept’.

- A ‘Dispatch’ window will appear.
- In ‘Dispatch Management to Print,Packing & Delivery status 1-Yes 2-No’ option, the user will select ‘1’.
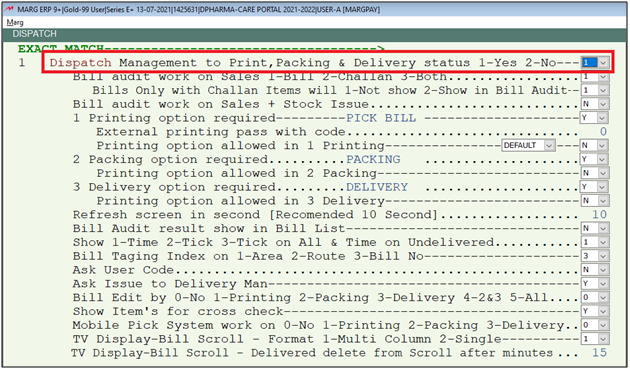
- Along with it, the user can view that there are a maximum 3 stages of it and to enable any of the stages the user will select ‘Y’.
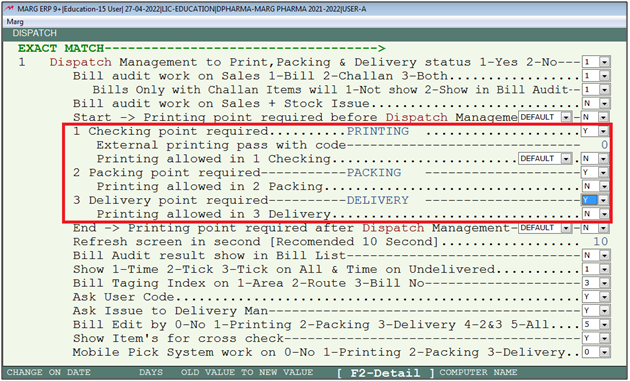
- The user can also change its headings as per the requirement.

- In ‘Show 1-Time 2-Tick 3-Tick on All & Time on Undelivered’, the user will select ‘1’ to show time, select ‘2’ to show tick for the status of the process, select ‘3’ to show tick on the processed bill or show time on the undelivered bill.
- Suppose select ‘1’.
- The user will now press ‘ESC’ key twice.

- Then click on ‘Yes’ to save the changes.
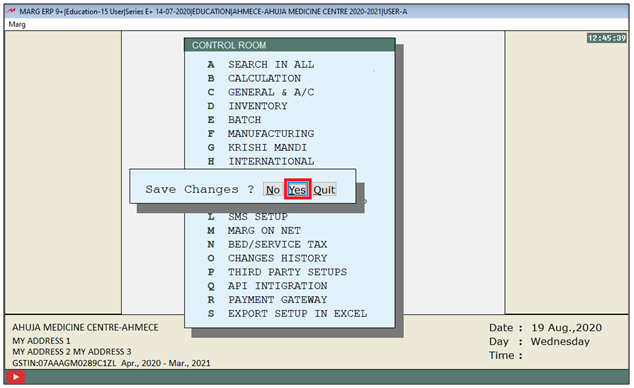
- Now, go to Transactions > Dispatch Management > Dispatch Management.

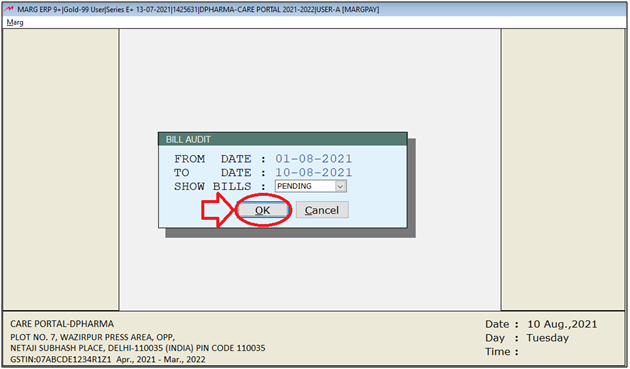
A ‘Bill Audit’ window will appear.
a. From Date To Date: Select the particular period i.e. from which date till which date the audit needs to be done.
b. Show Bills: Select the bills that need to be viewed.
All: Under this Option, all the Pending and Finalized bills are displayed.
Pending: It displays the bills which are pending and are not completed till delivery.
Finalized: Finalized bills are those bills whose Printing, Packing, and Delivery are completed.
Suppose the user selects ‘Pending’. Then click ‘OK’.
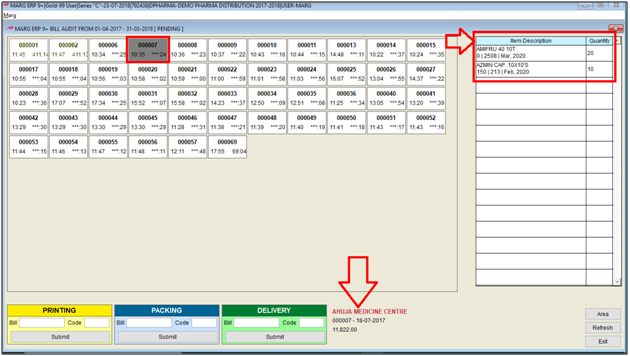
- The user can view the pending bills of that particular date are displayed i.e. the Bill no. and the time of bill creation is displayed.

- Also if the user places the cursor on any bill it will display the Bill details.
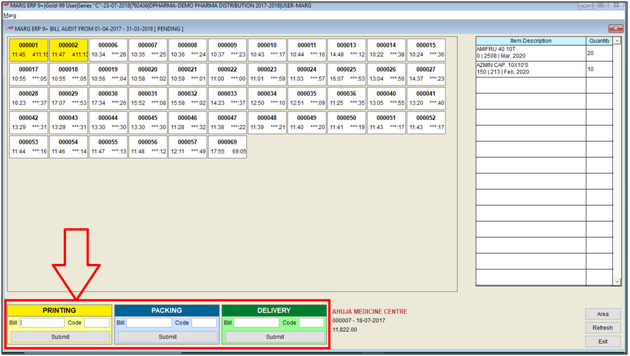
- The three stages will also be displayed i.e. PRINTING, PACKING, AND DELIVERY. It means that firstly it will print the bill. Then once the Bill Number is entered then it will go for packing and lastly, it will be delivered.
Note: As a user authority needs to be provided whichever user is printing the bill, should get an option of bill print only, whoever is doing packing should get the packing option and the user who is looking for delivery should get delivery option only.
- The Admin should have all three options. So, as login is being done from the supervisor user that’s why all three options are been shown here.
- In order to create the rest of the users, go to Masters > Passwords and Powers > Operator’s.

- A ‘Password & Authority Window’ will appear.
- The user will press ‘F2’ key to create a new user.
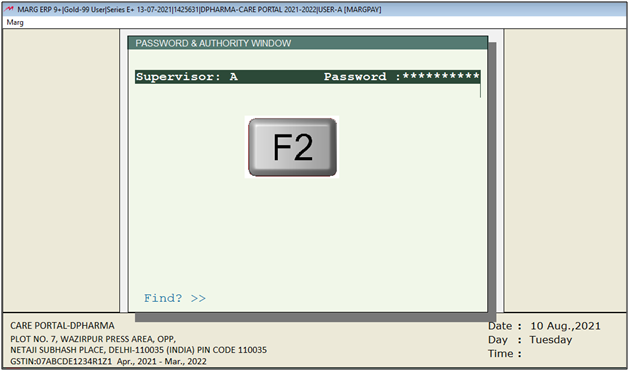
A ‘New User’ window will appear with some options:
1. User Id: Enter the user id which is required to be provided to the user like provide user id for bill printing user i.e. ‘Bill Print’.
2. Password: Enter the password for the user as per the requirement.
3. Operator Type: Select the operator type i.e. the particular user is Admin, Manager or Operator.
a. Operator: In this case, the user will get the operator power and authority.
b. Manager: In this case, the user will get the manager authority and power.
c. Admin: In this case, the Admin will get all the authorities
Suppose select ‘Operator’ for this user and then select ‘Yes’ and save it.

- A 'Bill Print Powres' window will appear. Click on ‘Search in All’.
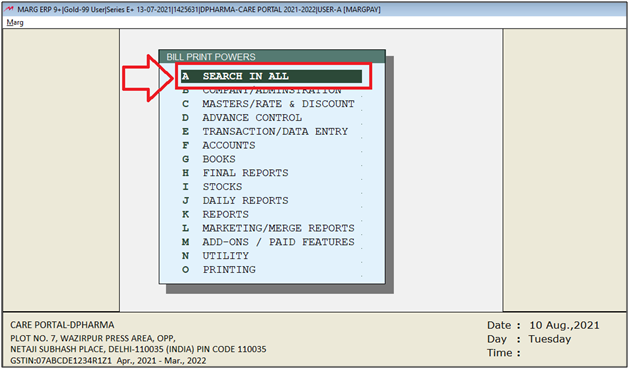
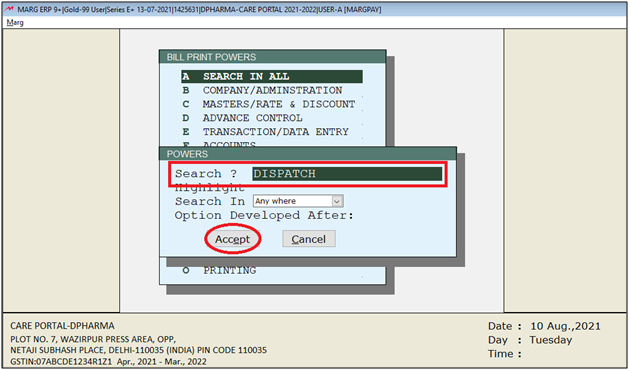
- A 'Powers' window will appear, the user will search 'Dispatch'.
- In ‘Dispatch Management 1-View, 2-All, 3-Printing, 4-Packing, 5-Delivery and 6-No’ to give authority for printing the user will select ‘3’.
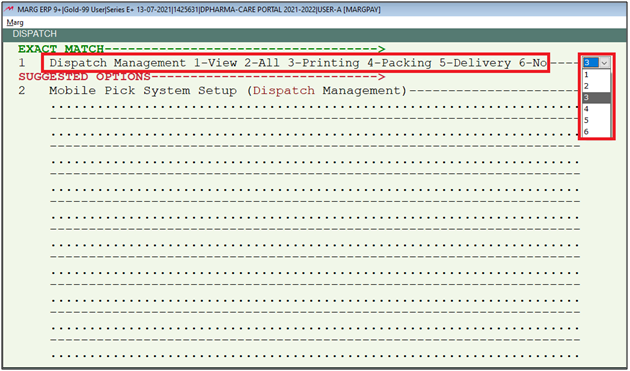
- The user will now press ‘ESC’ key.
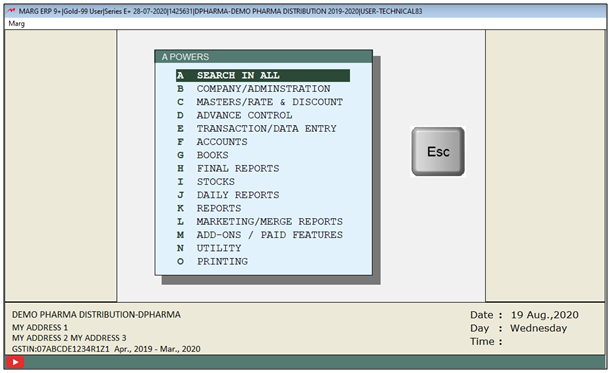
- Again press ‘ESC’ key and then click on ‘Yes’ to save the changes.
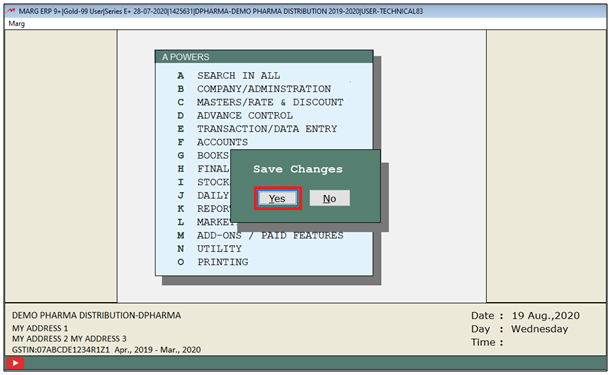
- A ‘Powers of Authority’ Pop-Up will appear in which the user will press ‘ESC’ key.
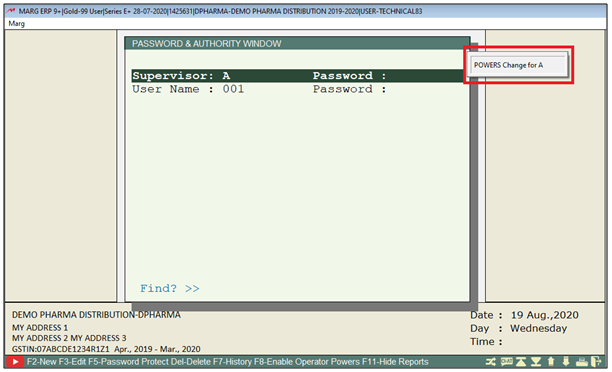
- Again press ‘ESC’ key and then click on ‘Yes’.
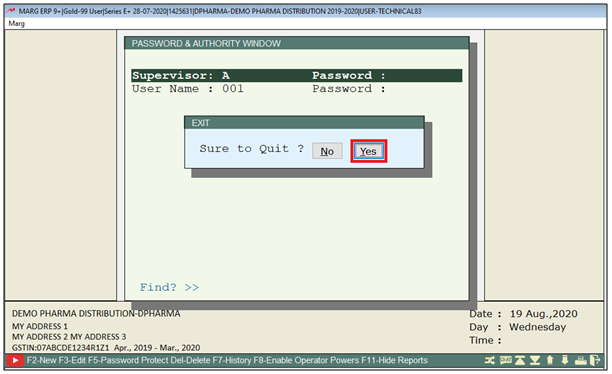
- The user is being created for bill printing and similarly, users can be created for packing and delivery also.
- The user will set the power of the users i.e. Packing and Delivery by following the above process.

- Now suppose, the user needs to print the bill, the user needs to Log in with other ID.
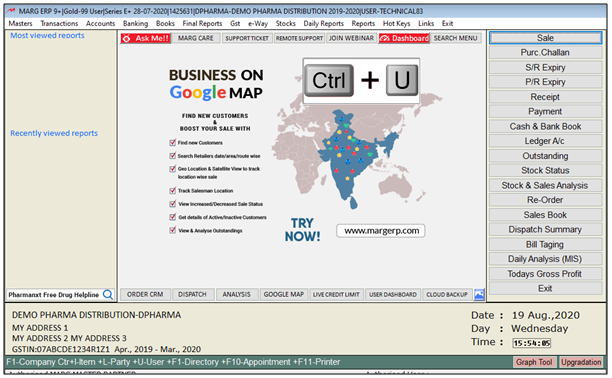
- Press ‘Ctlr+U’ key to change the user.
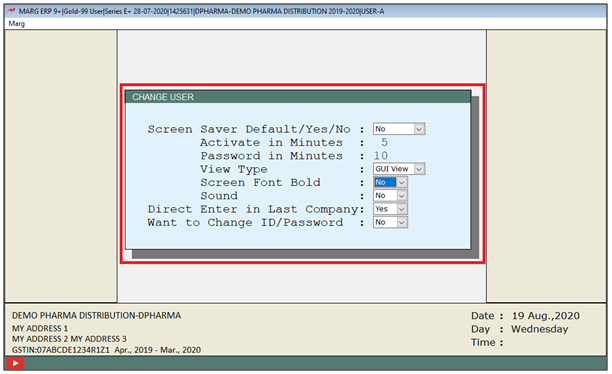
- A 'Change User' window will appear.
- Enter the user id ‘Bill Print’.

- Again ‘Change User’ window will appear in which the user will press ‘ESC’ key.
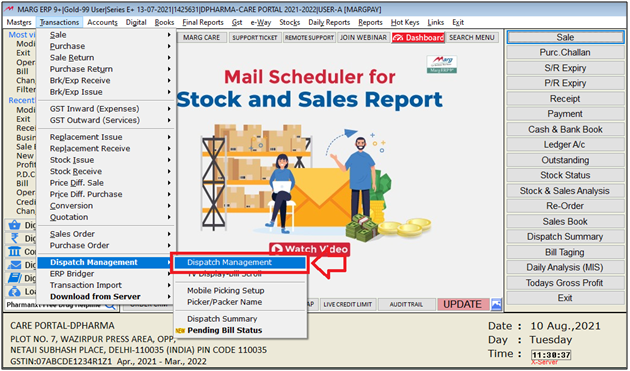
- Then go to Transactions > Dispatch Management > Dispatch Management.
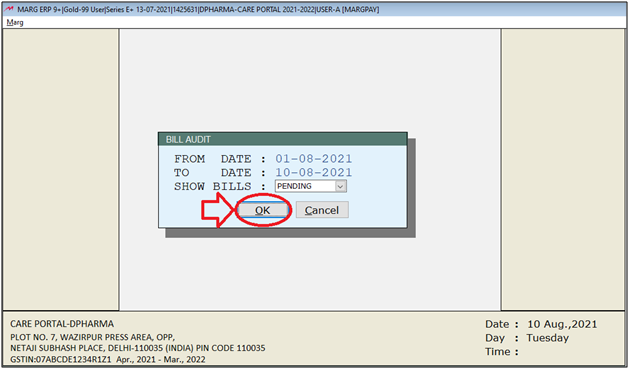
- The user will enter the date i.e. from which date till which date the audit of the bill is required.
- In 'Show Bills', the user will select ‘Pending'.
- Then select ‘Ok’.
- The user can view that the number of pending bills from 01-08-2021 to 10-08-2021 are been displayed.
- So, whichever bill needs to be printed; the user will Enter that particular bill number.
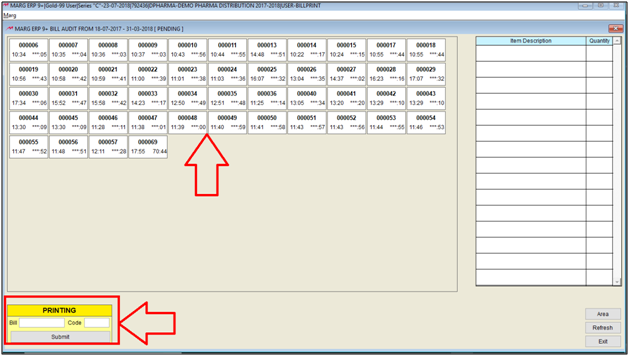
- Apart from it, the user can also simply click on bill >> Enter the user code (The user code can also be an employee code)
- Suppose, mention '001'.
- Then click on ‘Submit’ from here.
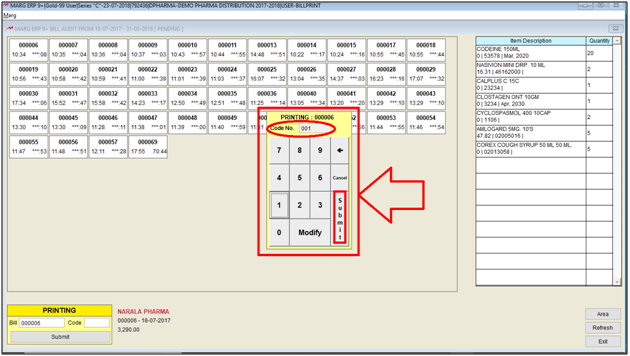
- And as the user will submit then the bill will get printed and it will be removed from Pending Bills. So, in this way the user can print the bill.
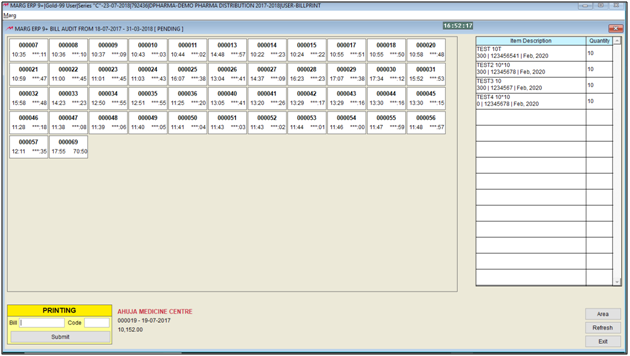
- Now, the packing user will enter their User ID.
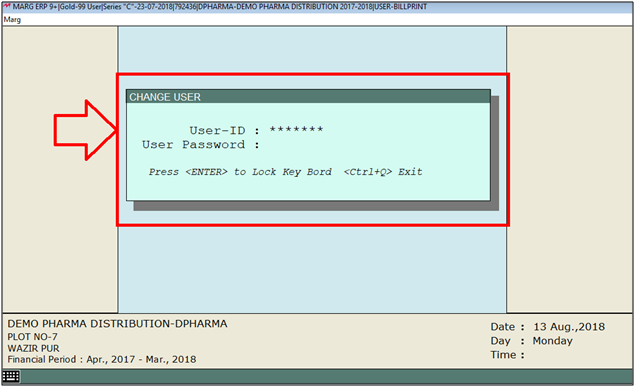
- Go to Transactions > Dispatch Management > Dispatch Management.

- The user will enter the date i.e. from which date till which date the audit of the bill is required.
- In 'Show Bills', the user will select ‘Pending’ .
- Then select ‘Ok’.

- The user can view that the number of pending bills are been displayed for packing.

- Suppose, the packing of Bill no. ‘000006’ needs to be completed.
- So, the user will select that particular bill number and enter the user code.
- Then click on ‘Submit’.

- As the user clicks on submit then BILL No. 000006 will be removed i.e. the packing has been completed.
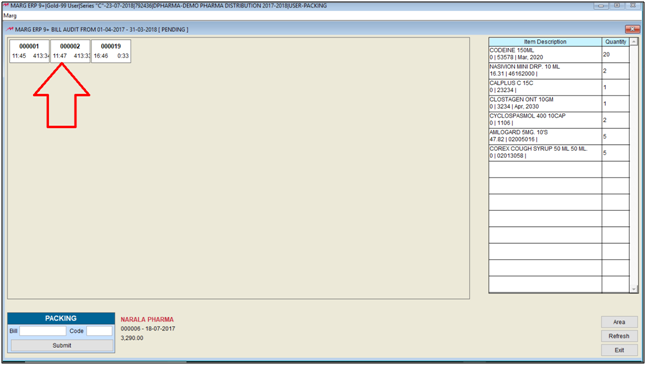
- Now, the last and final step is ‘Delivery’.
- The Delivery user will enter their User ID.
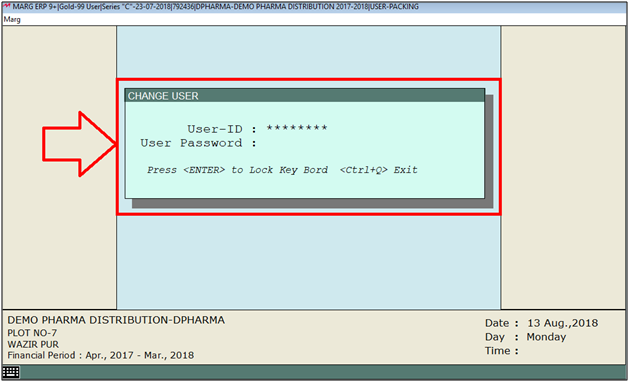
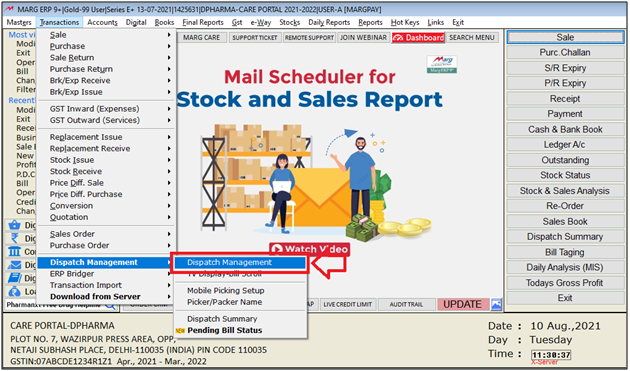
- Go to Transactions > Dispatch Management > Dispatch Management.
- The user will enter the date i.e. from which date till which date the audit of the bill is required.
- In ‘Show Bills’, the user will select ‘Pending’.
- Then select ‘Ok’.
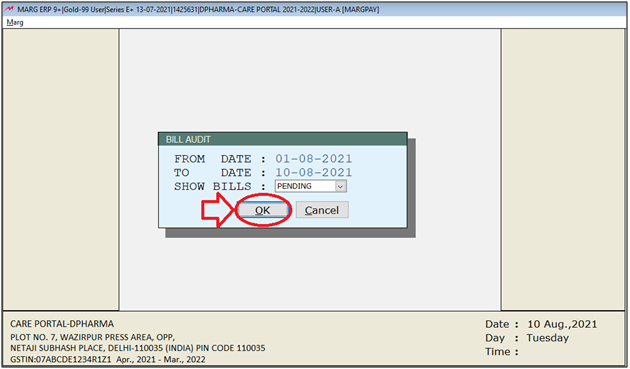
- The user can view that the number of pending bills are been displayed.

- So, in order to complete its Delivery, the user will select that particular bill number and enter the user code as the user will do the delivery of a particular bill .
- Click on ‘Submit’.

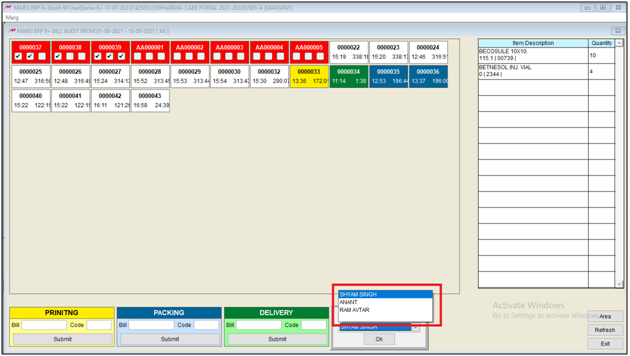
- Now, the user will select the MR.
- Then click on ‘Ok’.
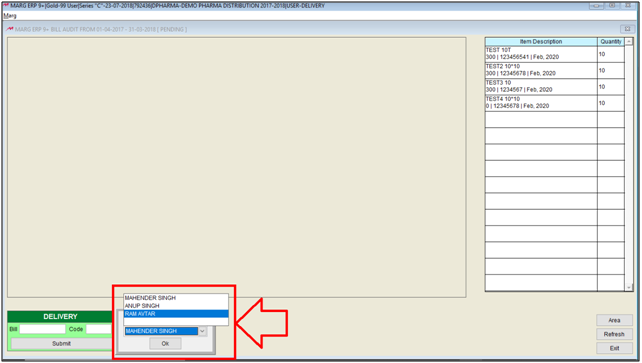
Now, the user can view that the delivery of the bill has been completed.
PROCESS TO AUDIT THE BILL BY ADMIN/SUPERVISOR IN MARG SOFTWARE
- Suppose, if any customer asks that till which process/stage the bill has been completed i.e. the status of the bill like if the packing is being done or not, etc.
- So, in order to check the status of the bill the admin will go to Transactions > Dispatch management > Dispatch management.

- The user will select the bills which need to be viewed.
- Suppose, select ‘All’
- Then click on ‘Ok’.

- Now the user can view that the colors of the bills are been changed.
- The bills in Yellow color indicate Printing i.e. their printing has been completed.
- The bills in Blue color indicates Packing, i.e. their packing process is completed and
- The bills in Green color indicate Delivery i.e. their delivery has been done.
- So, in this way the process from printing to delivery can be completed.

PROCESS OF TV DISPLAY-BILL SCROLL OPTION IN MARG SOFTWARE
- Go to Masters > Dispatch Management > TV Display-Bill Scroll.
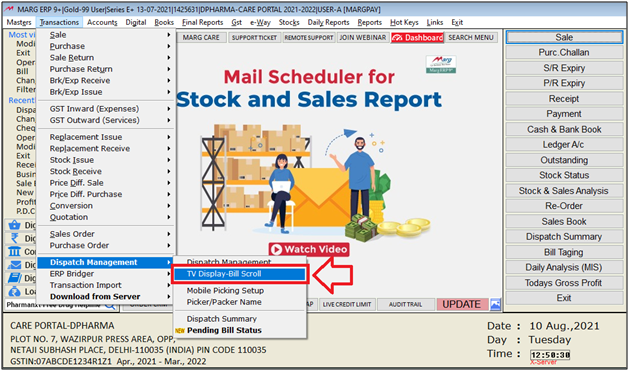
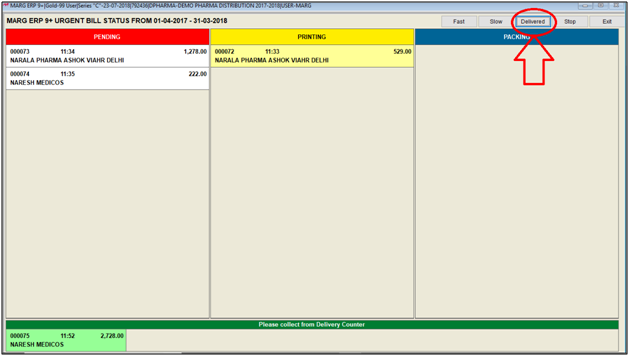
- TV Display Bill Scroll in Dispatch Management means that the status of the Urgent bills will be displayed on TV and it will get auto scroll.
- The user can do the scroll speed fast or slow and can start and stop the scrolling as well as per the requirement.
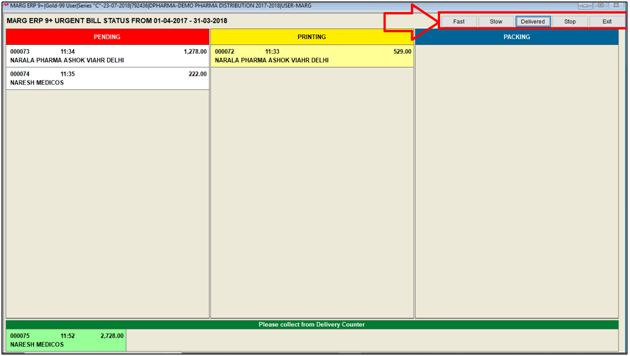
- Also, the user can view the bill status i.e. Pending, Printing, and Packing is displayed here along with it the user can also view the status of the bills which have completed the process till delivery.
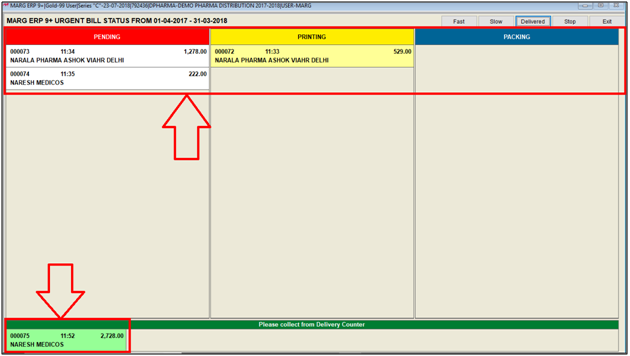
- Then click on ‘Delivered’ in order to mark those bills which have been delivered.
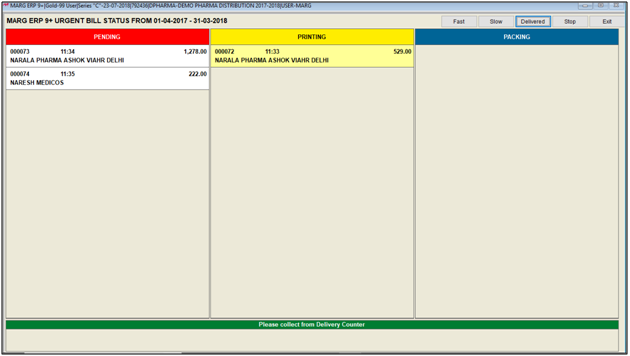
- The user will enter the bill number and click on ‘Okay’ so that the bill will be removed from here when it gets delivered.
- So, in this way the user can use TV Display Bill Scroll option.
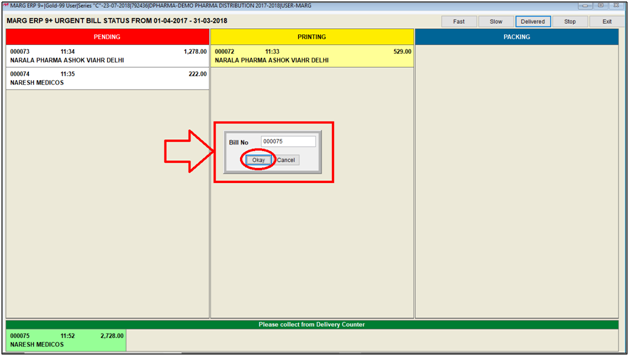
Fig. 1 View of Urgent Bill Status Window in Marg Software
PROCESS OF BILL VERIFICATION OPTION IN MARG SOFTWARE
- When the user sells any item of batch number 1234 at the time of sale creation but at the time of dispatch, the user will dispatch that item with 2234 batch number.
- So, in this case our physical and computer stock gets mismatched, but the user needs that both the stock should always remain matched.
- Similarly, at the time of Dispatch, the user can dispatch the wrong Item, quantity, or packing which is correct in the bill print but while dispatching some kind of mistakes can occur like there is a quantity 9 in bill print and the user have issued 8 or 10 or an item is of 500 gm and the user have done 250 gm or 1kg.
- So, due to these kinds of human mistakes the user does not get to know about the hidden loss.
In order to verify these things, the user can use ‘Bill verification’ option.
- For this, go to Masters > Marg Setups > Control Room.

- A ‘Control Room’ window will appear.
- The user will select ‘Search in All’.
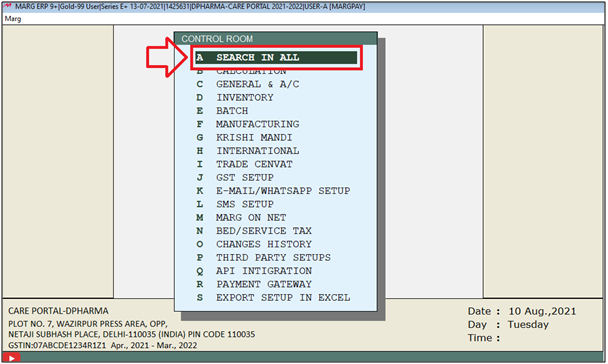
- A ‘Controls’ window will appear in which the user will search ‘Bill Verification’.
- Click on ‘Accept’.
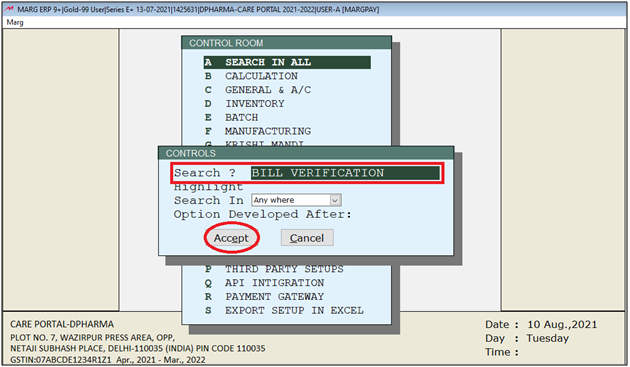
- A ‘Bill Verification’ window will appear.
- In ‘Bill Verification 0-No 1-Printing 2-Packing 3-Delivery 4-Manual’ option, the user will select that at which stage the ‘Bill Verification’ window needs to be required i.e. Printing , Packing Or Delivery.
- Suppose, select ‘2’ i.e. software should ask about the bill verification at the time of packing.

- The user will now press ‘ESC’ key twice.
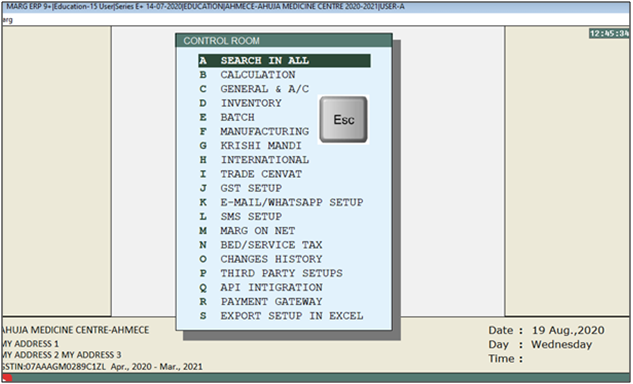
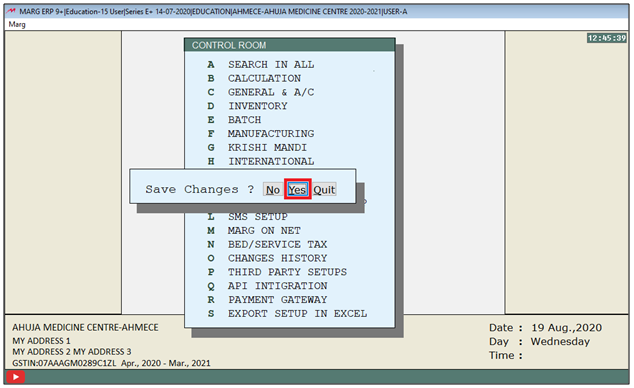
- Now click on ‘Yes’ to save the changes.
- Suppose the packing of Bill no. ‘0000036’ needs to be completed. So, the user will select that particular bill number and enter the user code.
- Then click on ‘Submit’.
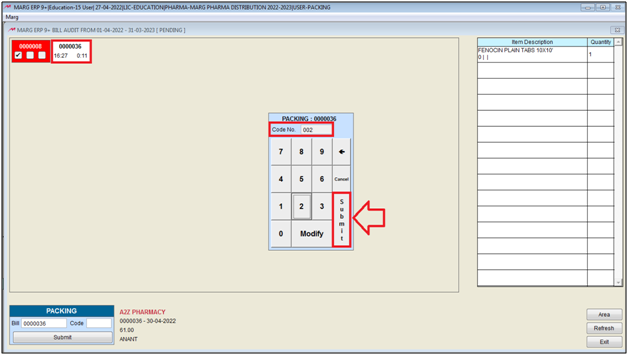
- A 'Bill Verification' window will open and from here, the user can verify the bills one by one.
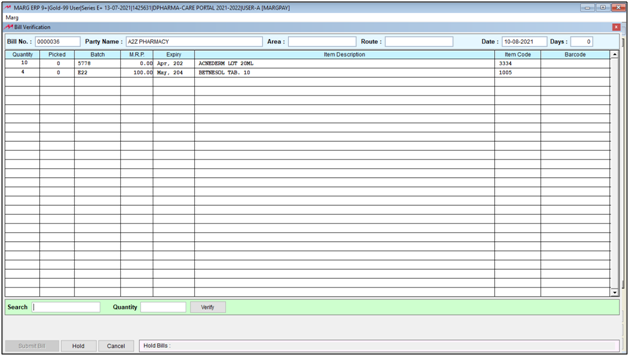
- Now suppose, the user will search that whosoever have an item code ‘5778’ in this bill should have ‘10’ quantity.
- Click on ‘Verify’ tab.
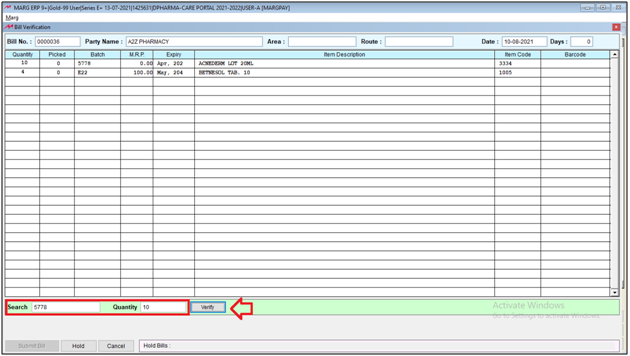
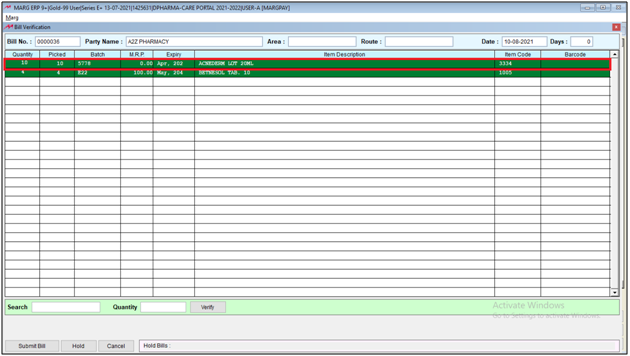
- After verification, it appears in green color which shows that this item has been verified i.e. the quantity which has been picked is correct.

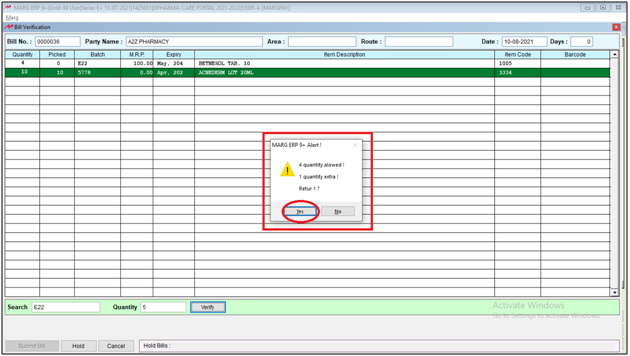
- Similarly, the user will verify another item, of which item code is ‘E22’, it should have 4 quantities.
- But suppose, if the user submits ‘5’ instead of ‘4’ by mistake, that means if the quantity is less, and will submit more quantity. So, now software will tell that the user is giving one extra quantity. Return it.
- So, its benefit is that the software will tell that the user is giving extra quantity. Now click on ‘Yes’ to return that extra quantity.
- Similarly, if there is more quantity in any item the user will submit less quantity.
- Like here, item code is ‘E22’, the quantity is ‘4’ but suppose if the user submits ‘3’ instead of 4 then that particular row will get yellow and along with it will be shown to that the actual quantity 5 from which the user has picked 4.
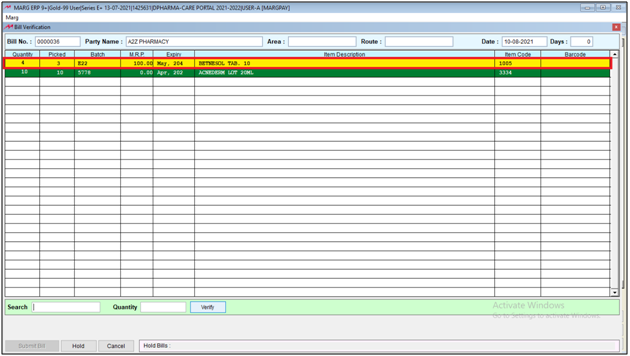
- So, the user will pick one more quantity and ‘Verify’ it.
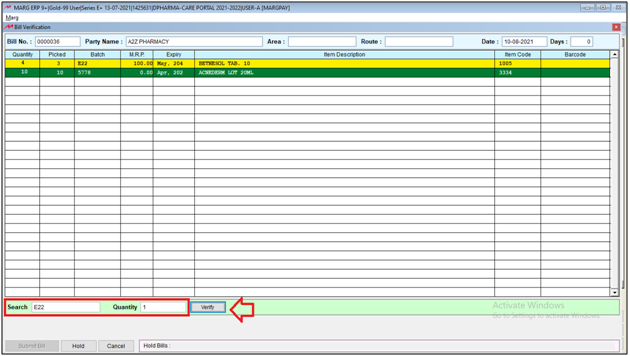
- And after verifying it, the row will appear green which means this item is verified.
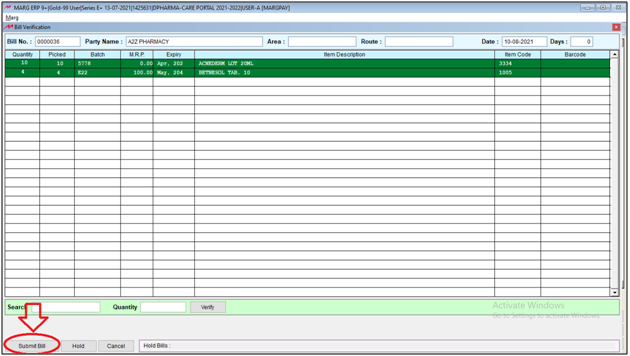
- Then click on ‘Submit Bill’ button.
- Apart from it, the user can verify the items based on MRP and Barcode.
- After this, suppose if the user is verifying the bill and for example the MRP of the product which is been sold is less or more than the product’s MRP, then in that case the user can put it on hold.

- So, in this way, Admin can open bill verification window for a particular user and can get the bills verified.
- After this suppose, if admin needs to hide Quantity, Batch and MRP on bill verification window then simply admin will go to Masters > Marg Setups > Control Room.
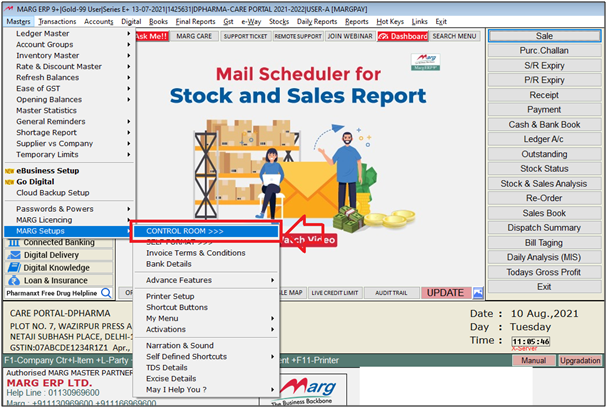
- A ‘Control Room’ window will appear.
- The user will select ‘Search in All’.

- A ‘Controls’ window will appear in which the user will search ‘Bill Verification’.
- Click on ‘Accept’.

- A ‘Bill Verification’ window will appear.
- In ‘Bill Hide Information 0-No 1-Batch+MRP 2-Batch+MRP+Qty’ option, the user will select ‘1’ to hide Batch and MRP or select ‘2’ to hide Batch + MRP + Qty.
- Suppose select ‘1’ to hide Batch & MRP on the bill verification window.
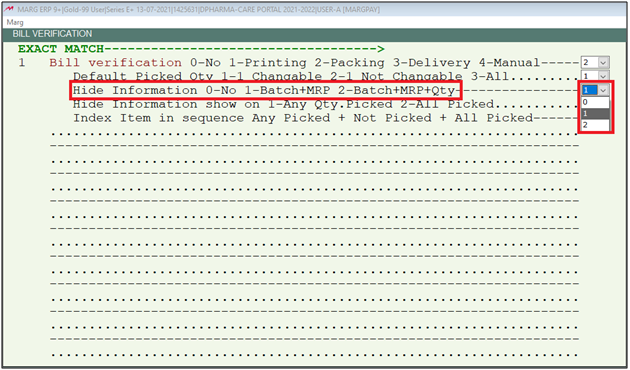
- The user will now press ‘ESC’ key twice.
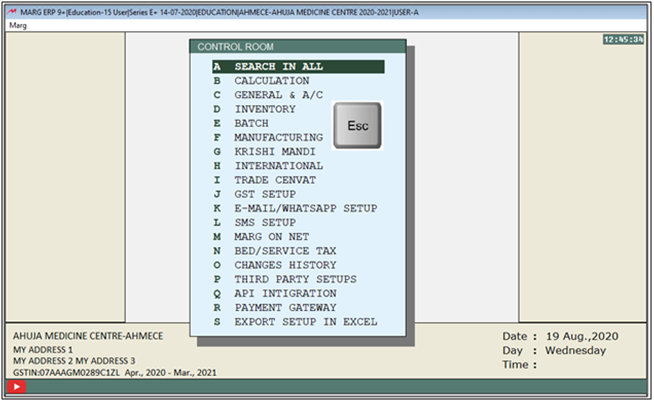
- Now click on ‘Yes’ to save the changes.

- Now the user will view the Batch and MRP are hided on the bill verification window.
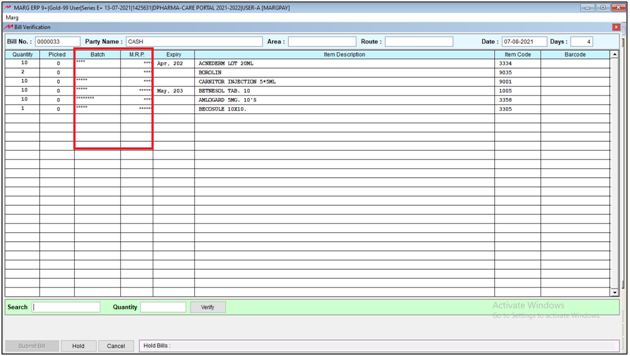
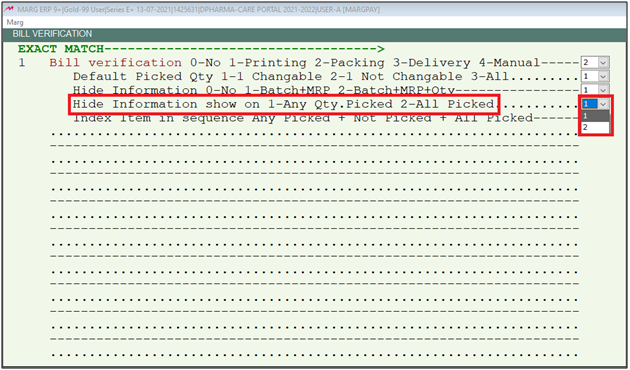
Along with it, the user can set that when the Batch and MRP should be shown. When all quantities will be picked or even one, MRP and batch will be shown at that time.
Hide Information show on 1-Any Qty.Picked 2-All Picked: If the user needs that if even one quantity is picked, batch or MRP should be shown then set ‘1’ for it and if the user needs to show batch or MRP when all quantities are picked then set ‘2’.
Default Picked Qty 1-1 Changable 2-1 Not Changable 3-All
Select 1: Select if the user needs that 1 qty should be picked by default of a particular item and the user can change it as per the requirement.
Select 2: Select if the user needs that 1 qty should be picked by default of a particular item and the user can’t change it .
Select 3: Select if the user needs that all quantities should be picked automatically of particular item at the time of bill verification then set ‘3’ for all.

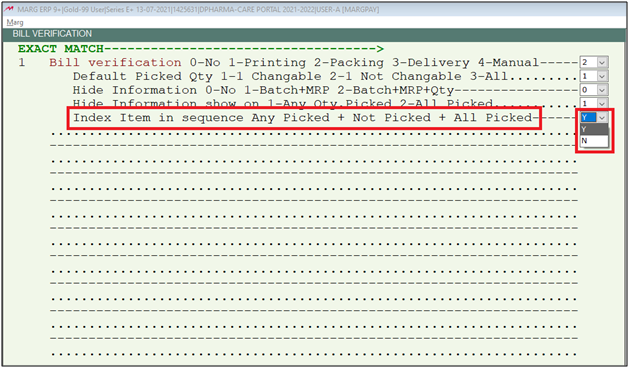
Index Item in sequence Any Picked + Not Picked + All Picked: In this option, the user will set the sequence of the item on the bill verification window:
Select Y: Select if the user needs to view first pick one quantity even then its indexing would be done before then 'not picked items’ will be shown there and after it ‘all picked items’ will be displayed.
Select N: Select if the user needs to view items in the default sequence on the bill verification window.
- After this, as some bills are urgent or some products are like which the user needs to deliver as soon as possible like someone is purchasing it in cash then they will take the stock same day.
- So, in that case the user can enter remarks at the time of billing that if that particular bill is urgent or important.
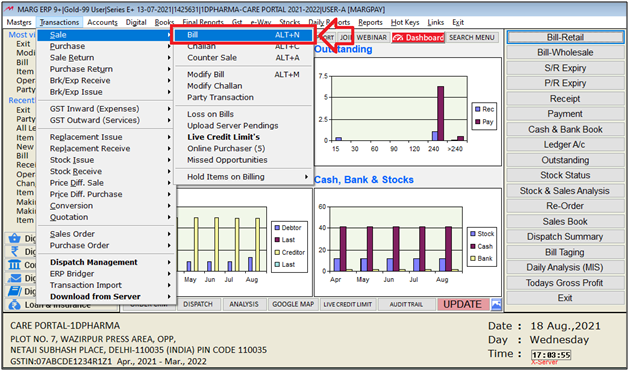
- Go to Transactions > Sale.
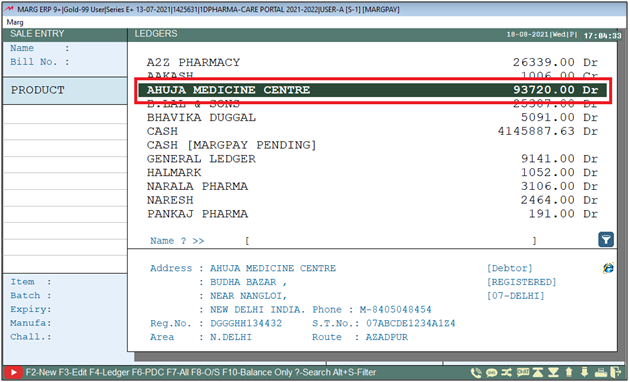
- The user will select ‘Party’.
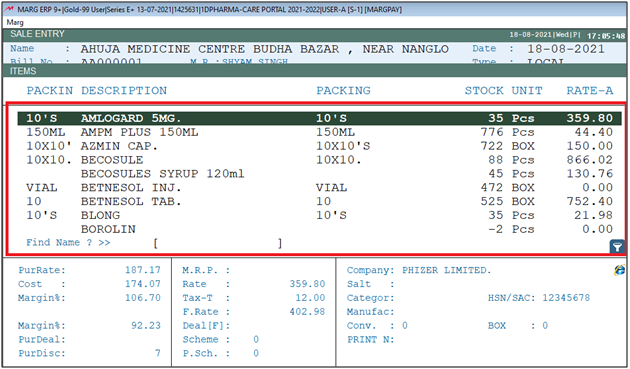
- Then user will select the item.
- Then press ‘Tilde’ key.

- A ‘Message’ window will appear in which the user will select whether these products have By Hand delivery or not.
- Suppose, select ‘Yes’.
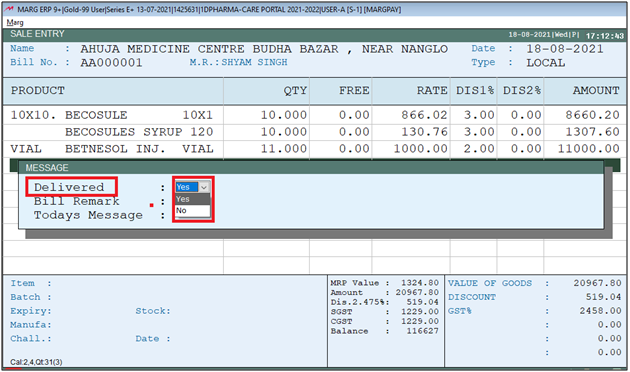
- The user can view bill remark, ‘By Hand’ will be picked by default.
- In Today’s Message, if the user needs to give any remark like this bill is urgent or important etc, so the user can enter it here.
- Suppose, enter ‘Urgent’.
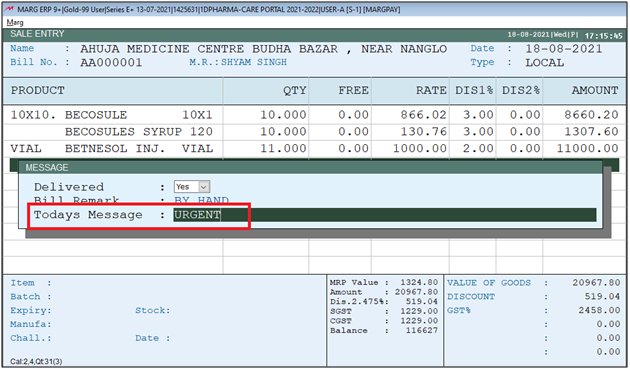
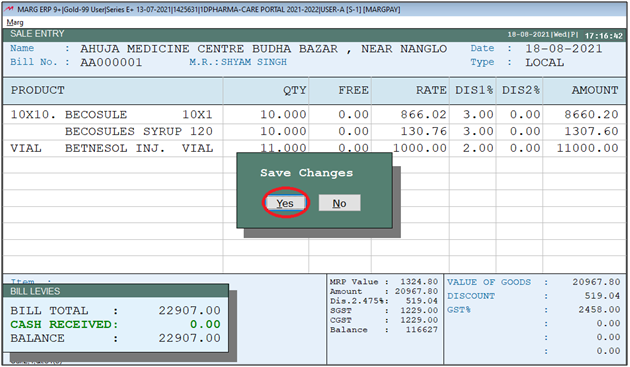
- Then press ‘Ctrl+W’ and click on ‘Yes’ to save the bill.
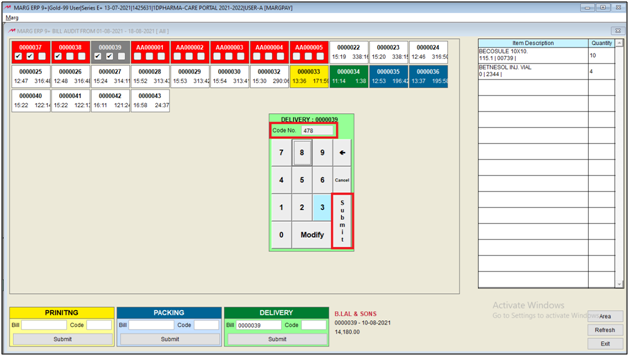
- Then the user will again go to Dispatch Management and the user will view the bills which are urgent or important are shown in red color.
- And along with it, here 3 check boxes are also shown which is indicating printing, Packing and Delivery.
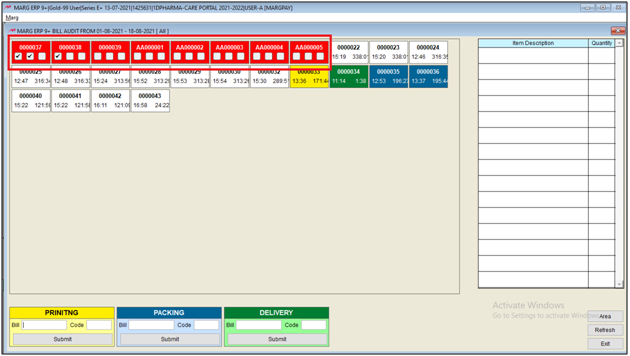
- So the user will click on first check box and complete its printing.
- The user will enter ‘User Code’.
- Then click on ‘Submit’.
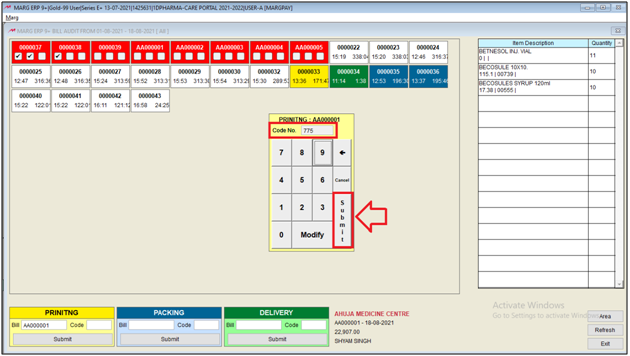
- Now the user can view that the printing has been completed.
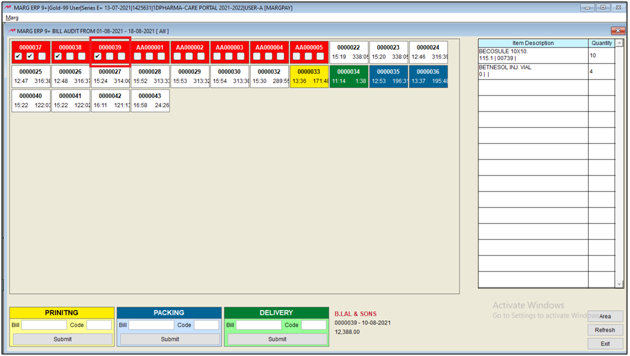
- Click on second check box to complete the packing and then delivery.
- The user will enter ‘User Code’.
- Then click on ‘Submit’.
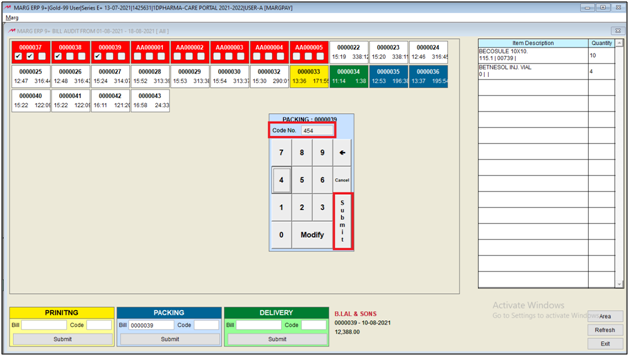
- Now the user can view that the packing has been completed.
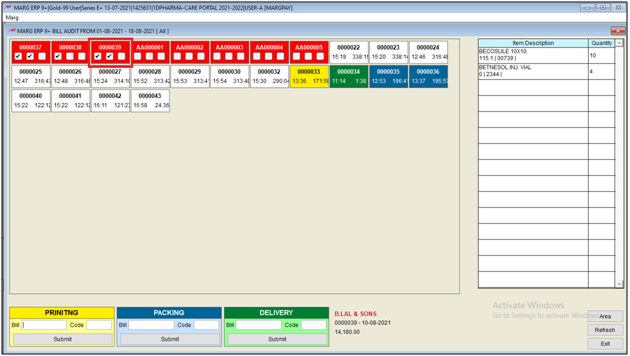
- Then click on third check box to complete the delivery.
- The user will enter ‘User Code’.
- Then click on ‘Submit’.
- The user will select M.R. for whom the user needs to issue this bill.
- Then click on ‘Ok’.
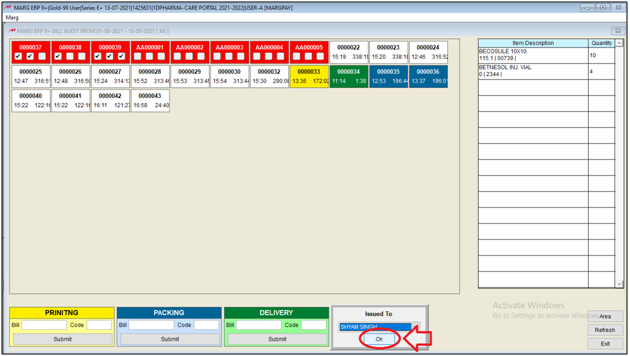
So, in this way the user can complete the process from printing to packing.
PROCESS TO VIEW DISPATCH MANAGEMENT REPORT IN MARG SOFTWARE
- Go to Daily Reports > Daily Working > Dispatch Management Reports.
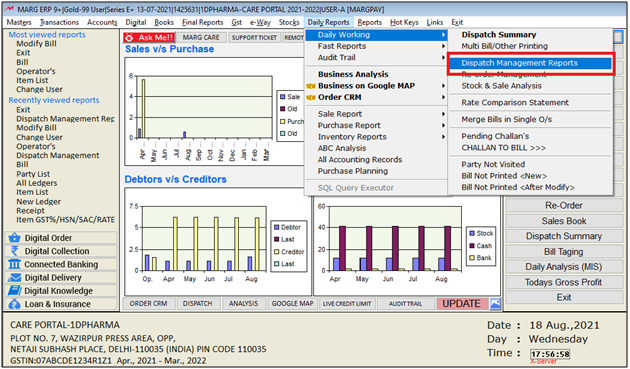
a. Date From & To: The user will enter the date i.e. from which date till which date the user needs to view the Dispatch Management Report.
b. Bill/User Wise: Select whether the report needs to viewed Bill wise or user wise.
Suppose, select ‘User Wise’.
c. Report Type: Select the Report Type like Detail or Summary as per the requirement.
d. Report Index: If the user needs Indexing of the report on the certain condition then the user can select any option from these available options:
1. Bill No.
2. Pick Time
e. Time Difference: The user can specify the Time Difference that after this particular time, what the user needs to view from all these (after picking, printing, packing, delivery or any).
f. User: If the user needs to view the report of any particular user then the user can enter the user code in this option.
g. Service Type: Select the Service type like Printing, Packing and delivery as per the requirement.
After this, the user can select here that the user needs to view the Report, print it or needs to export it in excel etc. as per the requirement.
The user will click on ‘View’.

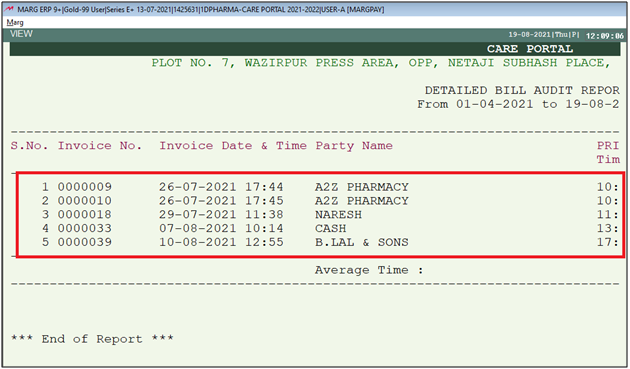
After following the above steps, the user can view that the user-wise dispatch management report has been generated.


 -
Marg ERP 9+


