

Welcome to  -
Marg ERP 9+
-
Marg ERP 9+
Home > Margerp > Dispatch Management > Process of Dispatch Management of Marg Software
Process of Dispatch Management of Marg Software

Overview of Dispatch Management System in Marg ERP Software
Benefits of Dispatch Management System in Marg ERP Software
Process of Dispatch Management in Marg ERP Software
OVERVIEW OF DISPATCH MANAGEMENT SYSTEM IN MARG ERP SOFTWARE
- In every business there is a complete process from product order to delivery which different businessmen manage in different ways.
- For e.g. There are different counters for Bill Printing, Packing and Delivery of goods. When the user visits big stores/ Distributor/Wholesaler/Stockiest stores at the time of purchasing products due to which different operators are engaged / involved in the completion of the whole process.
- For this type of business, a feature has been developed, ‘Dispatch Management System’.
BENEFITS OF DISPATCH MANAGEMENT SYSTEM IN MARG ERP SOFTWARE
Dispatch Management System helps to track the status of the customer’s order or the generated bill i.e. at which stage the delivery of the order has been completed along with the color indication.
Dispatch Management includes four steps:
- Billing
- Printing
- Packing
- Delivery
- It easily provides the user-wise authority to all the users and maintains the accuracy and the proficiency of the work which results / leads to no chance of any kind of mistakes or omissions from the generation of the bill to the delivery of the product. This allows the user to set priority for any urgent bills.
- This option easily manages the whole dispatch process without any misplacement of the bills.
- Dispatch Management System easily tracks that which bill is completed, which bill is pending and also allows updating the customers through an e-mail or by sending SMS regarding the status of the order.
PROCESS OF DISPATCH MANAGEMENT IN MARG ERP SOFTWARE
Let’s implement the four steps i.e. Billing, Printing, Packing and Delivery in Marg ERP Software.
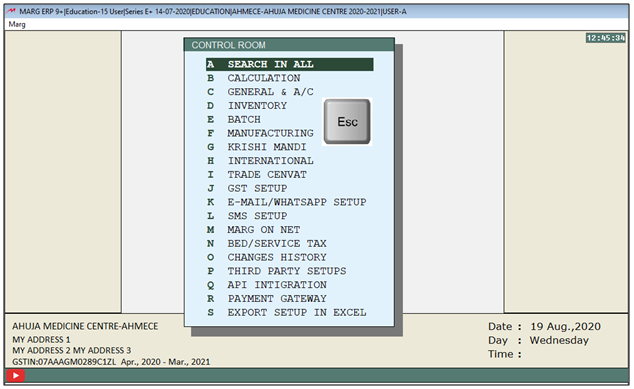
- Go to Masters >> Marg SetUp >> Control Room.

- A ‘Control Room’ window will appear.
- The user will select ‘Search in All’. Press Enter.

- A ‘Controls’ window will appear in which the user will search ‘Dispatch’.
- Click on ‘Accept’.

- A ‘Dispatch’ window will appear.
- In ‘Dispatch Management to Print,Packing & Delivery status 1-Yes 2-No’ option, the user will select ‘1’.
In ‘Bill audit work on Sales 1-Bill 2-Challan 3-Both’ option:
a. 1-Bill: If the user need bill audit option only for sale bill, then select '1'.
b. 2-Challan: If the user need bill audit option only for challan, then select '2'.
c. 3.Both: If the user need bill audit option for both the transactions i.e. Sale and Challan, then select '3'.
- In 'Bills Only with Challan Items will 1-Not show 2-Show in Bill Audit' option,
- In 'Bill audit work on Sales + Stock Issue' option, select whether the user needs bill audit option for both sale and stock issue transactions or not.
- In 'External printing pass with code' option.
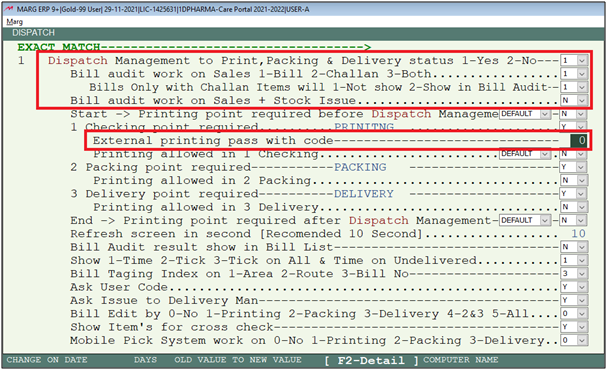
- Along with it, the user can view that there are maximum 3 stages of it and to disable any of the stages then select “No”.

- The user can also change its headings as per the requirement.

- The user will now press ‘ESC’ key twice.
- Then click on ‘Yes’ to save the changes.

- Now, go to Transactions >> Dispatch Management >> Dispatch Management.

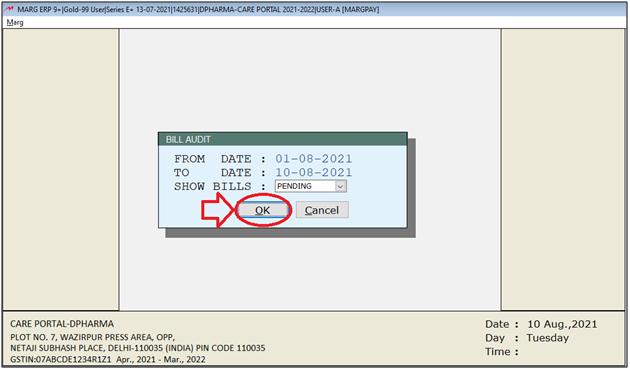
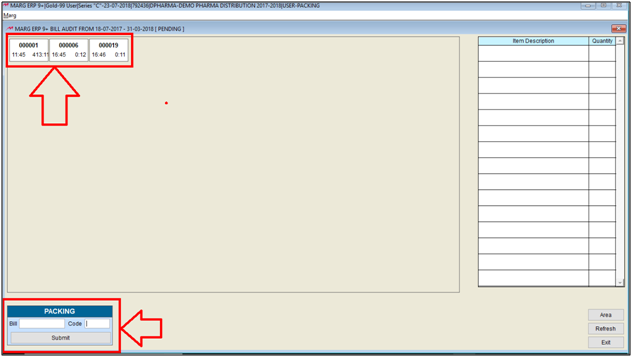
A ‘Bill Audit’ window will appear:
1. From Date To Date: Select the particular period i.e. from which date till which date the audit needs to be done.
2. Show Bills: Select the bills which need to be viewed.
a. All: Under this Option, all the Pending and Finalized bills are being displayed.
b. Pending: It displays the bills which are pending and are not completed till delivery.
c. Finalized: Finalized bills are those bills of whose Printing, Packing and Delivery are completed.
Suppose the user selects 'Pending'.
Then click ‘Ok’.

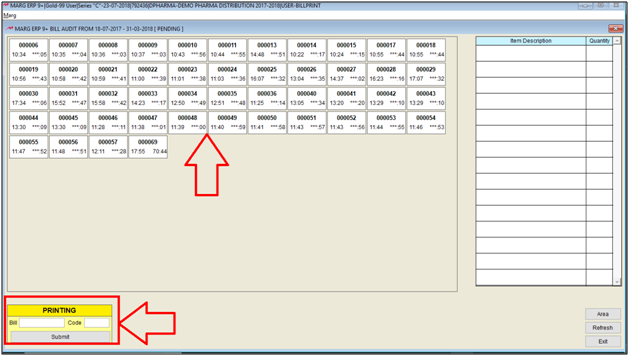
- The user can view that the pending bills of that particular dates are displayed i.e. the Bill no. and the time of bill creation is displayed.

- Also, if the user hovers the mouse to any bill then it shows that the particular bill is of which party, date on which the bill is created along with the amount of the bill and item description displayed on the right side.

- The three stages will also be displayed i.e. PRINTING, PACKING AND DELIVERY. It means that firstly it will print the bill. Then once the Bill Number is being entered then it will go for packing and lastly it will be delivered.
As user wise authority needs to be provided that whichever user is printing the bill, they should get an option of bill print only, whosoever is doing packing should get packing option and the user who is looking for delivery should get delivery option only.
- In order to assign power for Printing, Packing and Delivery, go to Masters >> Passwords and Powers >> Operator’s.

- A ‘Password & Authority Window’ will appear.
- Select the user whom you want to give the power to print the bill. Press 'Enter'

- Select ‘Search in All’.

- Now, search ‘Dispatch’ from Powers window.

- Here, an option will be displayed: “Dispatch Management 1-View, 2-All, 3-Printing, 4-Packing, 5-Delivery and 6-No”.
- Suppose to give authority for printing to the user, select ‘3’.

- The user will now press ‘ESC’ key.

- Again press ‘ESC’ key and then click on ‘Yes’ to save the changes.

- A ‘Powers of Authority’ Pop-Up will appear in which the user will press ‘ESC’ key.

- Again press ‘ESC’ key and then click on ‘Yes’.

The user will set the power of the users i.e. Packing and Delivery by following the above process.

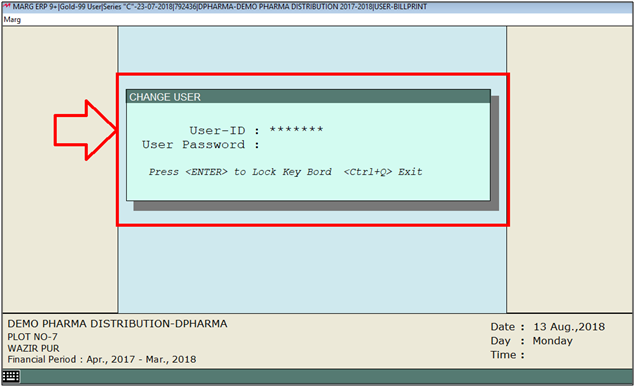
- Now suppose that the bill printing user needs to print bill then for that press ‘CTRL + U’ to change the user.
- Enter the user id and password.
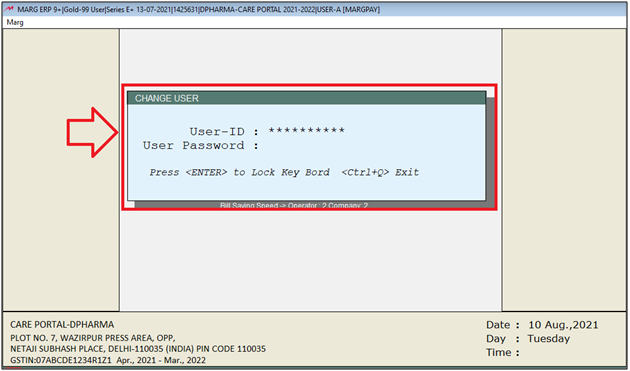
- A ‘Change User’ window will appear in which the user will press ‘ESC’ key.
- Then go to Transactions >> Dispatch Management >> Dispatch Management.

- Enter the date i.e. from which date till which date the audit of the bill is required.
- Select ‘Pending’ from Show Bills field.
- Then select ‘Ok’.
- The user can view that the number of pending bills from 01-08-2021 to 10-08-2021 are been displayed. So, whichever bill needs to be printed; the user will ‘Enter’ that particular bill number.
- Apart from it, the user can also simply click on bill >> Enter the user code (The user code can also be an employee code)
- The user code is not being provided.
- Then click on ‘Submit’.
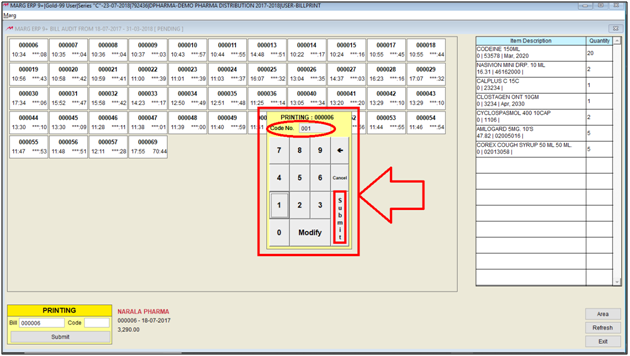
- And as the user will submit then the bill will get printed and it will be removed from Pending Bills. So, in this way the user can print the bill.

- Now, the packing user will enter their User ID.
- Go to Transactions >> Dispatch Management >> Dispatch Management.

- Enter the date i.e. from which date till which date the audit of the bill is required.
- Select ‘Pending’ from Show Bills field.
- Then select ‘Ok’.

- The user can view that the number of pending bills are been displayed for packing.
- Suppose the packing of Bill no. ‘000006’ needs to be completed. So, the user will select that particular bill number and enter the user code.
- Then click on ‘Submit’.
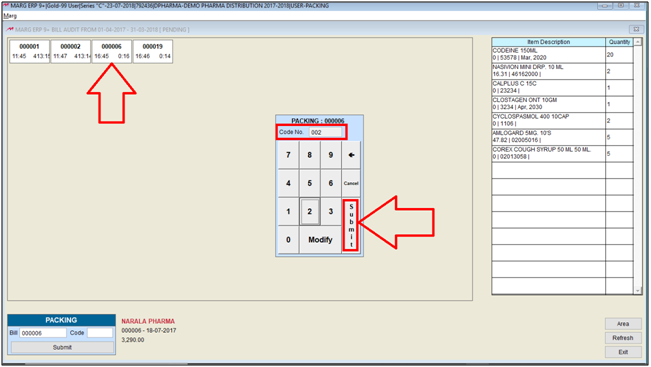
- As the user will click on submit then that BILL No. 000006 will be removed i.e. the packing has been completed.

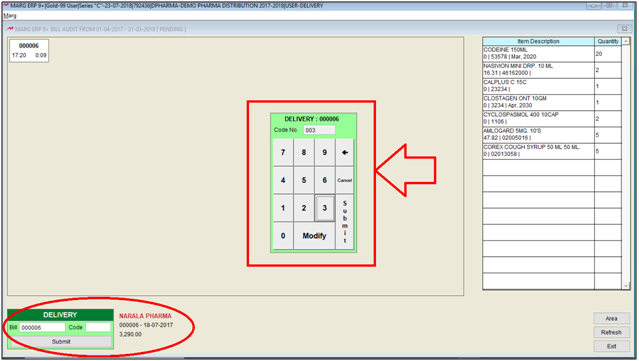
- Now, the last and the final step is ‘Delivery’.
- The Delivery user will enter their User ID.

- Go to Transactions >> Dispatch Management >> Dispatch Management.

- Enter the date i.e. from which date till which date the audit of the bill is required.
- Select ‘Pending’ from ‘Show Bills’ field.
- Then select ‘Ok’.

- The user can view that the number of pending bills are been displayed.

- So, in order to complete its Delivery, as the user will do the delivery of a particular bill then the software will ask that to which MR the bill needs to be issued.
- Select the MR.
- Then click on ‘Ok’.
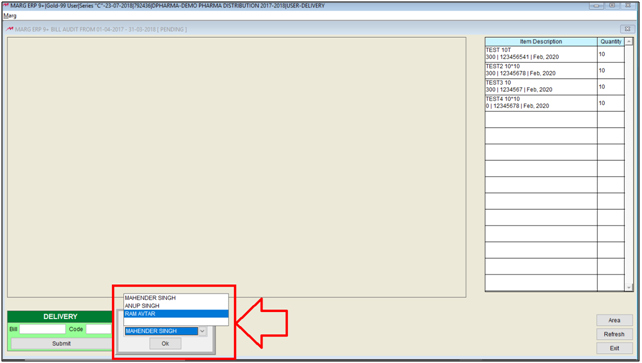
Now, the user can view that the delivery of the bill has been completed.
