Welcome to  -
Marg ERP 9+
-
Marg ERP 9+
Home > Margerp > Erp Bridger > How to Import Multiple vouchers through ERP Bridger in Marg Software ?
How to Import Multiple vouchers through ERP Bridger in Marg Software ?

Overview/Introduction to ERP Bridger in Marg ERP Software
Steps to Create Method to Import Voucher in Marg ERP Software
Steps to Import Accounting Vouchers through ERP Bridger in Marg ERP Software
OVERVIEW/INTRODUCTION TO ERP BRIDGER IN MARG ERP SOFTWARE
- ERP Bridger is a tool developed by Marg and this tool can be used in import and export of data.
- The user can easily import data from other software to Marg if that software has a provision of data export.
- ERP Bridger is very useful to the ones who need to transfer their data from one software to another for accounting purposes, inventory purposes etc.
- The user can also import vouchers like receipt voucher, payment voucher etc through excel file to Marg.
STEPS TO CREATE METHOD TO IMPORT VOUCHERS IN MARG ERP SOFTWARE
- Firstly, Go to Masters > MARG Setups > Advanced Features > ERP Bridger- Import-Accounts.

- An 'ERP to Marg ERP 9+ Inventory' window will appear.
- The user will now select ‘Method’.

- An 'ERP to Marg ERP 9+ Inventory Method' window will appear.
- In the Name field, the user will enter the name for the method.
- Suppose enter ‘Sales’.
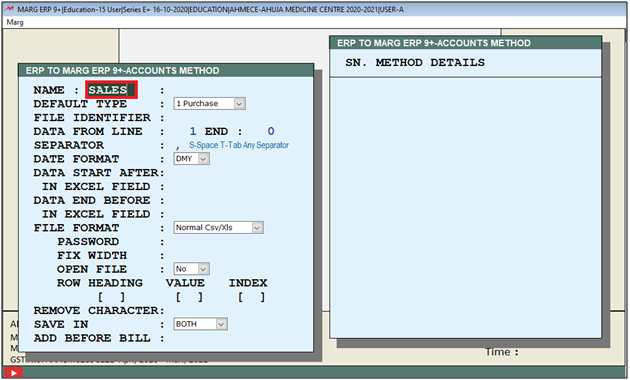
- An alert window will appear ‘Not found! Want to create!’, the user will click on ‘Yes’.

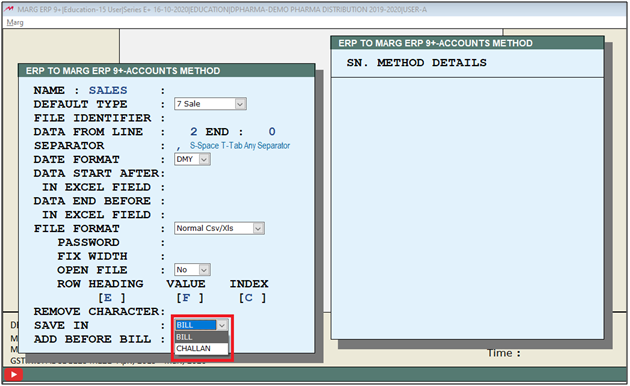
- In Default Type, the user will select the type for the method from the drop down.
- Suppose select ‘Sale’.

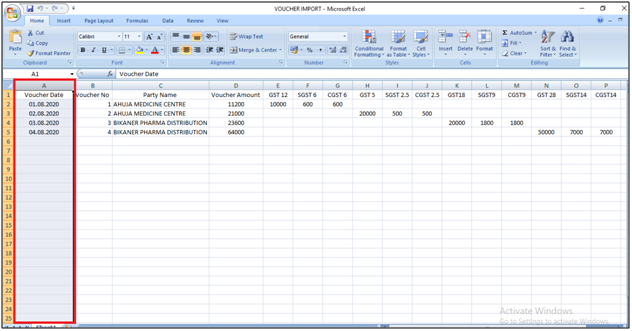
- In the excel sheet that the user needs to import, the user can view that the data starts from line 2.

- So, in ‘Data from line’, the user will enter ‘2’.

- In 'Save In', the user needs to select whether the user needs to import the transaction in bill or challan.
- Suppose select 'Bill'.
- An 'Import Method' window will appear. Press 'Enter' key.
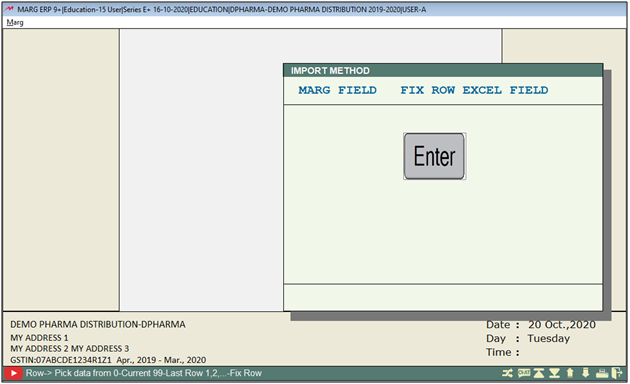
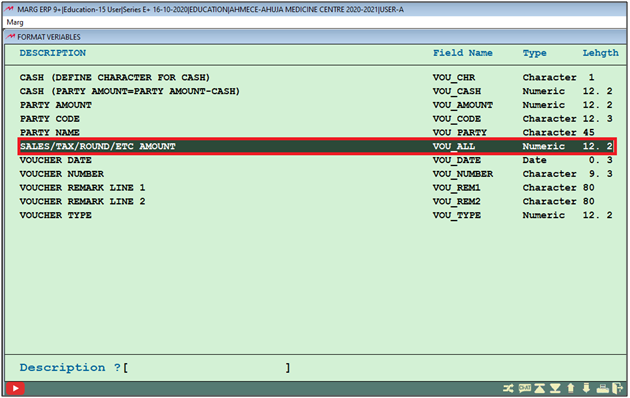
- A 'Format Variables' window will appear.
- The user will now search the heading to be imported from the Excel sheet.
- Suppose select Voucher Date.
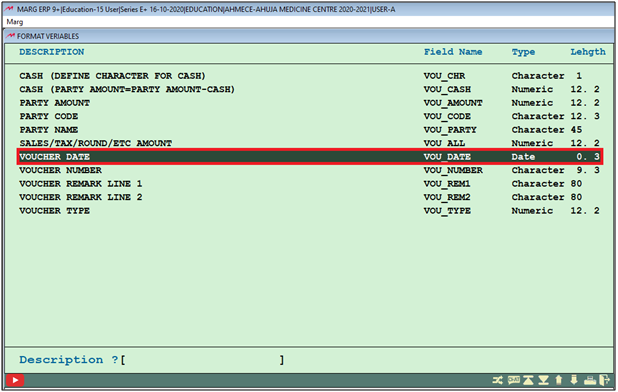
- In the excel sheet, the user can view that Voucher Number is in column A.
- Then, in the Import method window the user will enter ‘A’ in the Excel field.

- Similarly to import 'Voucher No' from the excel, select the command for it.
- Suppose select 'Vou_Number'

- Now mention in which column the excel sheet contain the voucher no.
- Suppose in our case it is in column 'B'.

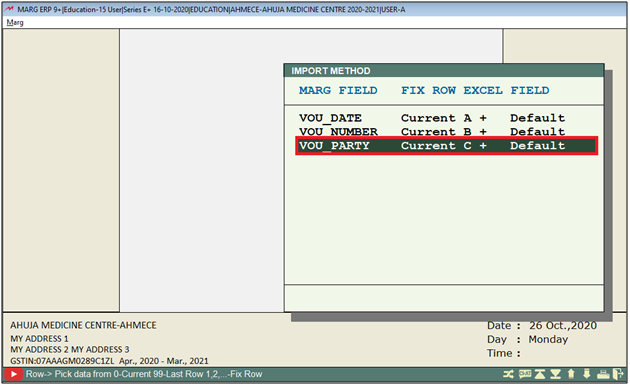
- Similarly to import 'Party Name' from the excel, select the command for it.
- Suppose select 'Vou_Party' .
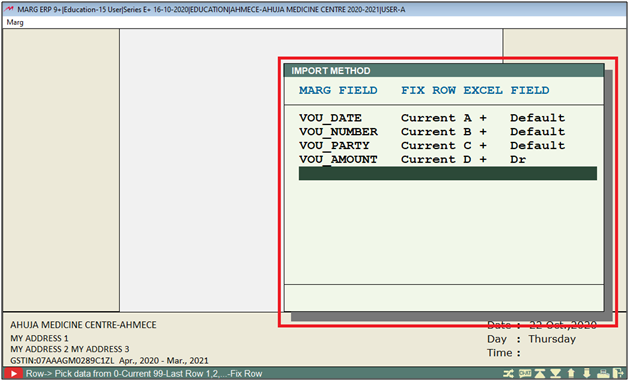
- Now to import 'Voucher Amount ' from the excel, select the command for it.
- Suppose select 'Vou_Amount' .
Important : To import the taxable amount of the sales i.e. 5%,12%,18%, user needs to use only one command i.e. 'Vou_All'.
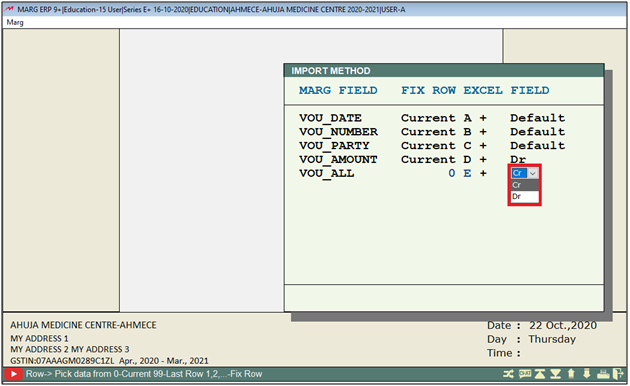
Suppose the user needs to import the taxable amount of GST 5% then firstly select the command 'Vou_All'.
- Then select whether the taxable amount needs to credited or debited.
- Suppose in our case we are importing sales voucher then the user needs to select 'Cr'.
- Press 'Enter' key.
- Now a 'Ledgers' window will appear, select the sale tax ledger as per the requirement.
- Suppose select Local Sales 5%.
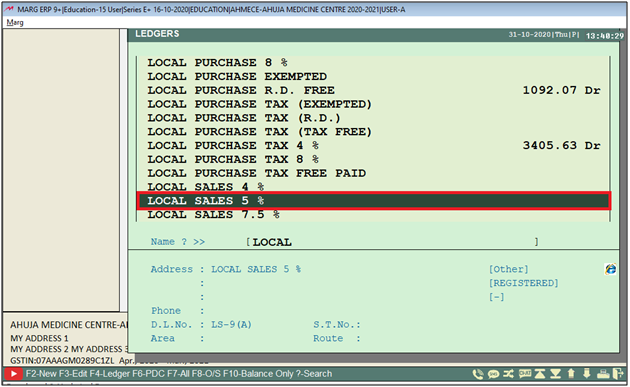
- Press 'Enter' key twice.
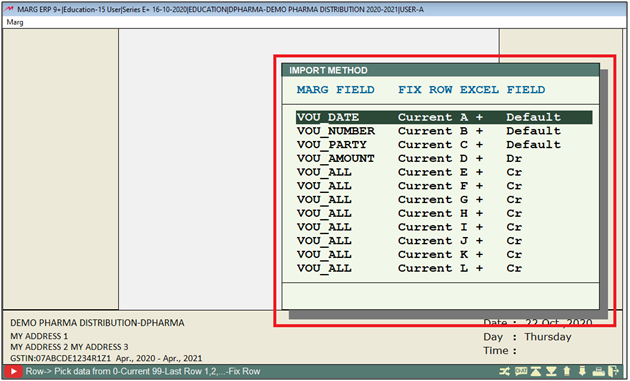
- Similarly, the user will select all the headings to be imported from the Excel sheet.
- Press 'Enter' key and then press 'ESC' key to save.
STEPS TO IMPORT ACCOUNTING VOUCHERS THROUGH ERP BRIDGER
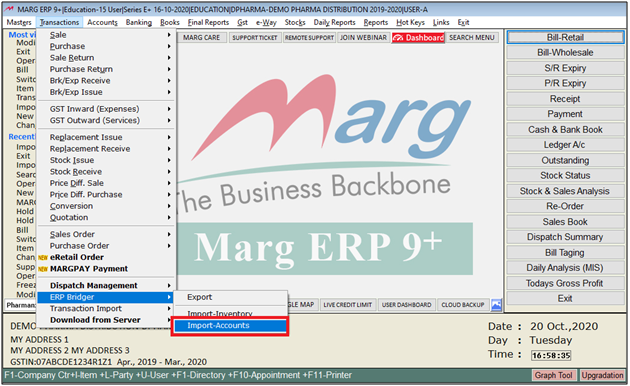
- Go to Transactions > ERP Bridger > Import Accounts.
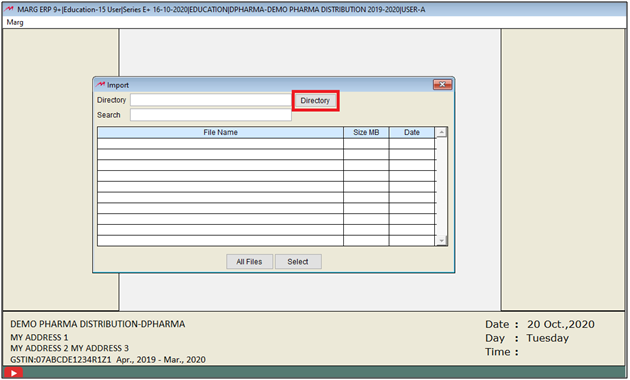
- A 'Copy Marg Help From' window will appear.
- The user will select a location from where the user needs to import the transaction.
- Then click on 'Select'.
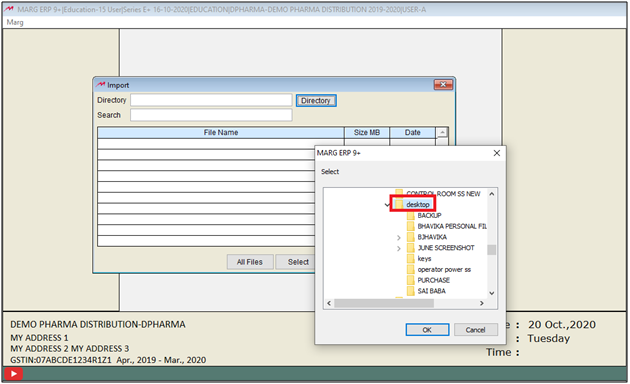
- Suppose select ‘Desktop’.
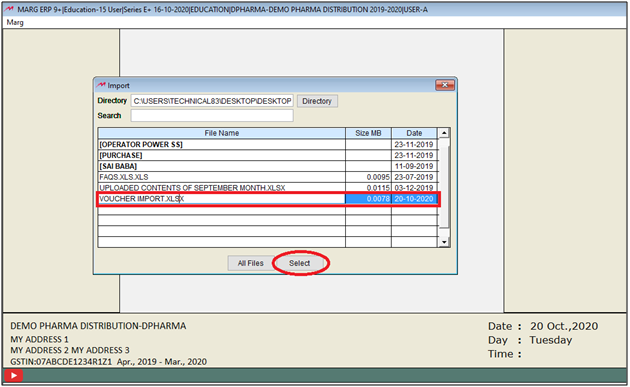
- Then select the file as per the requirement.
- Suppose select ‘Voucher Import.XLSX.
- Then click on 'Select'.
- Then click on ‘Accept’.

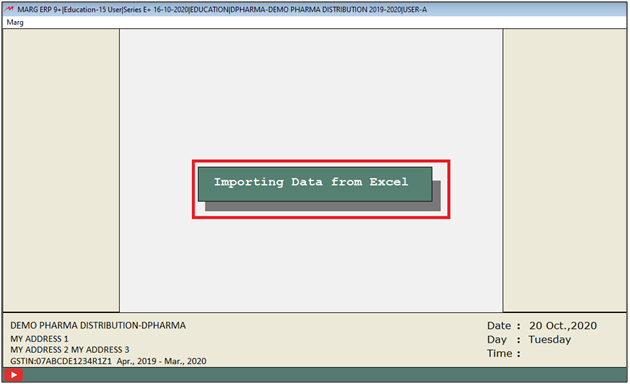
- Then the software will show that the file from the selected excel is being imported.
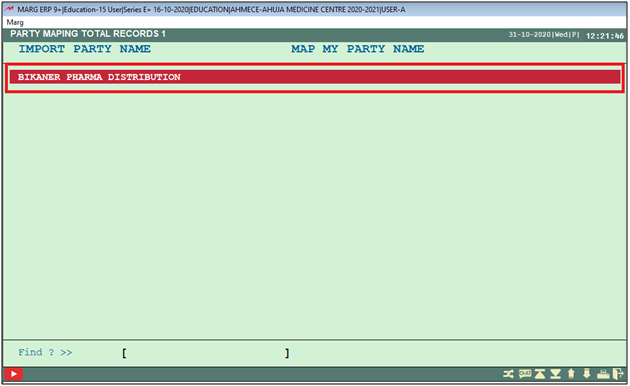
- A ‘Party Mapping’ window will appear. Here, the software has displayed the list of unmatched party details.
- To map the records, press 'Enter' key.
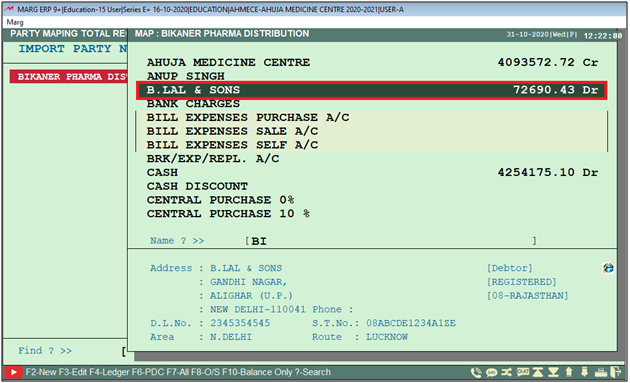
- A Software ledger window will appear.
- The user will now select the ledger to map.
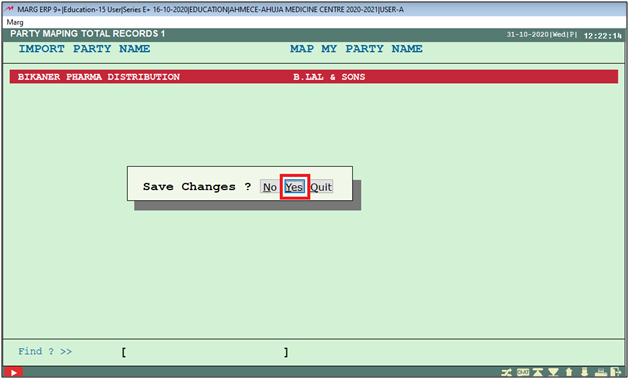
- Suppose map ‘Bikaner Pharma Distribution’ with B.LaL & Sons.
- Now press 'ESC' key to proceed.

- Now select ‘Yes’ to save the changes.
- In the next window select ‘Accept’ to confirm the further process.

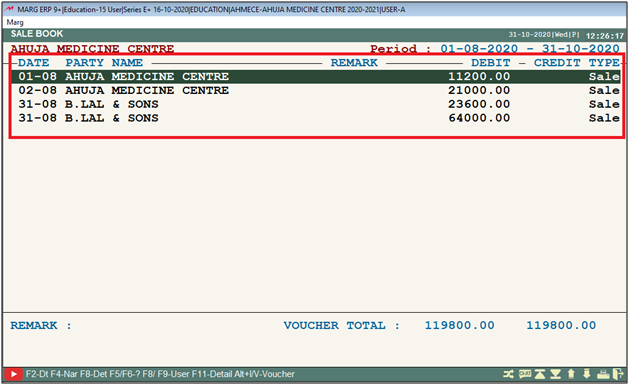
After following the above steps, the process will get done and all the vouchers (in excel) will get imported successfully into the software.

In This Page