Welcome to  -
Marg ERP 9+
Search by Category
- Marg Nano
- Swiggy & Zomato
- ABHA - Ayushman Bharat
- Marg Cloud
-
Masters
- Ledger Master
- Account Groups
- Inventory Master
- Rate and Discount Master
- Refresh Balances
- Cost Centre Master
- Opening Balances
- Master Statistics
- General Reminder
- Shortage Report
- Supplier Vs Company
- Temporary Limit
- Shop QRID and eBusiness
- Cloud Backup Setup
- Password and Powers
- Marg Licensing
- Marg Setup
- Target
- Budget
- Credit Limit Management
- Change ERP Edition
- Ease Of Gst Adoption
-
Transactions
- ERP To ERP Order
- Sale
- Purchase
- Sale Return
- Purchase Return
- Brk / Exp Receive
- Scrap Receive
- Brk / Exp Issue
- Scrap Issue
- GST Inward
- GST Outward
- Replacement Issue
- Replacement Receive
- Stock Issue
- Stock Receive
- Price Diff. Sale
- Price Diff. Purchase
- BOM
- Conversion
- Quotation
- Sale Order
- Purchase Order
- Dispatch Management
- ERP Bridger
- Transaction Import
- Download From Server
- Approvals
- Pendings
- Accounts
- Online Banking
-
Books
- Cash and Bank Book
- All Ledgers
- Entry Books
- Debtors Ledgers
- Creditors Ledger
- Purchase Register
- Sale Register
- Duties & Taxes
- Analytical Summaries
- Outstandings
- Collection Reports
- Depreciation
- T-Format Printing
- Multi Printing
- Bank Reconcilation
- Cheque Management
- Claims & Incentives
- Target Analysis
- Cost Centres
- Interest and Collection
- Final Reports
-
Stocks
- Current Stock
- Stock Analysis
- Filtered Stock
- Batch Stock
- Dump Stock
- Hold/Ban Stock
- Stock Valuation
- Minimum Level Stock
- Maximum Level Stock
- Expiry Stock
- Near Expiry Stock
- Stock Life Statement
- Batch Purchase Type
- Departments Reports
- Merge Report
- Stock Ageing Analysis
- Fast and Slow Moving Items
- Crate Reports
- Size Stock
-
Daily Reports
- Daily Working
- Fast SMS/E-Mail Reports
- Stock and Sale Analysis
- Order Calling
- Business on Google Map
- Sale Report
- Purchase Report
- Inventory Reports
- ABC Analysis
- All Accounting Reports
- Purchase Planning
- Dispatch Management Reports
- SQL Query Executor
- Transaction Analysis
- Claim Statement
- Upbhogkta Report
- Mandi Report
- Audit Trail
- Re-Order Management
- Reports
-
Reports Utilities
- Delete Special Deals
- Multi Deletion
- Multi Editing
- Merge Inventory Master
- Merge Accounts Master
- Edit Stock Balance
- Edit Outstanding
- Re-Posting
- Copy
- Batch Updation
- Structure/Junk Verificarion
- Data Import/Export
- Create History
- Voucher Numbering
- Group of Accounts
- Carry Balances
- Misc. Utilities
- Advance Utilities
- Shortcut Keys
- Exit
- Generals
- Backup
- Self Format
- GST Return
- Jewellery
- eBusiness
- Control Room
- Advance Features
- Registration
- Add On Features
- Queries
- Printing
- Networking
- Operators
- Garment
- Hot Keys
-
GST
- E-Invoicing
- Internal Audit
- Search GSTIN/PARTY
- Export Invoice Print
- Tax Clubbing
- Misc. GST Reports
- GST Self-Designed Reports
- GST Return Video
- GSTR Settings
- Auditors Details
- Update GST Patch
- Misc. GST Returns
- GST Register & Return
- GST RCM Statement
- GST Advance Statement
- GST Payment Statement
- Tax Registers and Summaries
- TDS/TCS Reports
- Form Iss./Receivable
- Mandi
- My QR Code
- E-Way Bill
- Marg pay
- Saloon Setup
- Restaurant
- Pharmanxt free Drugs
- Manufacturing
- Password and Power
- Digital Entry
Home > Margerp > Erp Bridger > How to Import Multiple vouchers through ERP Bridger in Marg Software ?
How to Import Multiple vouchers through ERP Bridger in Marg Software ?
Overview/Introduction to ERP Bridger in Marg ERP Software
Steps to Create Method to Import Voucher in Marg ERP Software
Steps to Import Accounting Vouchers through ERP Bridger in Marg ERP Software
OVERVIEW/INTRODUCTION TO ERP BRIDGER IN MARG ERP SOFTWARE
- ERP Bridger is a tool developed by Marg and this tool can be used in import and export of data.
- The user can easily import data from other software to Marg if that software has a provision of data export.
- ERP Bridger is very useful to the ones who need to transfer their data from one software to another for accounting purposes, inventory purposes etc.
- The user can also import vouchers like receipt voucher, payment voucher etc through excel file to Marg.
STEPS TO CREATE METHOD TO IMPORT VOUCHERS IN MARG ERP SOFTWARE
- Firstly, Go to Masters > MARG Setups > Advanced Features > ERP Bridger- Import-Accounts.

- An 'ERP to Marg ERP 9+ Inventory' window will appear.
- The user will now select ‘Method’.

- An 'ERP to Marg ERP 9+ Inventory Method' window will appear.
- In the Name field, the user will enter the name for the method.
- Suppose enter ‘Sales’.
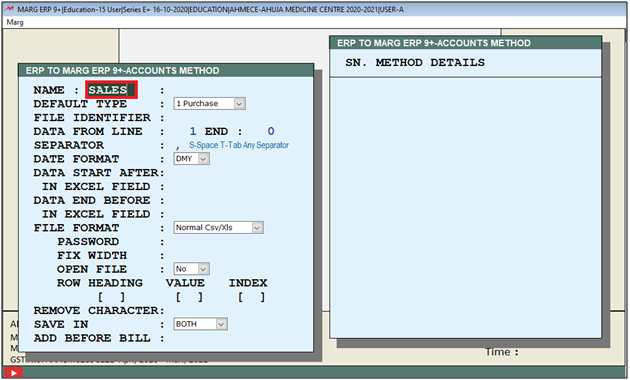
- An alert window will appear ‘Not found! Want to create!’, the user will click on ‘Yes’.

- In Default Type, the user will select the type for the method from the drop down.
- Suppose select ‘Sale’.

- In the excel sheet that the user needs to import, the user can view that the data starts from line 2.
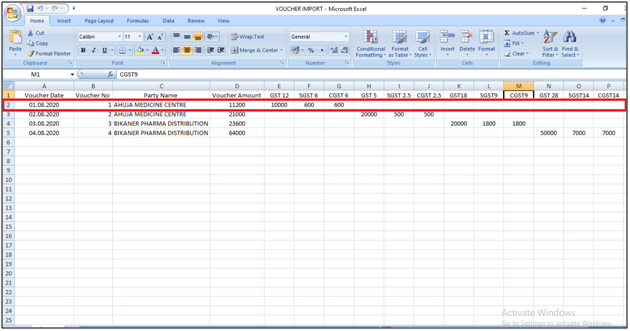
- So, in ‘Data from line’, the user will enter ‘2’.

- In 'Save In', the user needs to select whether the user needs to import the transaction in bill or challan.
- Suppose select 'Bill'.
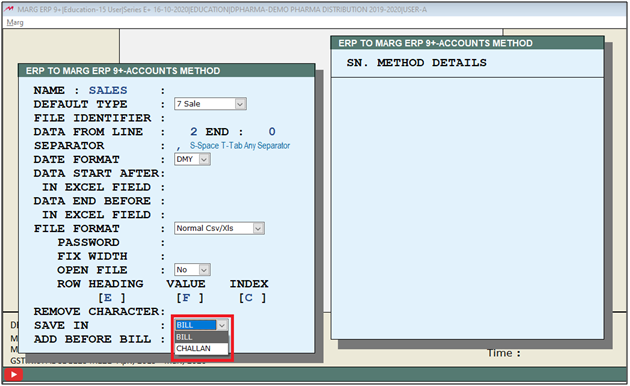
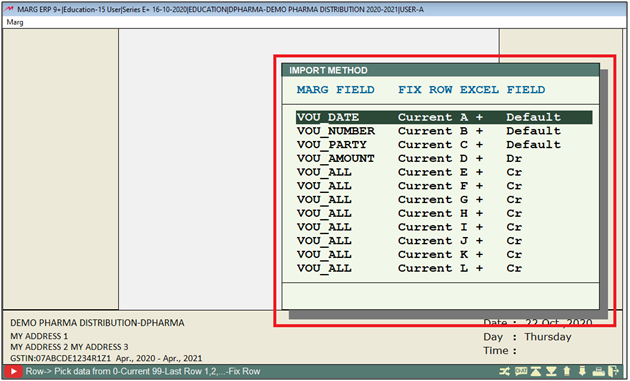
- An 'Import Method' window will appear. Press 'Enter' key.
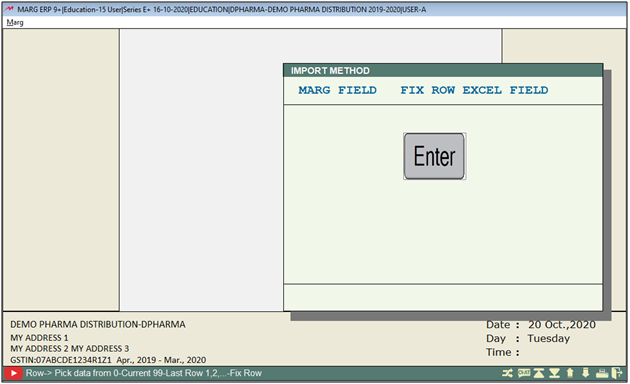
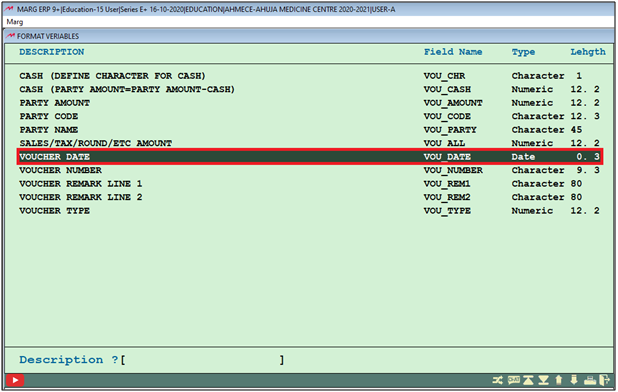
- A 'Format Variables' window will appear.
- The user will now search the heading to be imported from the Excel sheet.
- Suppose select Voucher Date.
- In the excel sheet, the user can view that Voucher Number is in column A.
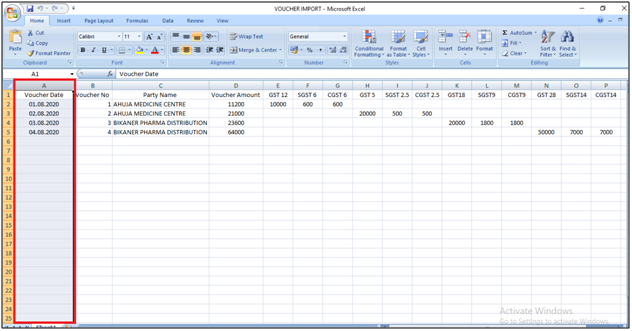
- Then, in the Import method window the user will enter ‘A’ in the Excel field.

- Similarly to import 'Voucher No' from the excel, select the command for it.
- Suppose select 'Vou_Number'

- Now mention in which column the excel sheet contain the voucher no.
- Suppose in our case it is in column 'B'.

- Similarly to import 'Party Name' from the excel, select the command for it.
- Suppose select 'Vou_Party' .
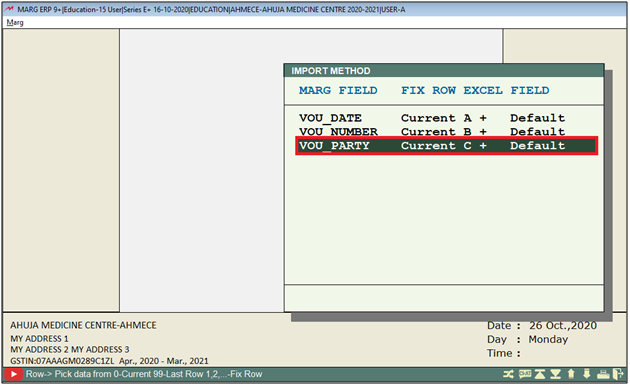
- Now to import 'Voucher Amount ' from the excel, select the command for it.
- Suppose select 'Vou_Amount' .
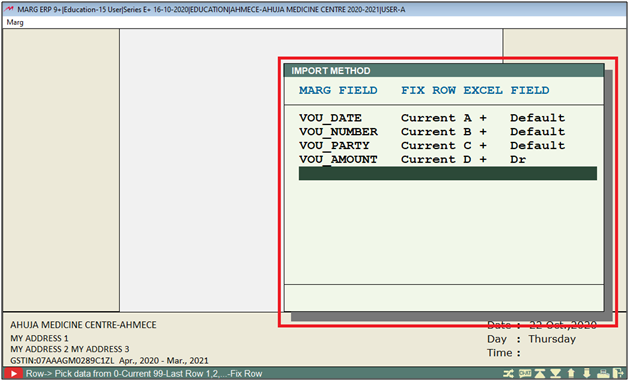
Important : To import the taxable amount of the sales i.e. 5%,12%,18%, user needs to use only one command i.e. 'Vou_All'.
Suppose the user needs to import the taxable amount of GST 5% then firstly select the command 'Vou_All'.
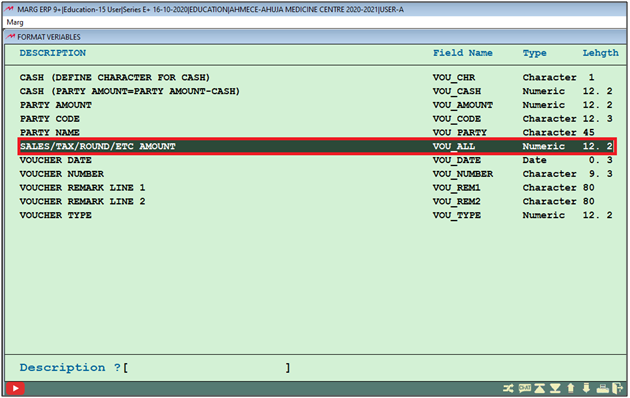
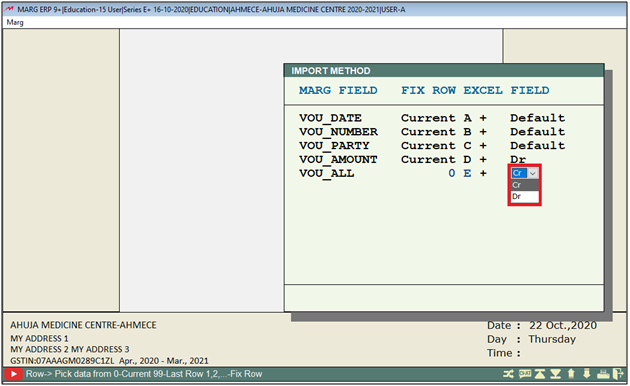
- Then select whether the taxable amount needs to credited or debited.
- Suppose in our case we are importing sales voucher then the user needs to select 'Cr'.
- Press 'Enter' key.
- Now a 'Ledgers' window will appear, select the sale tax ledger as per the requirement.
- Suppose select Local Sales 5%.
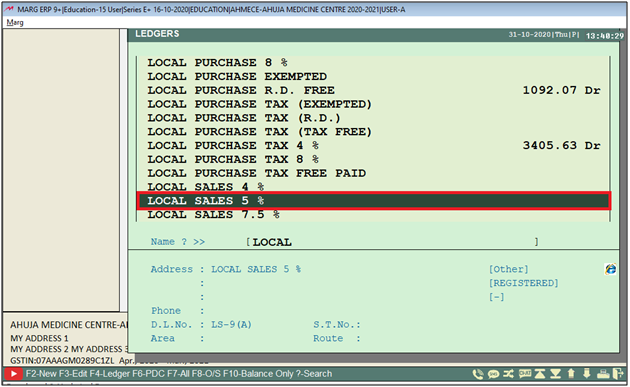
- Press 'Enter' key twice.
- Similarly, the user will select all the headings to be imported from the Excel sheet.
- Press 'Enter' key and then press 'ESC' key to save.
STEPS TO IMPORT ACCOUNTING VOUCHERS THROUGH ERP BRIDGER
- Go to Transactions > ERP Bridger > Import Accounts.
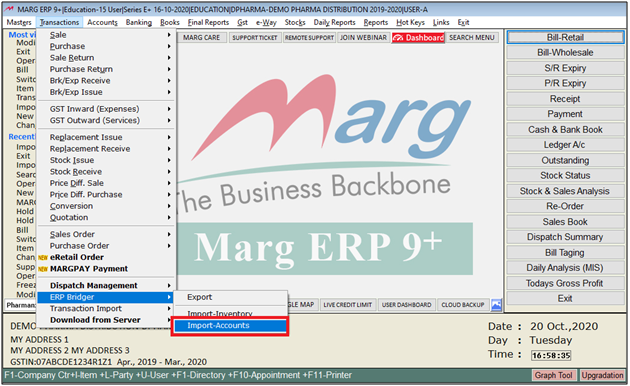
- A 'Copy Marg Help From' window will appear.
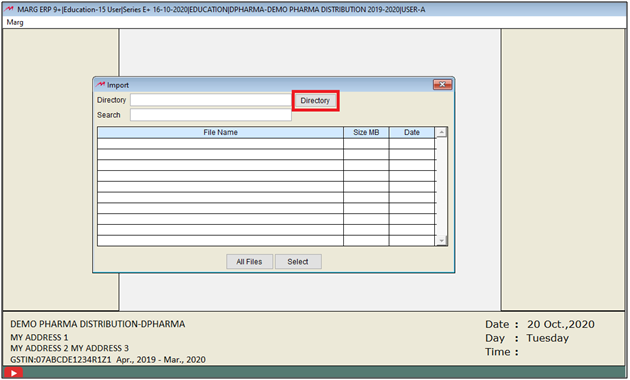
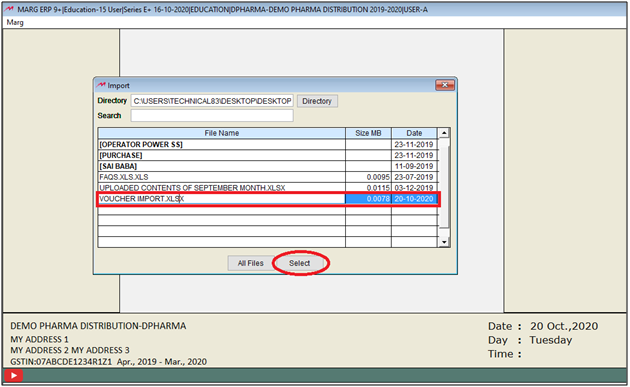
- The user will select a location from where the user needs to import the transaction.
- Then click on 'Select'.
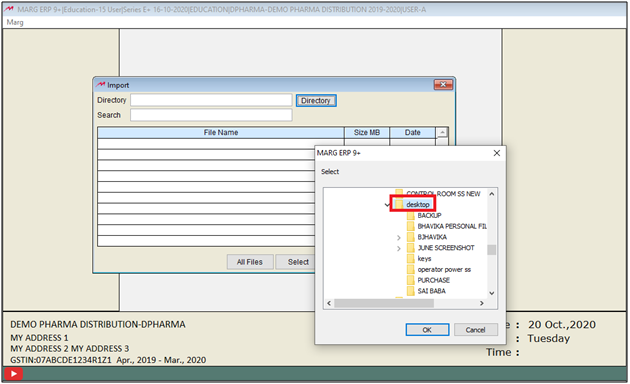
- Suppose select ‘Desktop’.
- Then select the file as per the requirement.
- Suppose select ‘Voucher Import.XLSX.
- Then click on 'Select'.
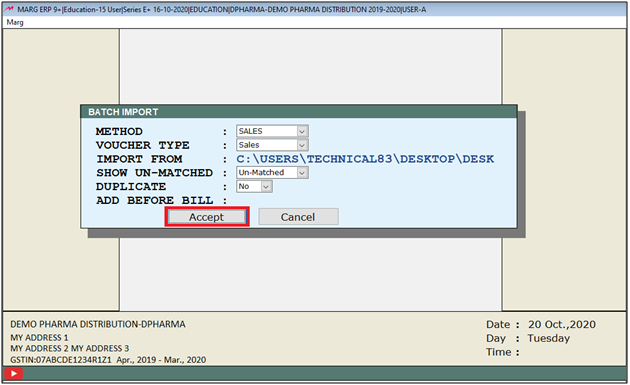
- Then click on ‘Accept’.
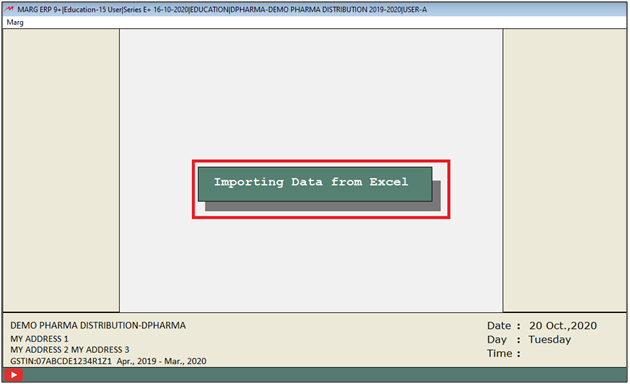
- Then the software will show that the file from the selected excel is being imported.
- A ‘Party Mapping’ window will appear. Here, the software has displayed the list of unmatched party details.
- To map the records, press 'Enter' key.
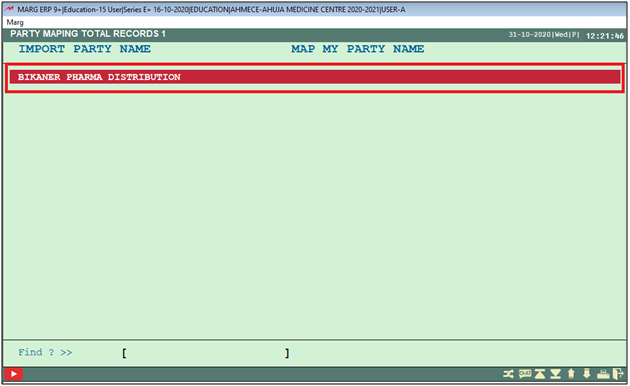
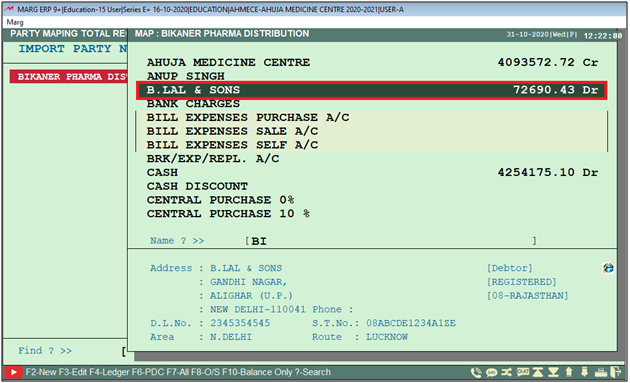
- A Software ledger window will appear.
- The user will now select the ledger to map.
- Suppose map ‘Bikaner Pharma Distribution’ with B.LaL & Sons.
- Now press 'ESC' key to proceed.

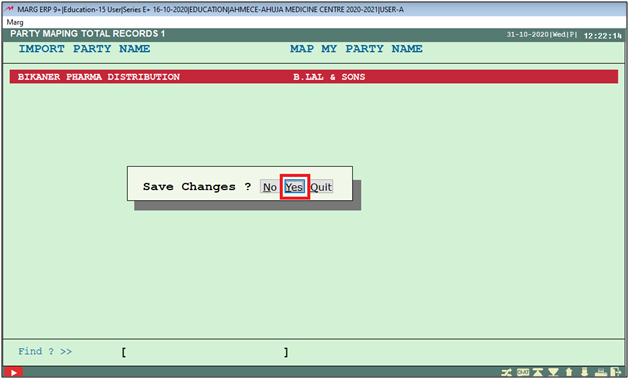
- Now select ‘Yes’ to save the changes.
- In the next window select ‘Accept’ to confirm the further process.

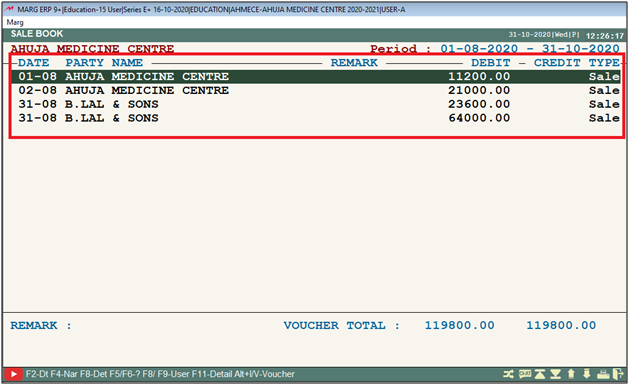
After following the above steps, the process will get done and all the vouchers (in excel) will get imported successfully into the software.
