

Welcome to  -
Marg ERP 9+
-
Marg ERP 9+
Home > Margerp > General Queries > How to create new company in Marg Software ?
How to create new company in Marg Software ?

Overview/Introduction of Company Creation in Marg ERP Software
Process of Company Creation in Marg ERP Software
Process of Company Alteration in Marg ERP Software
Process of Company Deletion in Marg ERP Software
OVERVIEW/INTRODUCTION OF COMPANY CREATION IN MARG ERP SOFTWARE
- The main purpose to create company is to start working in software and to maintain the basic or relevant details of the company during creation i.e. company name, address, branch code, GSTIN, business type etc. which allows it to automatically carry out the transactions as per defined information.
- With the help of creating new company in Marg, we can easily store information at one place.
PROCESS OF COMPANY CREATION IN MARG ERP SOFTWARE
Case1: If the user has installed the new setup
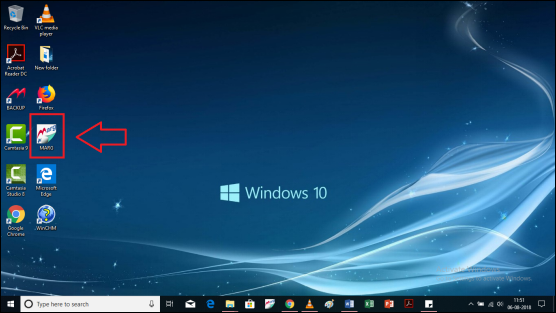
- Open Marg software from where it is installed.
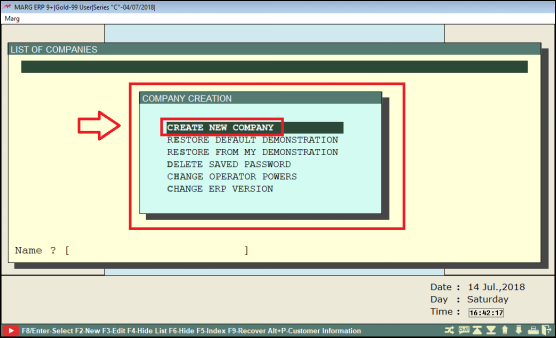
- The user will now press F2 key to create new company.

- A Company Creation window will appear. Select 'Create New Company'.
Case2: If the user has already created a company
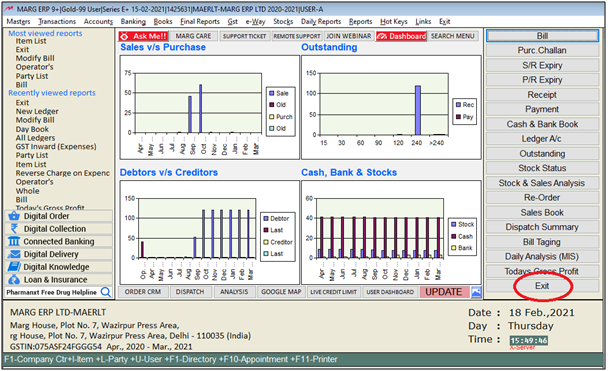
- Firstly, click on 'Exit' button on the main screen of the software.
- A List of companies window will appear. Press 'F2' to create new company.
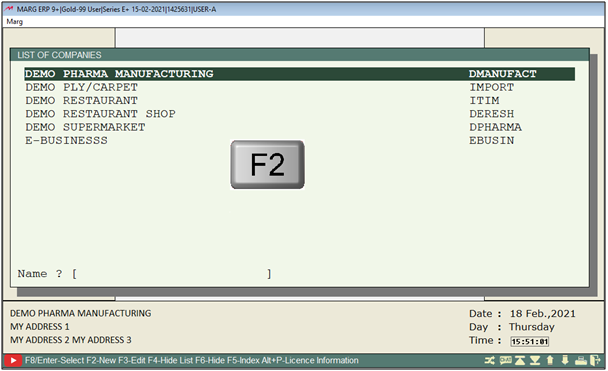
- Company creation window will get displayed.
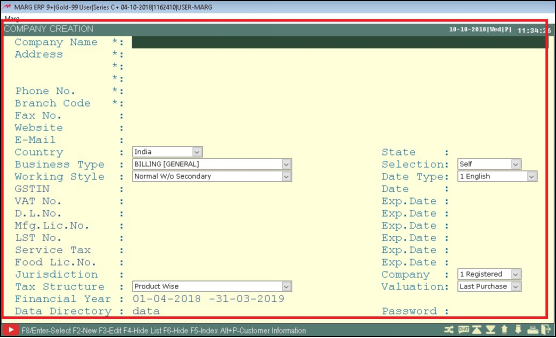
- Company Name - Mention the name of the company that the user wants to create. Suppose, enter Marg ERP Ltd.
- Address - Mention the address of the company. Suppose, enter Plot no. 7 Wazirpur, Delhi 110085.
- Phone No. - Mention the contact details of the company. Suppose, enter 9999999999.
- Branch Code - Marg ERP Software provides an easy way for the company having multiple offices and branches to handle the accounting process by segregating branch codes. The software usually auto picks the branch code from the company name entered. Whereas the user can also specify location of the branches. Example for Delhi DEL, Mumbai MUM etc. Suppose, enter DEL for Delhi. For example, there are 4 branches in Delhi like in Daryaganj, Laxminagar, Wazirpur, Pulbangash then the user can specify that code too.
- Fax No. - Mention the fax number of the company.
- Website - Mention the name of the company’s website.
- Email id - Mention the email id of the company. Suppose, enter info@margcompusoft.com.
- Country – After pressing enter on e-mail id, the user can view a drop down of country fields. By default the country name is India nut the user can also change as per the requirement.
- State code - On basis of Country, the software will automatically pick state code. Also, in the right side of screen the user can see state codes list and can also select according to list e.g. Delhi 07, Chandigarh 04 etc. The software can also auto pick state code on the basis of GSTIN number.
- Business Type - The user would define business type as per the nature of the business. Suppose the company trades in publishing then select books and if company trades in pharma then select Chemist/ pharmacy. Suppose now select pharmacy.
- Selection - This option is used in purchase bill and sale bill. Select billing option as self, fifo or manual.
- Working style - Working style is used where batch wise inventory is maintained and secondary stock is used as well. If want to maintain inventory without identification of lot no., then select normal without secondary option and if the user needs to record inventory lot wise and with the identification of batch no., mrp, size, s.no ,then select secondary. Eg. in footwear/garment industry inventory is maintained size wise and color wise thus in such cases the user will select secondary.
- Date type - The user would select the calendar followed in business like English calendar, Bikram samvad , Afghan calendar. Suppose, select English calendar.
- GSTIN - If the company is registered under GST then the user needs to fill 15 digits unique identification number here. Then a pop up will be displayed at the top right of the state code. Here, 07 Delhi.
- VAT No. - If the company is registered under GST then VAT is not applicable for that company. If required the user can edit.
- Expiry date - Mention the expiry date of VAT no. if required.
- D.L. No. - If the company deals in pharma industry then enter drug license number.
- Expiry date - Mention the expiry date of the drug license number.
- Mfg. Lic. No. - If the company carries manufacturing license number then mention it here else leave this option blank. Mfg. Lic. No. Is editable.
- LST No. - Mention the Local sales tax number here and if company doesn't have LST but has TIN no. then the user can also change it to tin no.
- Expiry date - Mention the LST/TIN expiry date here.
- Service Tax - If the company has a service tax number, then mention it here.
- Expiry date - Mention the expiry date of the service tax number.
- Food licence - If the company has a food license number, then mention it here.
- Expiry date - Mention the expiry date of the food license number.
- Jurisdiction - Mention the city to which the company belongs. Suppose, enter Delhi.
- Company - 3 options come under Company i.e. registered, composition and un-registered. Select the option as per the requirement.
- Tax structure - Select tax structure that needs to be calculated either bill wise or product wise.
- Valuation - With help of this, the user can value stocks on the basis of various methods like last purchase, avg rat or self feeding method.
- Financial year- Mention the financial year as per accounting financial year.
- Data directory - The user would put the path or location where the data needs to be saved. When the user installs Marg software, user will find data folder by default under Marg software folder where all files related to software will be saved. The user can change the location as well if required.
- Password - If the user wants to create a company password protected, then put password here.

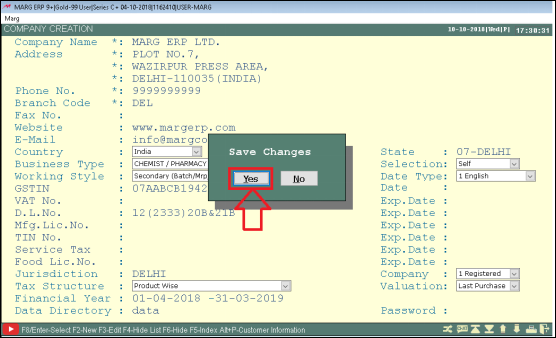
- After completion of all necessary options, press Enter and then click on 'Yes' to save the changes.
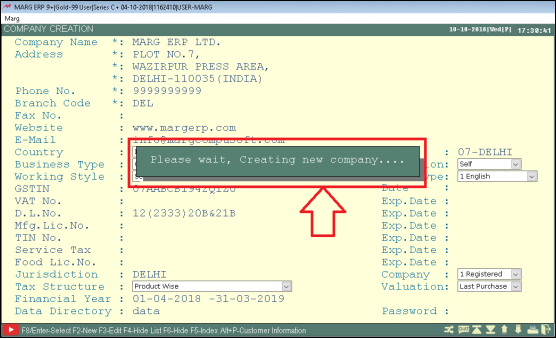
- The user can now view the alert message ‘Please wait, Creating new company....’
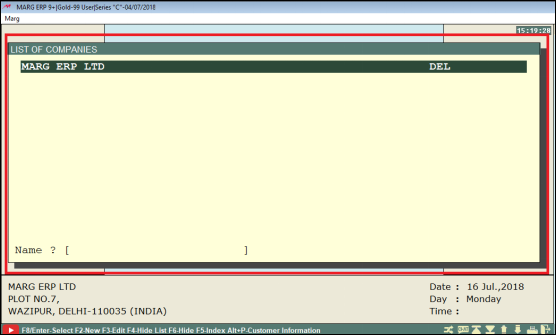
- In the List of Companies window, the user can view that the company has been created.

PROCESS OF COMPANY ALTERATION IN MARG ERP SOFTWARE
- In case the user has missed to add information or wrongly put any information while creating company then the user can modify the company details.
- Select company from this window to modify then press 'F3' on it.
- A window of company alteration will appear in which the user can make the changes as per the requirement.
- Then press 'Ctrl+W' to save the changes.
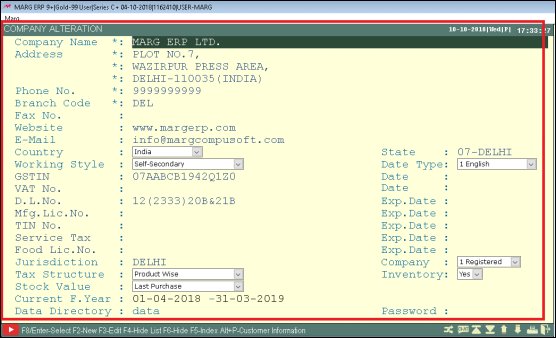
- Once the changes are done save by pressing enter key.
PROCESS OF COMPANY DELETION IN MARG ERP SOFTWARE
- Select company to delete from the list of companies. Press enter. Suppose enter on Marg ERP Ltd.
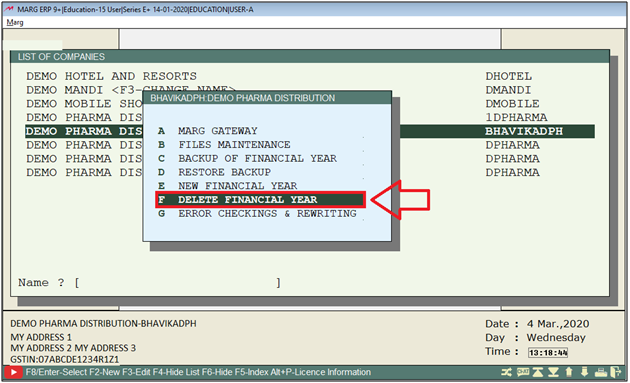
In order to delete financial year, the user needs to follow the given steps:
- Go to List of Companies > Press 'Enter' or 'F8' key on the selected company.
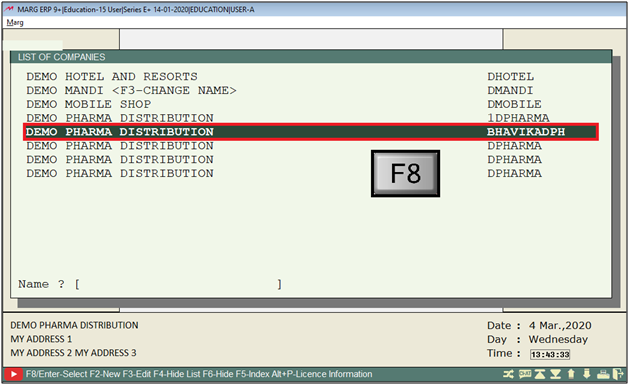
- A Selected Company window will appear.
- The user will select 'Delete financial Year'. Press Enter.
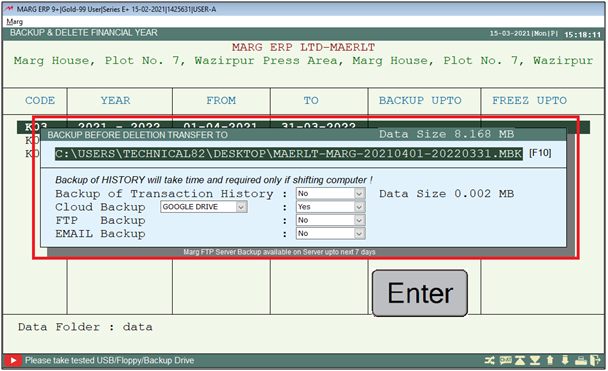
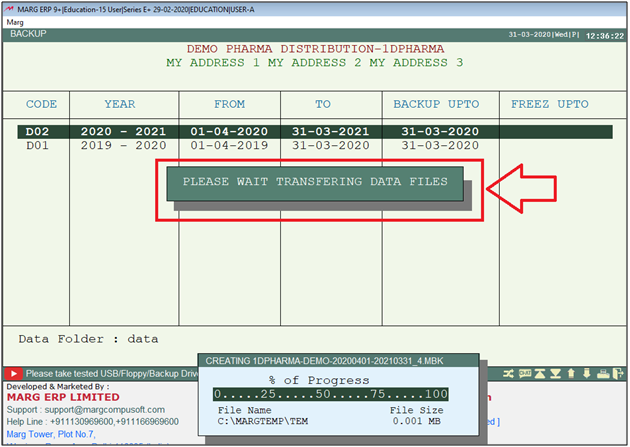
Note : At the time of deleting financial year software automatically asks for financial year backup to save the data and if in case user needs to restore the deleted financial year so this can be done easily.
- A Backup Before Deletion Transfer to window will appear.
- Now the software will automatically pick the path of the backup where the user have taken the backup previously, however if user needs to change the path of the backup then simply user needs to press F10 key on it.
- Then the user will keep pressing Enter on this window.
-
Thereafter the software will start transfer the backup file to selected the location.
- An alert of Confirmation 'Are you sure' , type 'Delete' will appear.
- Now the user will type ''DELETE". Press Enter.
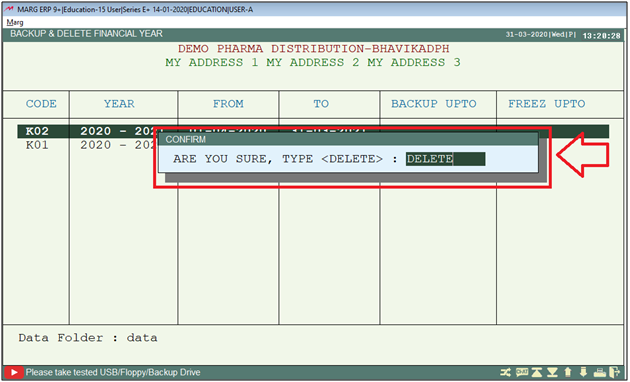
After following the above steps, the financial year will get deleted.

In This Page


