

Welcome to  -
Marg ERP 9+
-
Marg ERP 9+
Home > Margerp > Gui Format > Whole process of Invoice Format 99 in Marg Software
Whole process of Invoice Format 99 in Marg Software

Overview of Invoice Format 99 in Marg ERP Software
Parameters to design Invoice Format 99 in Marg ERP Software
Process of Invoice Format 99 in Marg ERP Software
OVERVIEW OF INVOICE FORMAT 99 IN MARG ERP SOFTWARE
Invoice Format 99 is designed on GUI i.e. Graphical User Interface pattern.
With the help of using Invoice Format 99 in Marg ERP Software, the user can design the format of an invoice as per the requirement from the customers as Multi default Invoice Samples are already being predefined which helps to minimize the customization time and reduces the manpower cost.
PARAMETERS TO DESIGN INVOICE FORMAT 99 IN MARG ERP SOFTWARE
- The user will select the page size to design the Invoice Format like A4, A3, A5, Legal Paper or Letter paper.
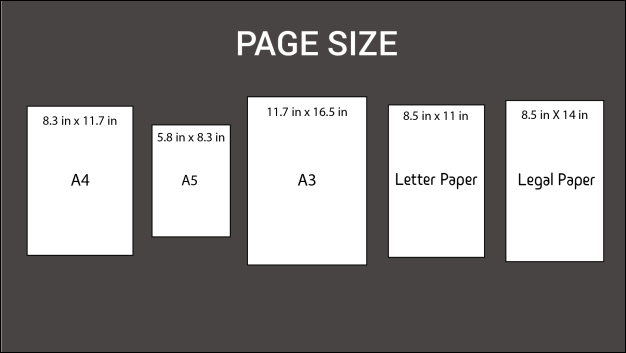
Fig A. Display of Page Size
- The user can view the width and size of these papers is displayed.

Fig B. Display of Different Page Size
- If the user is designing A4 size invoice format in Marg Software then the width and height used is 777px*1065px i.e. from left to right it is 1 to 777px and from top to bottom it is 1 to 1065px.
- The user should note that in these pixels there can be height and width wise variation.
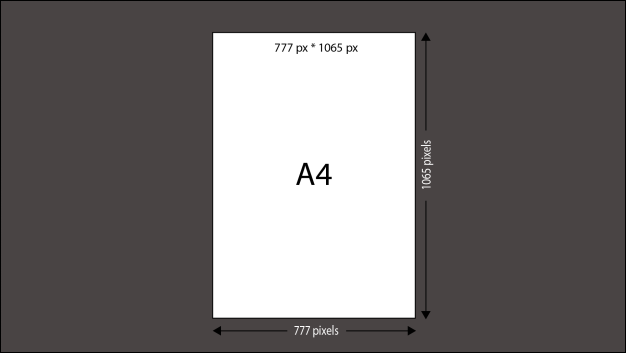
Fig C. Display of A4 size format
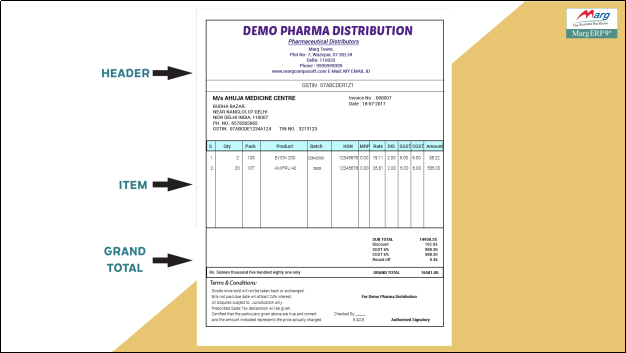
- The Invoice is designed in 3 parts i.e. Header, Item & Grand total.

Fig D. Display of Invoice
PROCESS OF INVOICE FORMAT 99 IN MARG ERP SOFTWARE
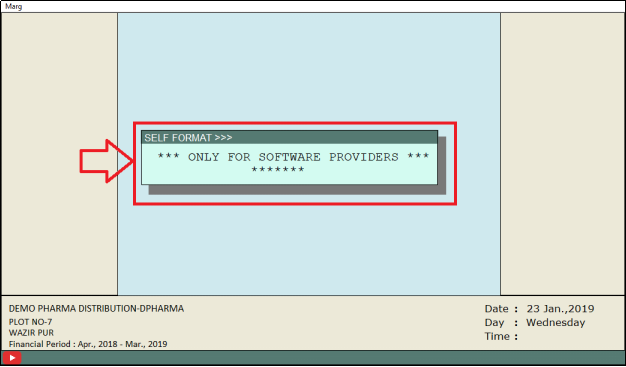
- Firstly, Go to Masters > MARG Setups > Self Format. Press Enter.

- A Self Format dialog box will appear. The user will now enter the password.
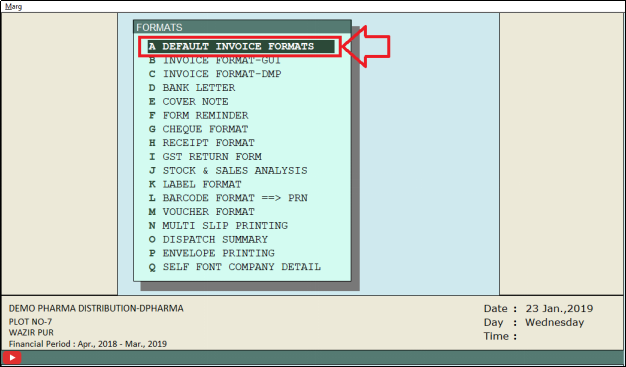
- Now, a Formats window will appear.
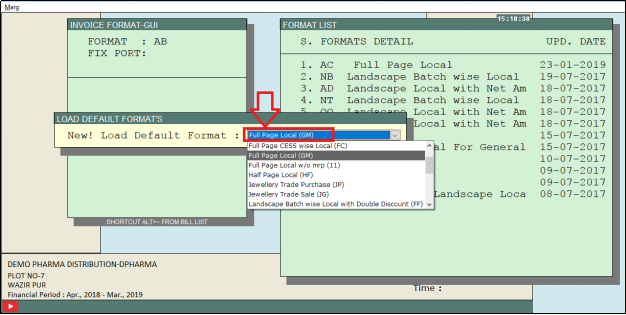
- The user will select Invoice Format- GUI. Press Enter.

- An Invoice Format- GUI window will appear.
- In ‘Format’, enter the name of the format the user wants to create. Suppose, the user enters “AB”. Press Enter.

- A Load Default Formats window will appear.
- The user will select the type of the format to be created.
- Suppose, select ‘Full Page Local (GM)’. Press Enter.
NOTE: The user should remember that after creating the new format, the user will set this format as ‘Default’ so that the whenever the user would generate the preview, it will be seen of this format.
To set the new format as Default:
- The user will now press Escape key.
- Then from the Formats window, the user will select ‘Default Invoice Formats’. Press Enter.
- A Default Invoice Formats window will appear.
- In ‘Default Invoice Format No.’ the user will select ‘GUI’. Press Enter.

- Now in ‘Name’ the user will select the new format created. Suppose, select ‘AB Full Page Local’.

- The user will now press Page down key and then select ‘Yes’ to save the changes.

Now as the user will create this invoice format:
- The company details, Party details, Vertical Columns and Column Headings will be created in the ‘Header’ part.
- S.no and Item values will be created in the ‘Item’ part.
- Grand Total, Terms & Conditions will be created in the ‘Grand Total’ part.
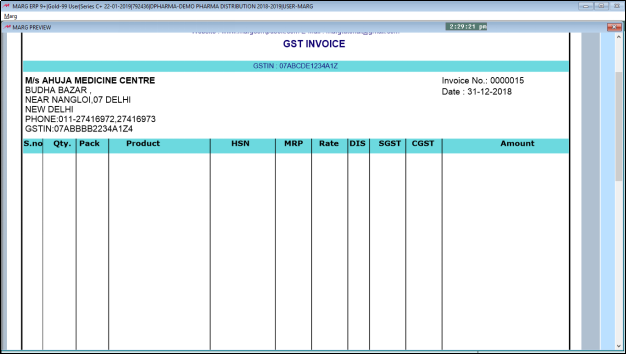
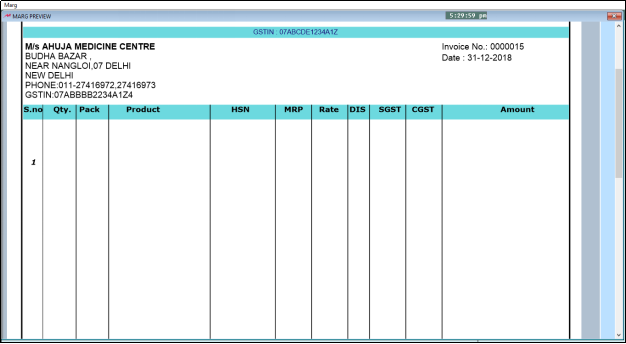
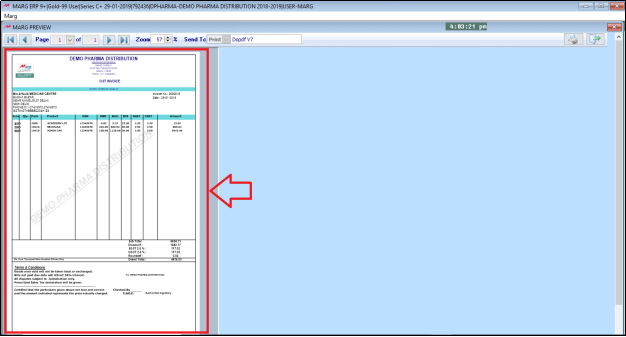
- The user can now view the Sample invoice which is to be created.
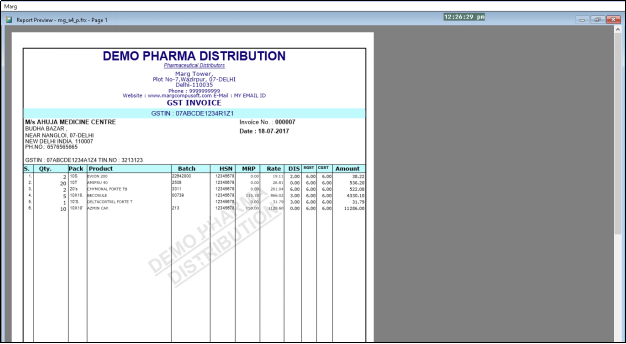
Fig I Sample Invoice
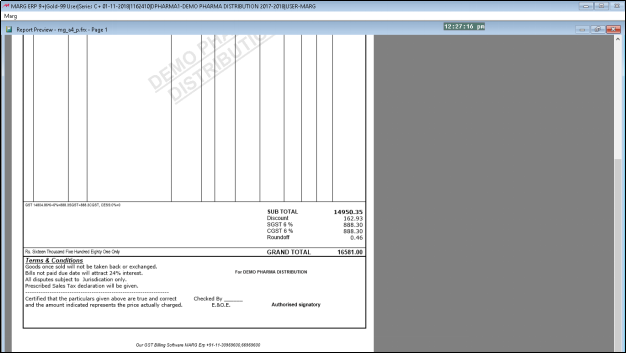
Fig II Sample Invoice
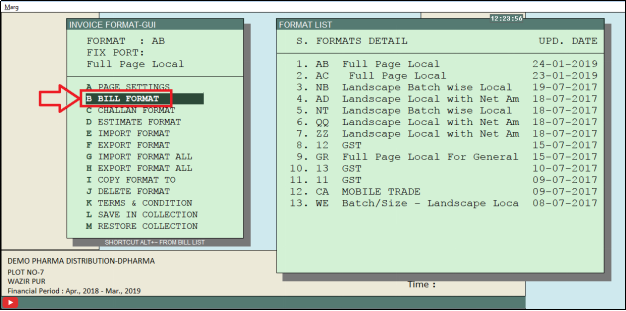
- Now, again from the Formats window, the user will select ‘Invoice Format- GUI’. Press Enter.

- An Invoice Format-GUI window will appear.
- The user will now select ‘Bill Format’. Press Enter.

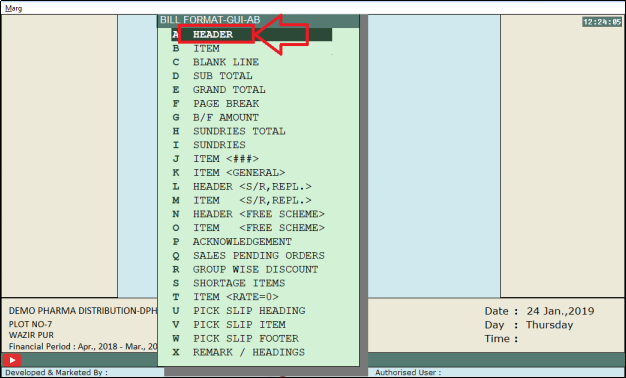
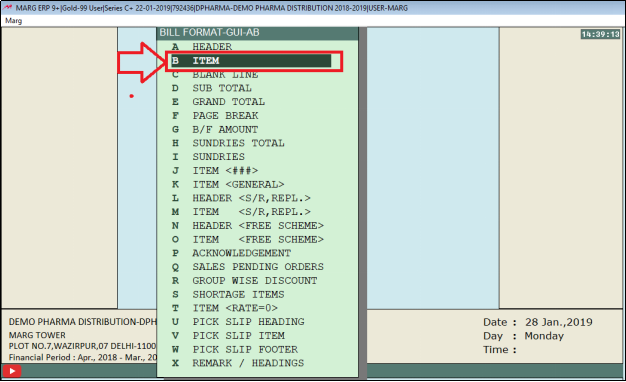
- A Bill Format GUI- AB window will appear.
- To create the Header part, the user will select ‘Header’. Press Enter.
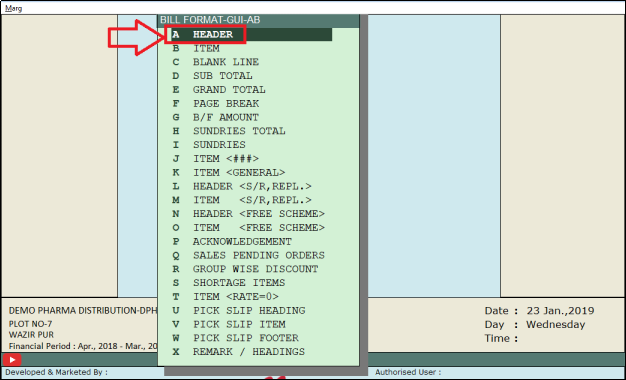
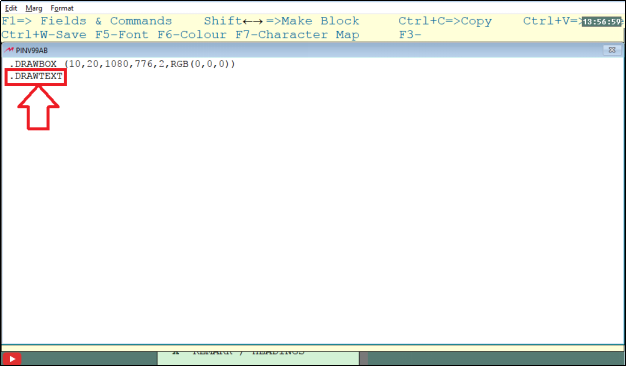
NOTE: When the new format is to be created, the default code is displayed. To create your own format, the user will remove the default code.
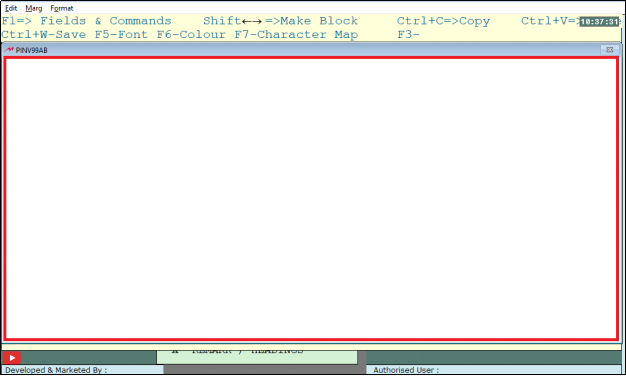
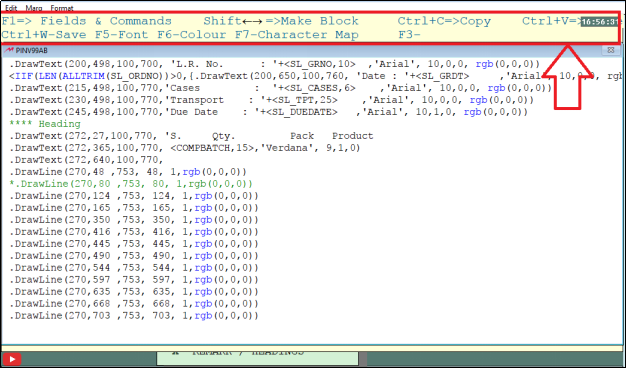
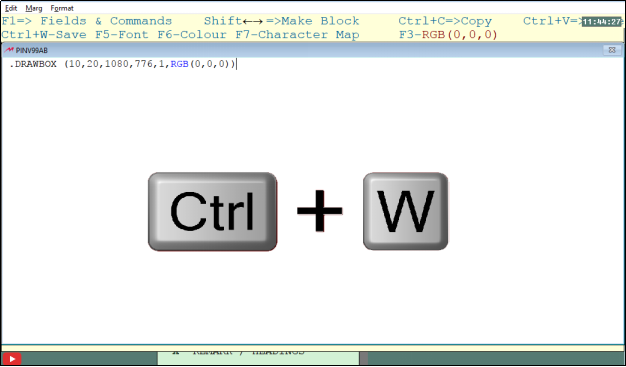
- The user can view that shortcut keys are displayed which can be used to design the invoice format. Like, F1 key is used for Fields and Commands and F3 key is used to paste the commands and Ctrl+W is used to save.
- The user can view that an outer box is created.
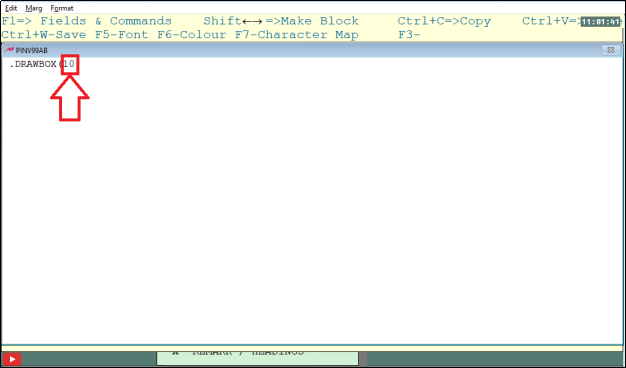
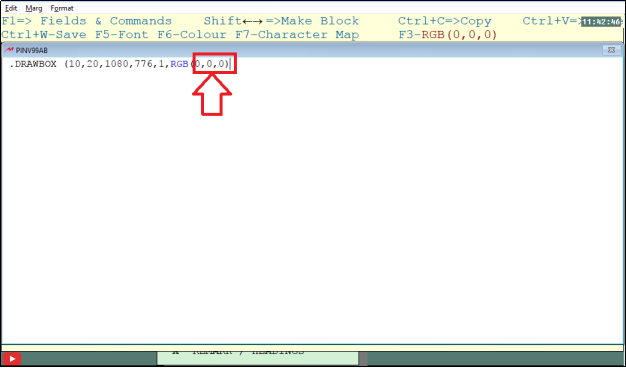
- To create the Drawbox, the user will enter the command ‘.DRAWBOX’.
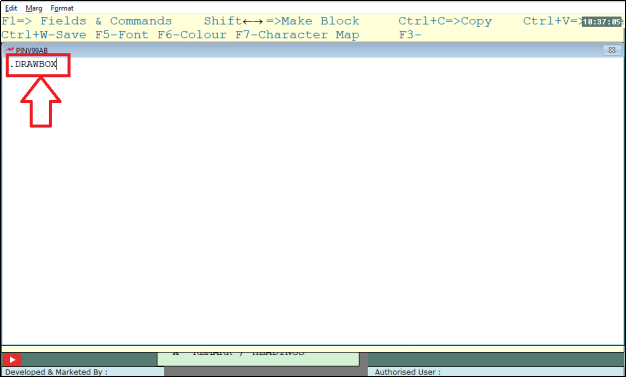
- The user will now open the bracket as ‘(‘.

- Then in Drawbox, the user will define four coordinates i.e. top, left, bottom, and right.
NOTE: These coordinated are to be defined anti-clock wise and their sequence should always remain the same.
- Now, firstly the user will define that the box should be created after leaving how many margins from the top. Suppose, enter ‘10’.
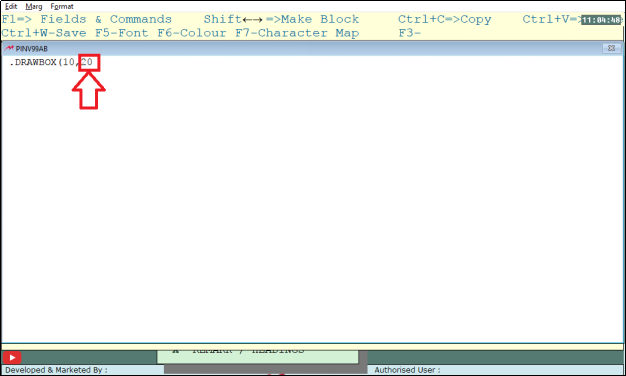
- Then the user will enter the value that the box should be created after leaving how many margins from the left. Suppose, enter ‘20’.
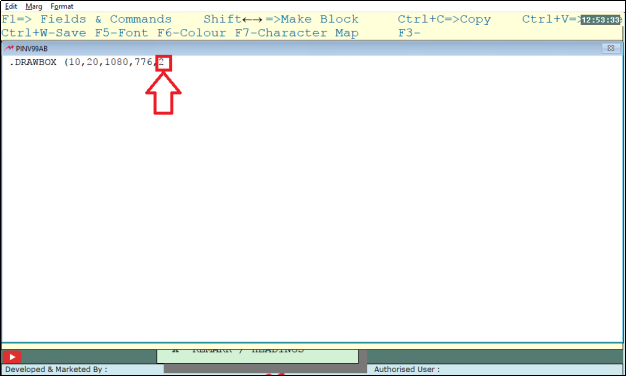
- Now the user will define that the box should be created after leaving how many margins from the bottom. Suppose, enter ‘1080’.
- Similarly, the user will define that the box should be created after leaving how many margins from the right. Suppose, enter ‘776’.

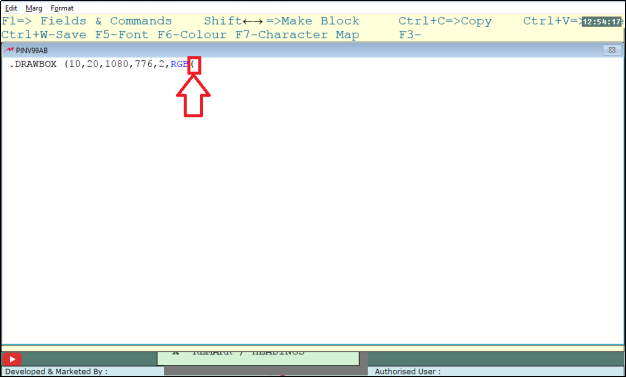
- The user would now define the outline of the box. Suppose, enter ‘2’.
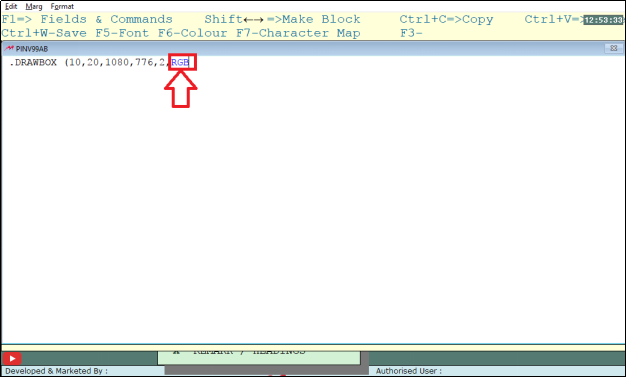
- Then for the outline, the user will define the color.
- So, for this the user will firstly enter “RGB” which stands for Red Green Blue.
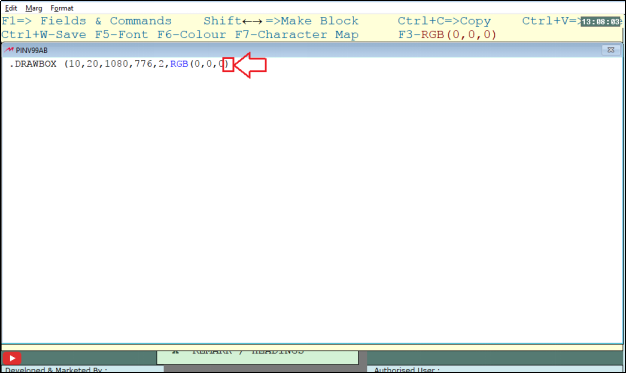
- The user will now open the bracket as ‘(‘.
- Now suppose the user wants that the outline color of the box should be black then define the values in RGB as (0, 0, 0).

- The user will now close the bracket as ‘)’.
- Suppose, if the user wants some other color then press F6 key.
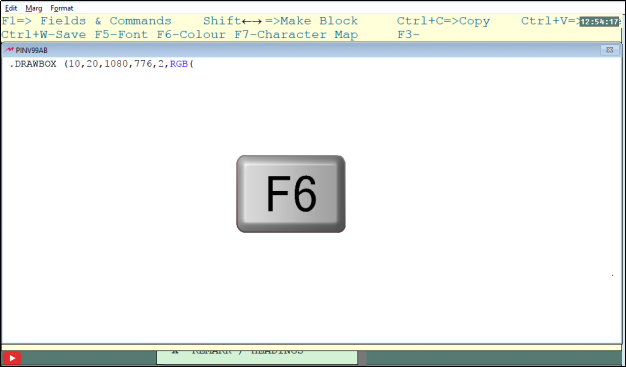
- A Color box will appear.
- The user will now click on ‘Define Custom Colors’.
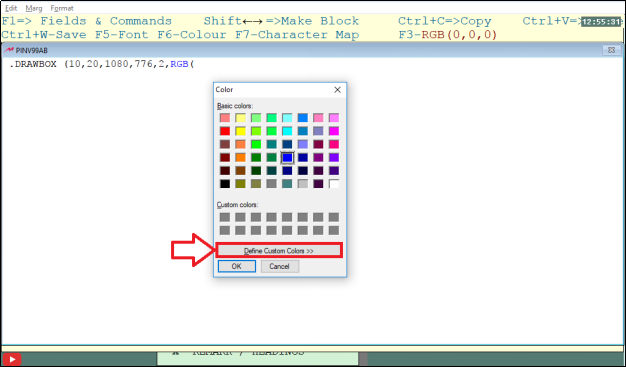
- Now the user can select any color for the outline. Whichever color the user will choose, the RGB values will be displayed.

- The user can manually enter the value in the RGB part.
- Then the user will close the RGB bracket as “)”.
- Again, the user will close the bracket that was opened in the beginning.

- To see its preview, the user will press Ctrl+ W key.
- Then the user will enter on ‘Save’.
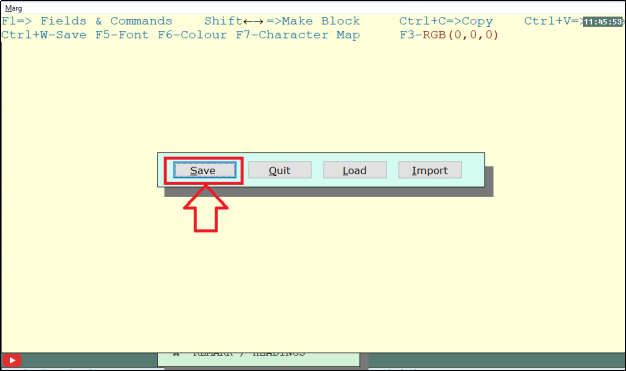
- Now press Escape key.
- From the main window, the user will click on ‘Sales Book’.
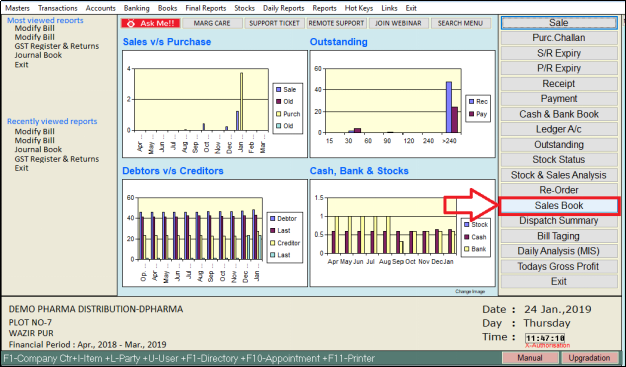
- A Modify window will appear. The user will keep pressing enter key.

- A Sales Book window will appear.
- The user will now select the party and then press Enter key.

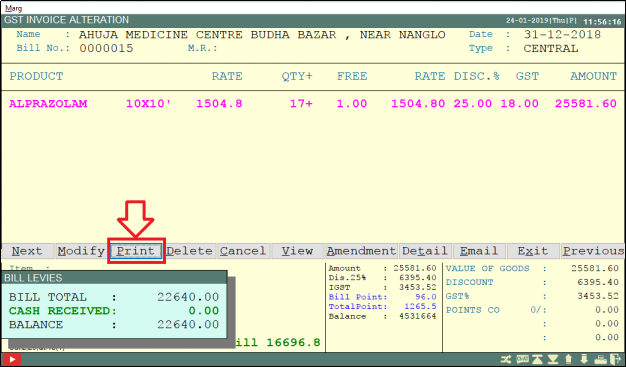
- A GST Invoice Alteration window will appear.
- The user will now click on Print to see the preview.
- Now it can be seen that the format which the user had set in the default invoice format is displayed here.
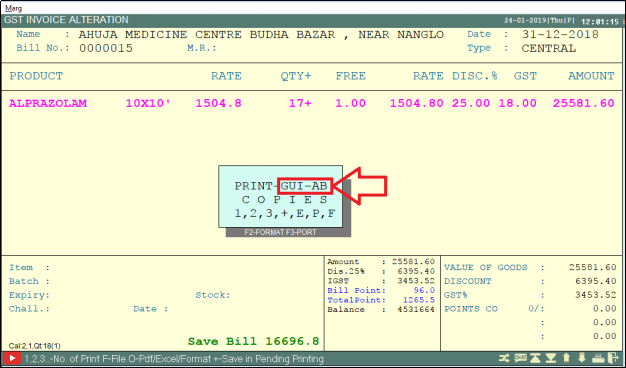
- To see the preview, the user will click on ‘F’ key.

- The user can view that the box has been created and the top, left, bottom & right margins have been created as specified.

- Similarly, the user can view that the outline is also thick as per the defined value.

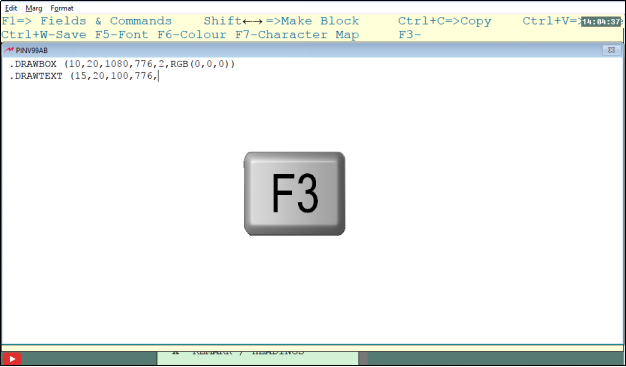
- Now to go to invoice format the user will press Alt+ ~ from the Sales Book window.

- Now the user will now select ‘Bill Format’. Press Enter.
- A Bill Format GUI- AB window will appear.
- The user will select ‘Header’. Press Enter.
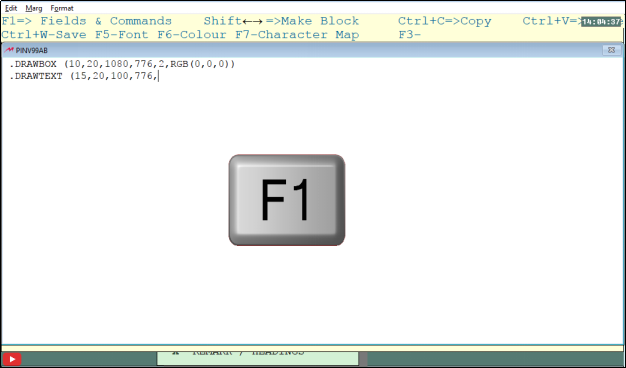
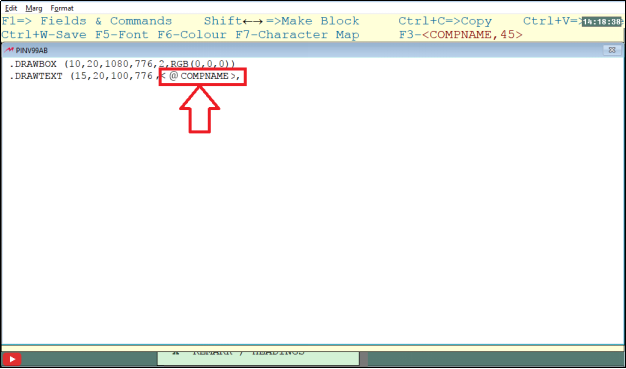
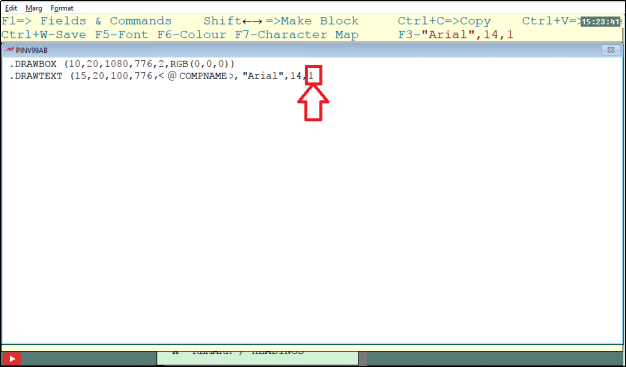
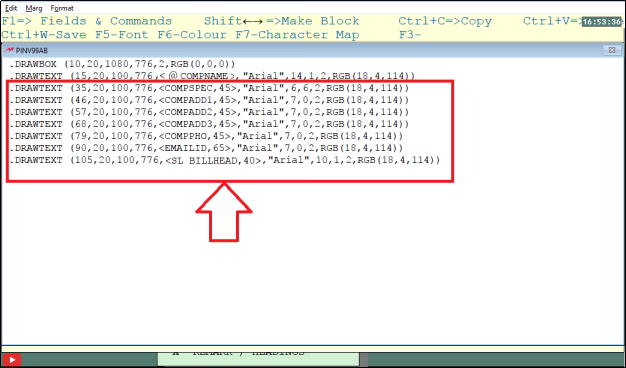
- Now, as the Company Name is in text format, so to write text the user will enter the command ‘.DRAWTEXT’.
- The user will now open the bracket & similar to .drawbox command the user will define the top, left, bottom, right coordinates.

- Now the user will press F1 to select the company name.
- A Format Variables window will appear.
- The user will select ‘Main Company Name’. Press Enter.
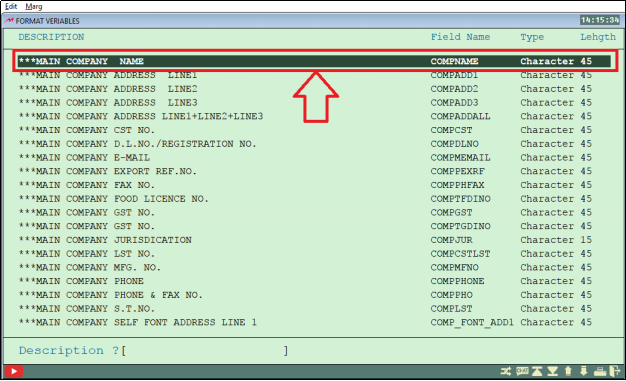
- To paste the command, the user will press F3 key.
- Here in the company command, the user can view “45”. 45 here is the character length i.e. when the company name will be printed on the invoice then maximum 45 characters of that company’s name will be printed in which spaces will also be included.
- The user can also change the character length as per the requirement.

- If the user removes 45 and adds ‘@’ before ‘COMPNAME’ then the software will automatically adjust the text.
- Now to define the font, the user will press F5 key.
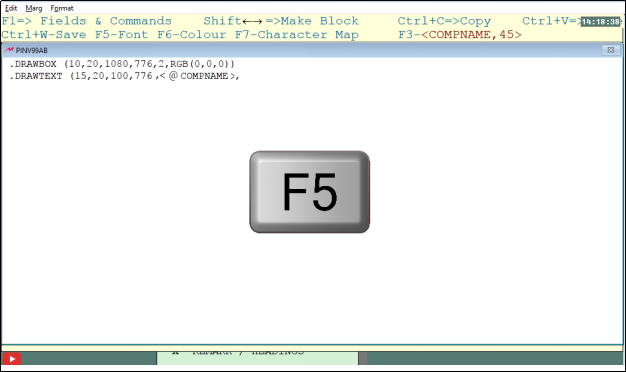
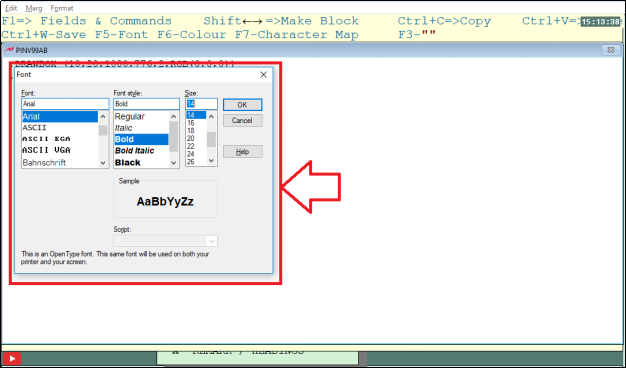
- A Font Box will appear.
- The user will now select the Font, Font Size and Font Style according to the requirement and then click on Ok.
- The user will now press F3 key.

- The user can now view that the selected Font, Font Size and Font Style is displayed.
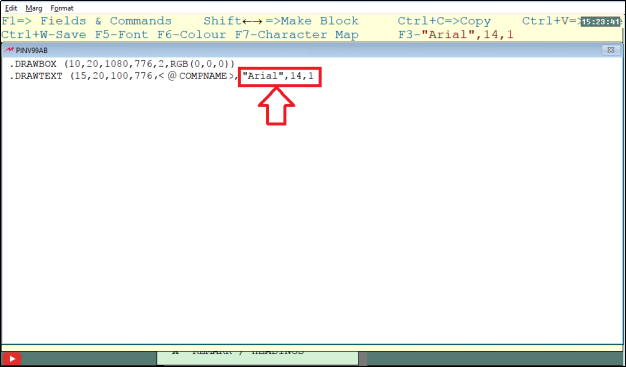
- Here, ‘1’ is connoted for bold text.
- Whereas, 0 is indicated for Normal text, 2 for Italic text, 3 for Bold Italic text, 4 for u=Underlined text, 5 for Bold Underline text, 6 for Italic Underline text and 7 for Bold Italic Underline text.
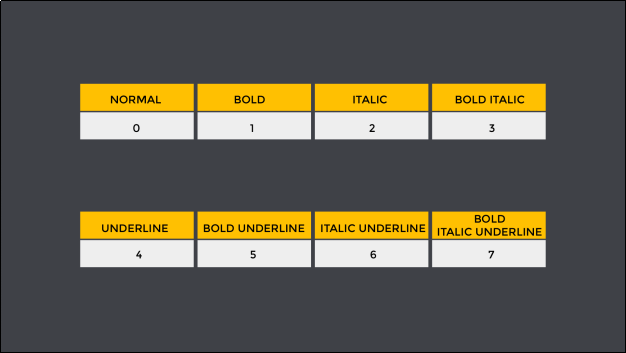
Fig E. View of Fonts
- For center alignment, the user will now set ‘2’.
- Now for text alignment ‘2’ is indicated for Center alignment.
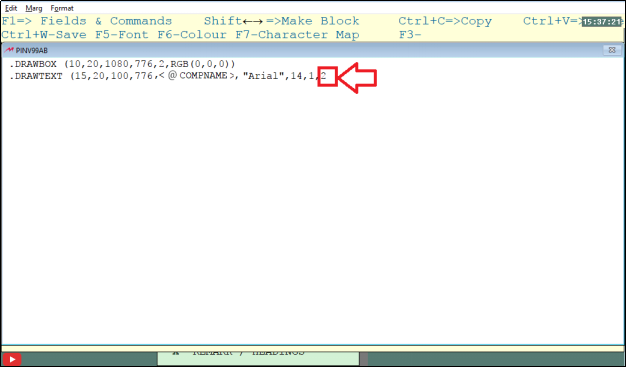
- Whereas, ‘0’ is for Left Align, ‘1’ is for Right Align and ‘3 is for Full Align.
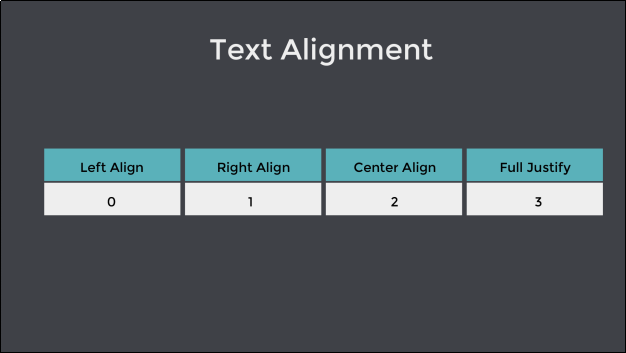
Fig F. Display of Text Alignment
- The user will now select the RGB values for the text color.

- Now the user can now see its preview.

- Similarly, the user will now enter the other company details.
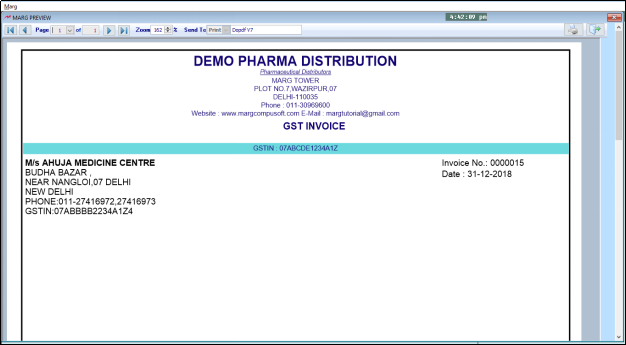
- In the sample invoice (Fig I), the user can view the trade specialization as ‘Pharmaceutical Distributors’.
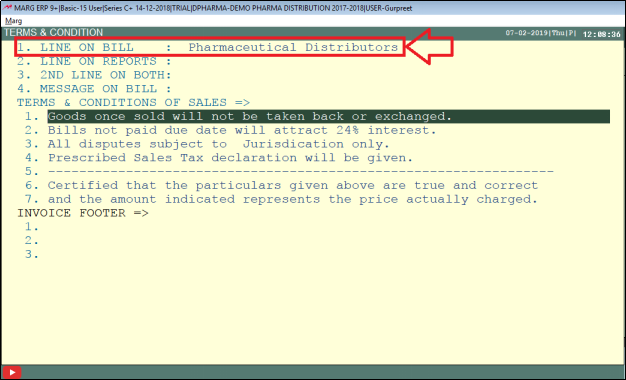
- If the user wants to change the trade specialization then from the Invoice Format-GUI window, the user will select ‘Terms & Conditions’.
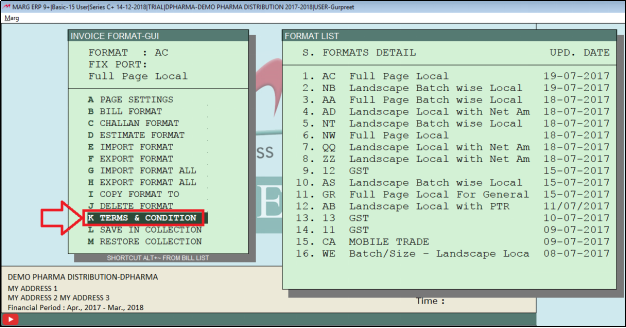
- A Terms & Condition window will appear.
- Now in ‘Line on Bill’, the user will enter any line that the user wants to write on bill.
- Also, if the user does not want to write anything then it can also be left blank.
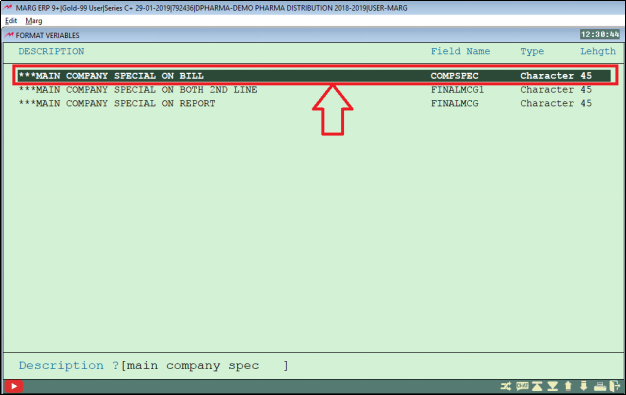
- To specify the command for Trade Specialization, from the Format Variable window the user will select ‘Main Company Special on Bill’. Press Enter.
- Then in the sample invoice (Fig I) the user can view that the Address is printed in 3 different lines.
- The user will now use 3 different commands as ‘COMPADD1’, ‘COMPADD2’ and ‘COMPADD3’.

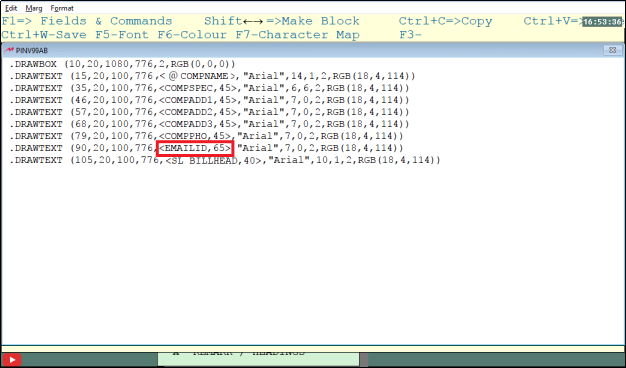
- Now to specify command for Phone number, the user will use command ‘COMPPHO’.

- Next, to specify the command for E-mail, the user will use command ‘EMAILID’.
- In the sample invoice (Fig I), the user can view the heading ‘GST Invoice’.
- To set this heading, the user will select the command ‘Heading of Bill/Challan’

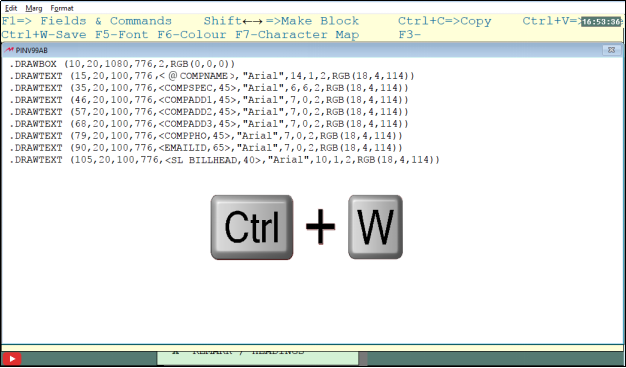
- The user will press Ctrl+W to save.
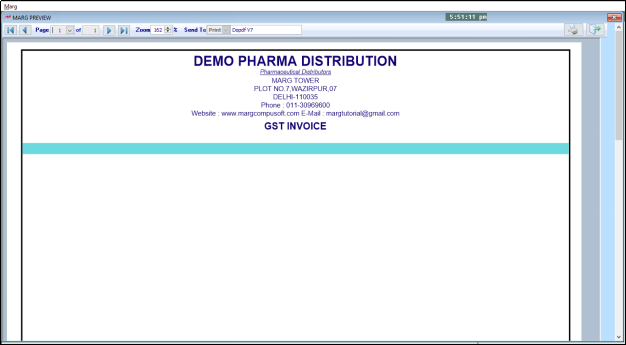
- Now in the preview, the user can view that the company details are printed.

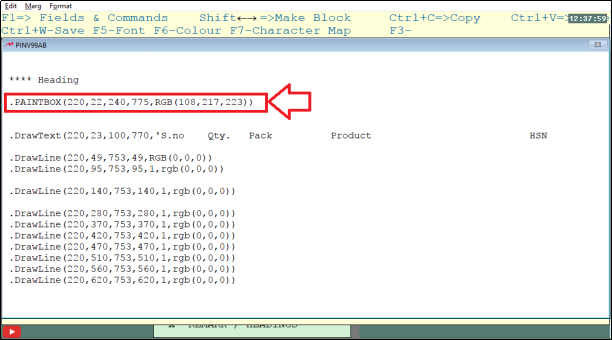
- In the sample invoice (Fig I), the user can view a colored box.
- To draw this box, the user will enter ‘.PAINTBOX’.
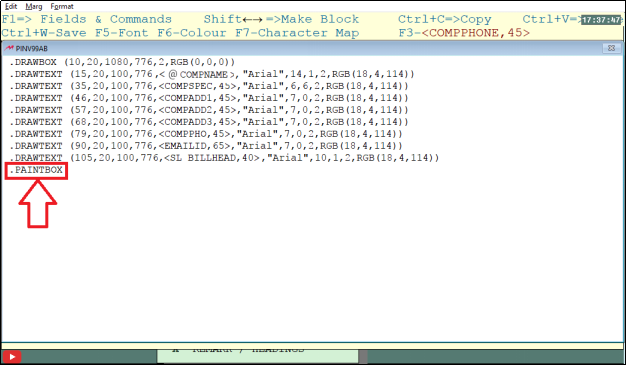
- The user will now open the bracket & similar to .drawbox the user will define the top, left, bottom, right coordinates.

- Then the user will define the RGB values.
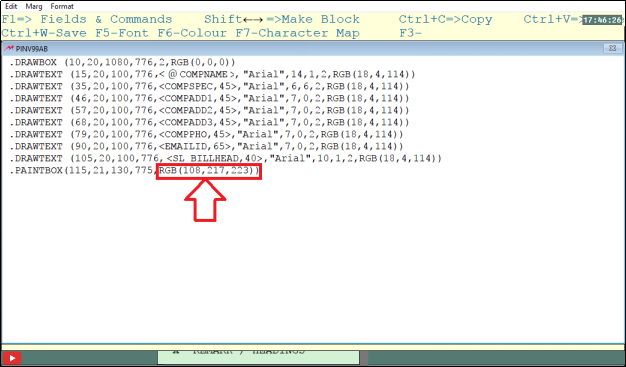
- The user will now save.

- In the preview, the user can view that the color box is drawn.
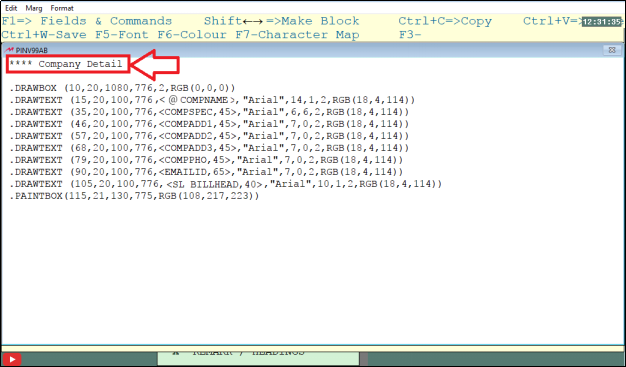
NOTE: While creating the code, the user can also enter the description or remark which will remind the user or anyone else working in this code of the code being created in which content.
- Suppose, for company detail the user can enter “***Company Detail’.
- Now, if the user does not want to print any command and also does not want to delete that command then the user can make that line a comment line by putting *.
- Suppose, the user does not want to print website & e-mail then the user will simply put “*” in the starting of that line.
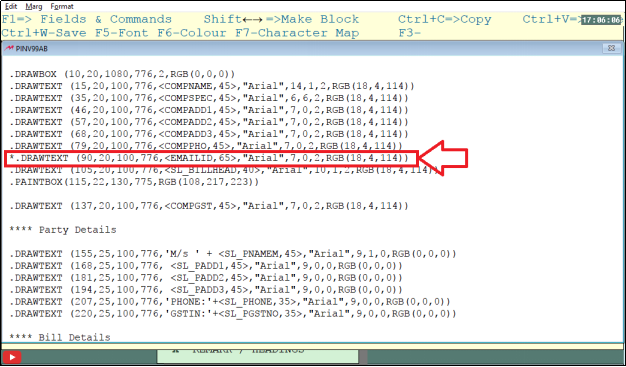
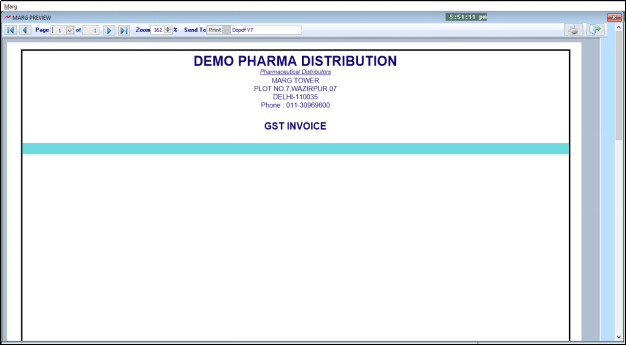
- When the user will see its preview, then it can be seen that the preview of that line is not seen in the invoice.
- In the sample invoice (Fig I), the user can view that in the color box few values are also printed.
- The user will search ‘Main GST no.’ from Font Variable window. Then Press F3 key.

Fig 1.1 View of Font Variable window in Marg ERP Software

NOTE: The user will always remember that to print any line or text in the colored box firstly print the colored box and then enter the command of the line/ text. By doing so, the line will be printed above the colored box.
- In the sample invoice (Fig I), the user can view the party details.
- Now in the invoice, as “M/s” is written manually then the user will type “‘M/s’ “.
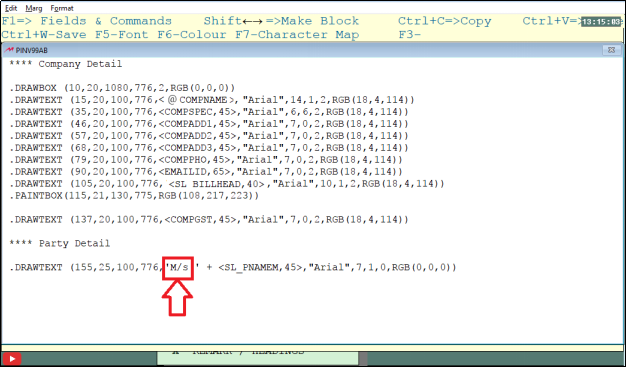
- The user can view in the invoice that there is a space between ‘M/s’ and the party name.
- So, the user will simply add space after ‘M/s’.

- Then to write ‘M/s’ and party name together, the user will type “+” and then paste the command for party name.
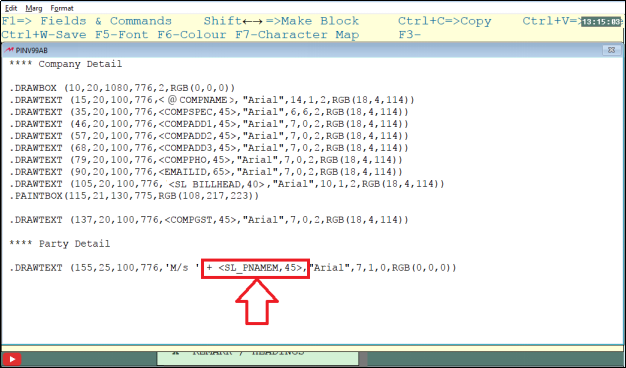
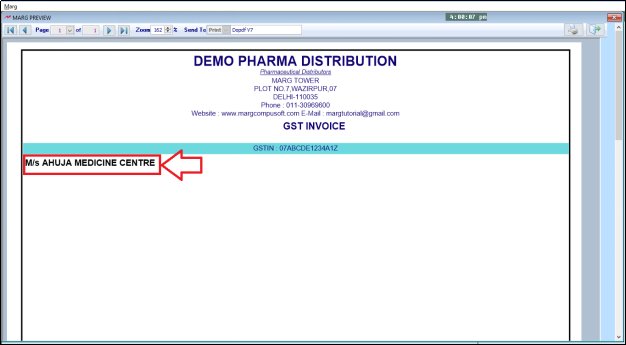
- Now when the user will see the preview, then the party name will be printed.
- Similarly, the user will define other details of the party.
- For GST No. the user will enter the command of Party GST No.
- For invoice number the user will enter the command of ‘Bill No.’
- For Bill date the user will enter the command for Bill/Challan Date.

Fig 1.2 View of Format Variables window in Marg ERP Software
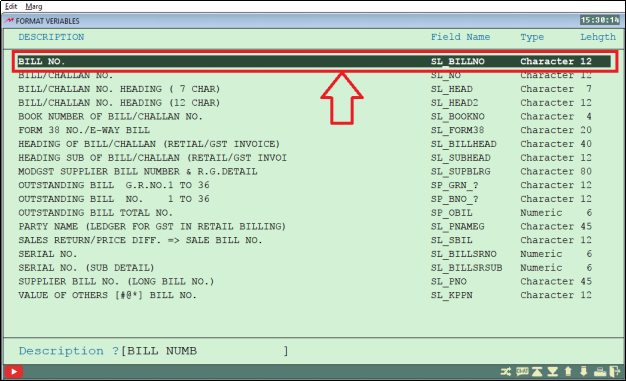
Fig 1.3 View of Format Variables window in Marg ERP Software

Fig 1.4 View of Format Variables window in Marg ERP Software

- In the preview, the user can view that Party Details section is completed.
- The user can view another paintbox in the sample invoice (Fig I).
- Using the paint box command, the user will create the paint box.
- The user can view that the paint box is created.
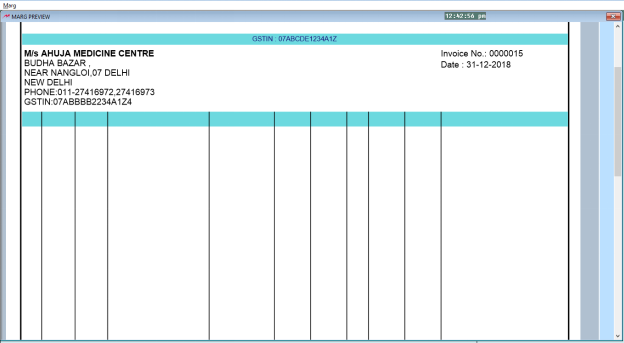
- Now in the sample invoice (Fig I), the user can view the vertical lines.
- To draw these vertical lines, the user will use the command ‘.DRAWLINE’.
- Then the user will define the coordinates & color.

NOTE: The user should remember that while defining the coordinates, the user will enter the same values of left and right coordinates. If the user will not enter the same values for left and right coordinates, then the line will be tilted.
- For example, the user enters a different right coordinate.
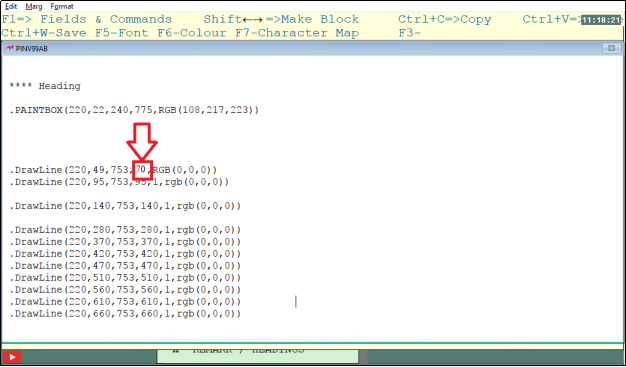
- Then when the user will view the preview, it can be viewed that the line is tilted.
- Now, the user will create the columns that are needed.
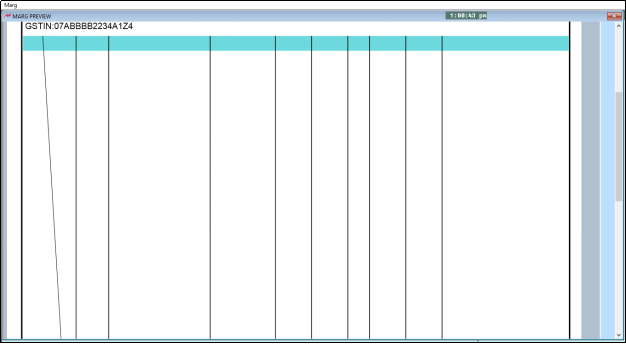
- The preview of columns can be viewed in the invoice.

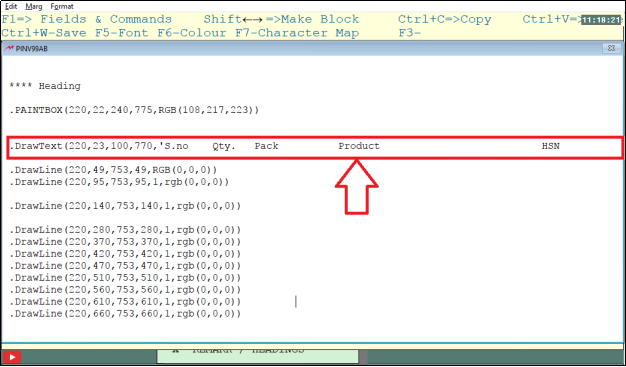
- In the sample invoice (Fig I), the user can view the headings i.e. S.no, Qty., Pack, Product etc.
- The user will now create these headings before the Drawline commands as the text is written before the line.
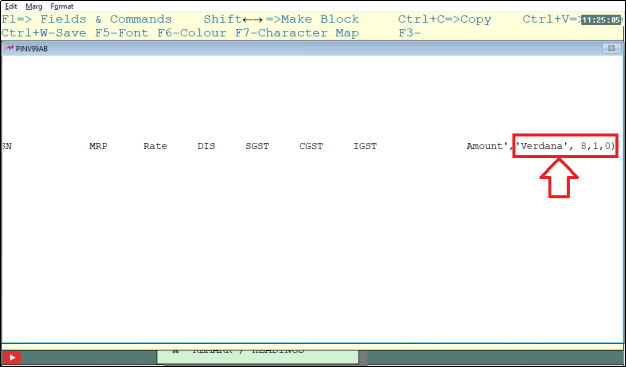
- Using the Drawtext command, the user will now set the coordinates and then in single quotes enter the headings & put the required spaces between the headings.
- The user will now define the font and then save the changes.
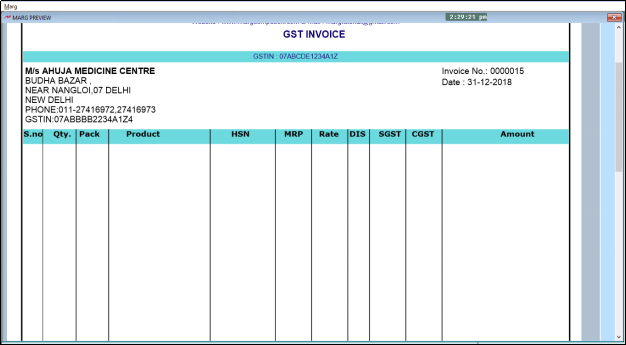
- In the preview, the user can view that the headings are displayed in their respective columns.
- Now suppose, the user wants to print the company’s logo.
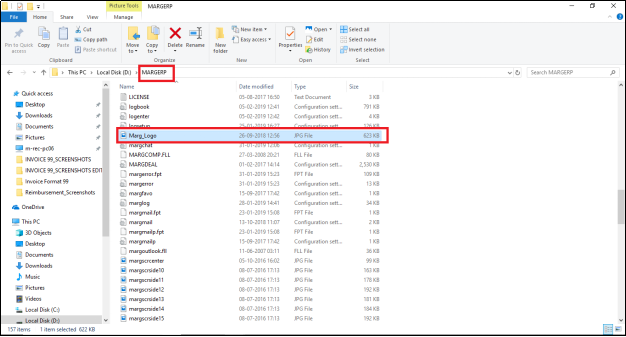
- Then the user will firstly paste the Company’s logo in Marg Folder.
- As the company logo is printed at the top, then at the top the user will enter the command for company’s logo i.e. DRAWPICTURE.
- Now the user will enter the top, left, bottom, right coordinates.

- The user will now enter the path where the picture is located.
- As the picture is located in the marg folder, the user will enter that path.

- Now the user will enter the stretch and rotation angle parameters as per the requirement am then save the changes.

- In the preview, the user can view that the company’s logo is displayed.

- To print the watermark, the user will enter the command ‘.WATERMARK’.
- Now the user will enter the top, left, bottom, right coordinates.
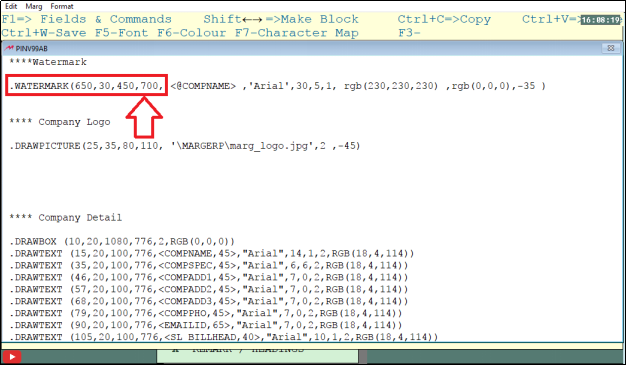
- If the user wants to enter any text as watermark or want the company name printed then enter the company name command i.e. @compname.
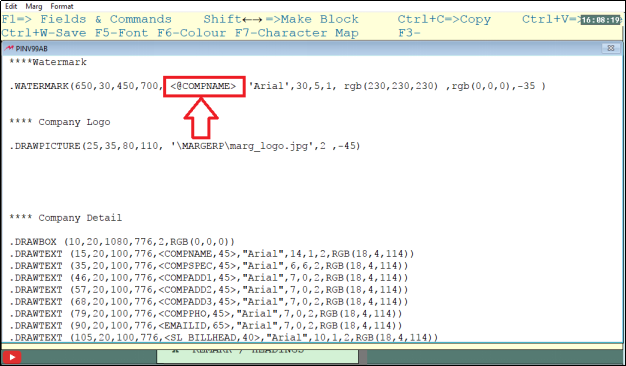
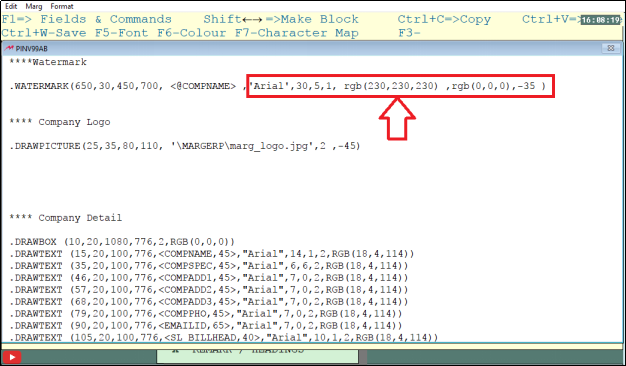
Now the user will define the font and rotation angle.
NOTE: The watermark command should be placed in the header first so that the watermark gets printed beneath the lines. But if watermark command is placed at the end of header then the watermark will be printed above the lines.
- When the user will view the preview, then it can be seen that the watermark is printed.

- Now the user can view that the header part is completed.
- In the Bill format GUI-AB window, the user will select ‘Item’. Then press enter.
- S.no, item and its values are to be printed in item field.
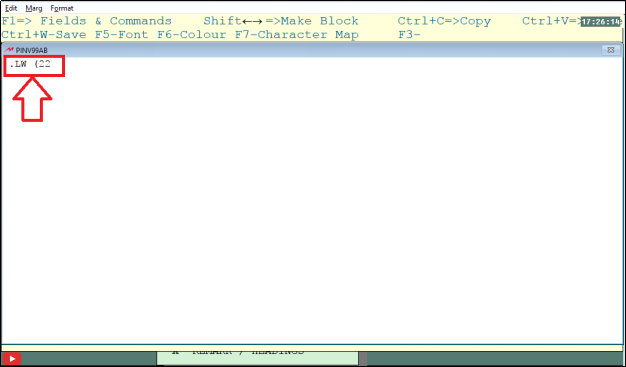
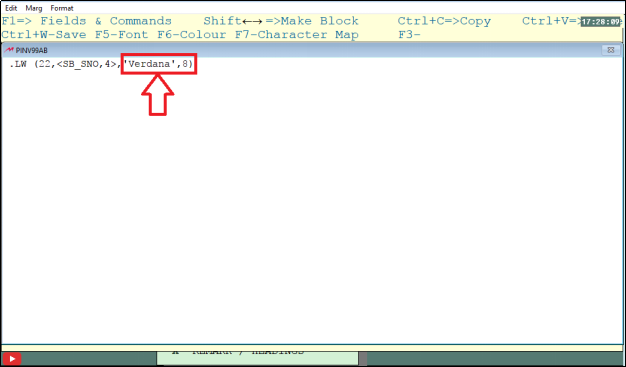
- To print s.no, the user will enter command .LW.
- The user will now put a bracket.
- Then to define the parameter enter the value of the marginthe user want to leave from left side to print the serial number.
- Now the user will press F1 key and search serial no.

- Now press F3 key and then paste the command.
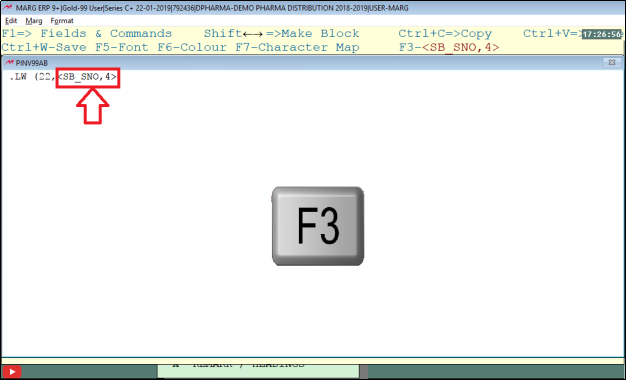
- The user will now define the font and then close the bracket.
- When the user will view the preview, then it can be seen that the S.no is printed much below.
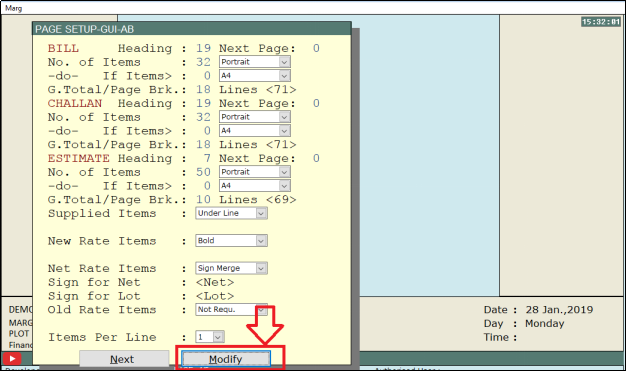
- So for this the user will do the page setup.
- Now in the Invoice format GUI window, the user will enter on Page Settings.

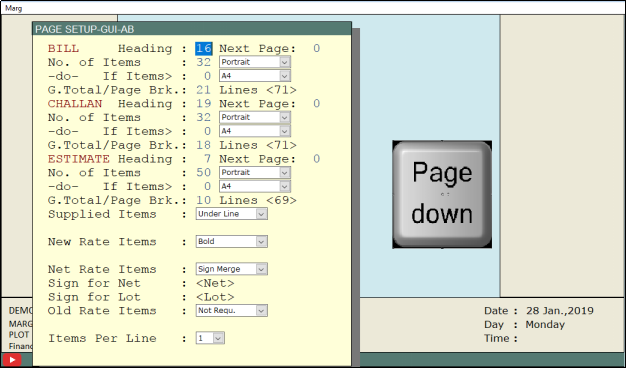
- A Page Setup-GUI window will appear.
- The user will now click on Modify.
- Now the user will change the bill heading number.
- In the A4 sheet the lines are 72 so the user will set the lines of bill headings, item and g. total.
Note: The bill headings, item and g. total will be printed on the line number specified.
- In bill heading as the user will set 16 i.e. the header part will be printed until 16 lines.
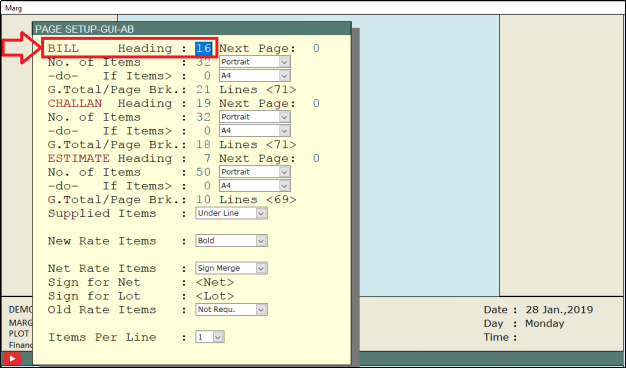
- The user can similarly do page setup for Challan and Estimate.

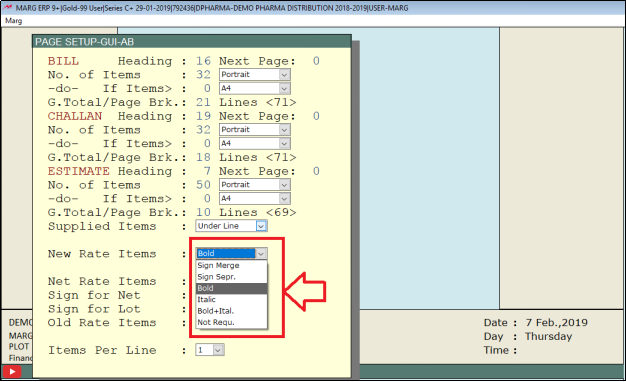
- Now in supplied items, the user can set that how the supplied items should be printed as underline, bold, italic etc.
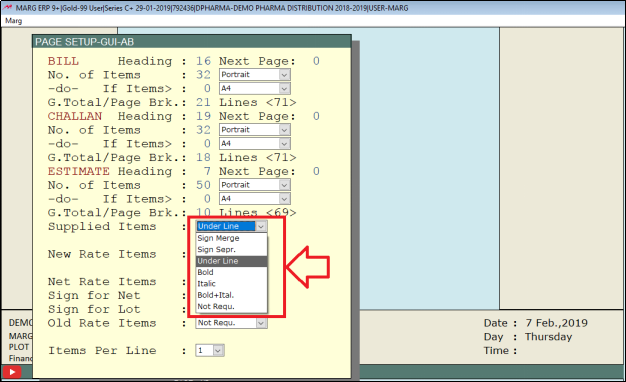
- Similarly, the user can set for Old Rate Items and New Rate Items.
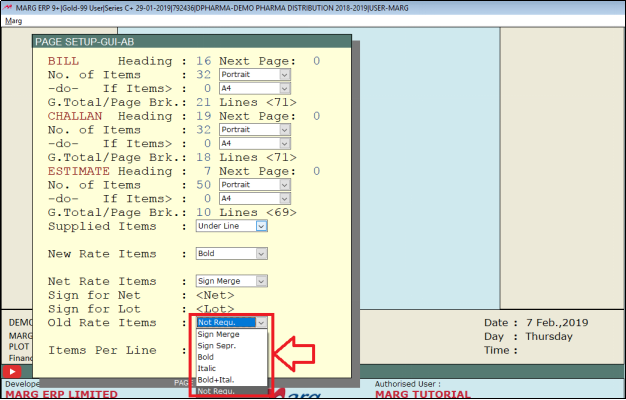
Fig 1.5 View of Page Setup-GUI window in Marg ERP Software
- The user will now press Page down key to save.
- Now the user will see its preview.

- To print quantity, the user will enter the command and press F1 to search for Quantity free command.
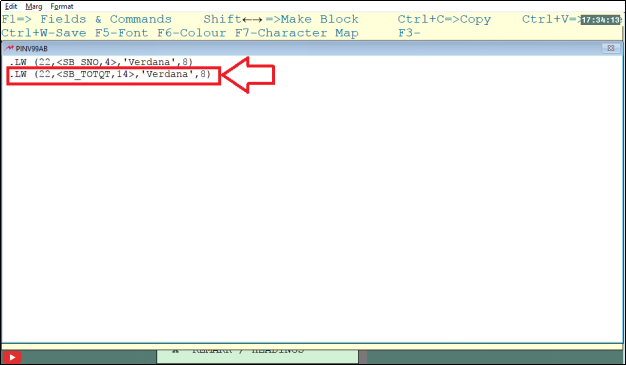
- Then the user will select whether to print the quantity with scheme or without scheme.
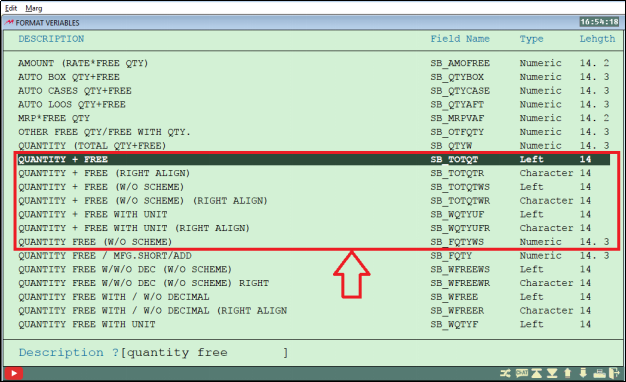
- Suppose, select ‘quantity + free’.

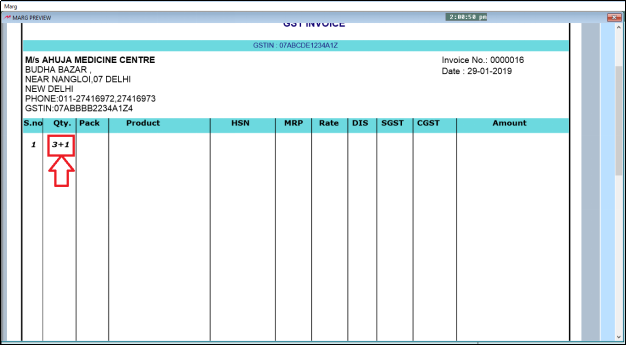
- Now in the invoice, the user can view that quantity with scheme is printed.
- To print pack, the user will enter the command and then press F1 to search for Item Packing command.

- The user will now enter the commands for item, HSN, rate, dis, MRP, SGST, CGST, amount.

- The user can view that in the discount command, the character length is defined in 2 parts i.e. total 6 digits of discount will get printed in which 2 digits will be after the decimal.

- Now when the user will see the preview, it can be seen that the item part is also completed.

- In the sample invoice (Fig II), the user can view that there is a horizontal line which is closing the table.
- In the Bill format GUI-AB window, select Sundries total. Then press enter.
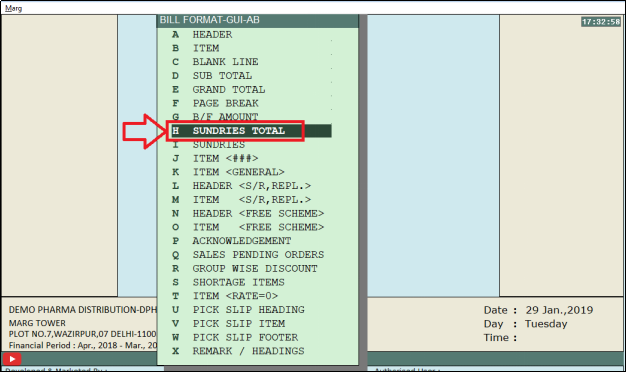
- The user will now enter .HL and will define the left and right coordinates as from where the item part ends the grand total part begins from there and so the user does not need to enter the top and bottom coordinates.
- Now the user will define the color.
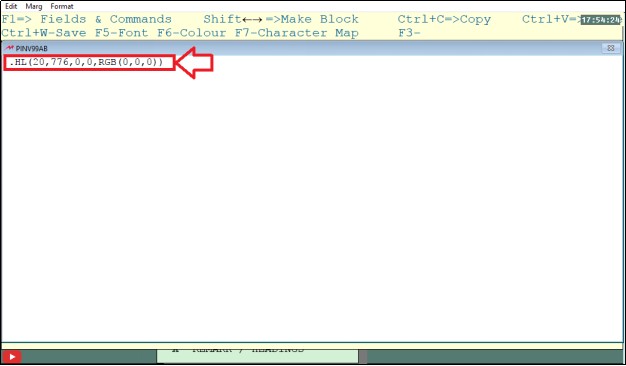
- The user can now view that the horizontal line is printed in the invoice.
- The user can also view that the vertical lines are coming a little outside of the horizontal line.
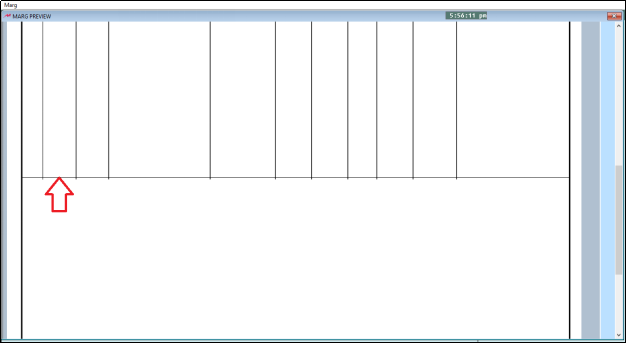
- To correct this, the user will give a few a few pixels gap by entering the command .LFPX
- Then the user will define the pixel. Suppose, here ‘4’.
- The user can also define the pixels in minus value if the horizontal line is to printed above.

- In the preview, the user can view that the horizontal line is perfectly printed.

- Now to print the subtotal part, the user will enter its command in sundries total field.

- To print the title, the user will enter .LW command and then search subtotal and enter the coordinates.
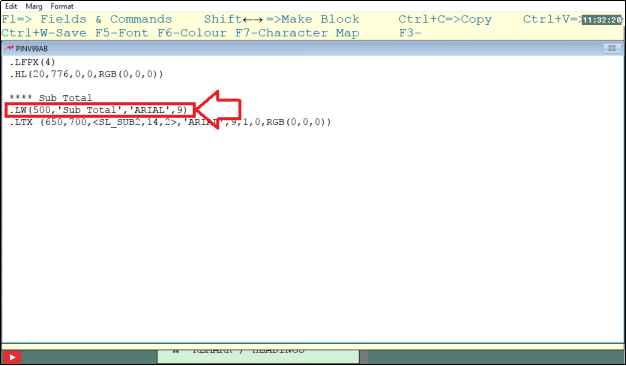
- Now the user will enter .LTX command. The .LTX command is used when the user wants to do any calculation and then define the coordinates.
- Now the user will press F1 and search Total (Rate*Qty) and press F3 to paste.

Fig 1.6 View of Font Variables window in Marg ERP Software
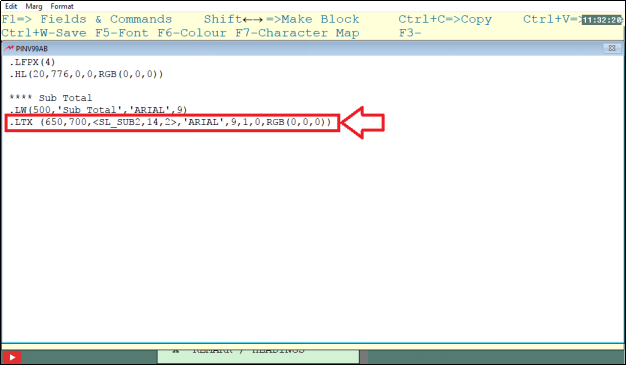
- Now the user will define the font and color.

- In the invoice, the user can view that the total of the values is printed.

- Now the user will define Discount, SGST, CGST, Round off in sundries.

- Here also the user will enter the title in .LW command & for calculation the user will use the command .LTX.
- The user should note that for the title of Discount, SGST, CGST, Round off use the Name Command according to the bill. Using this single command, all these titles will get printed.
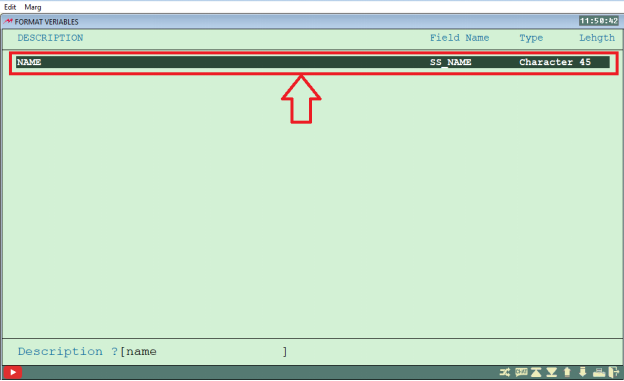
Fig 1.7 View of Font Variables window in Marg ERP Software

- For the values, the user will use the Amount command.
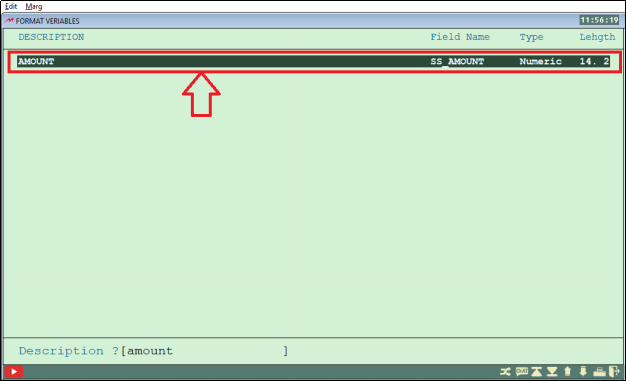
Fig 1.8 View of Format Variables window in Marg ERP Software

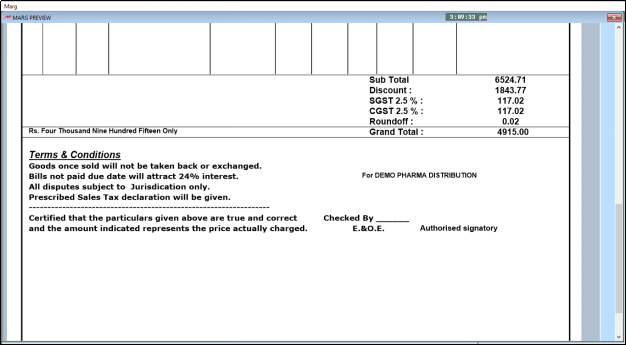
- Now in the sample invoice (Fig II), the user can view that Discount, SGST, CGST, Round off is printed.
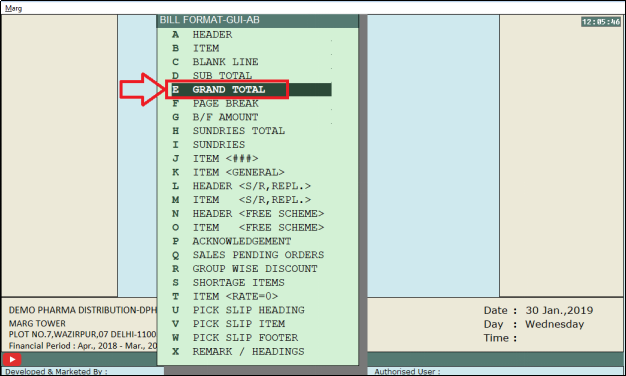
- In the Bill format GUI-AB window, the user will select Grand total. Then press enter.
- The user will enter .HL command to print horizontal line.

- Then for title the user will use the command .LW and then manually enter ‘Grand total’.
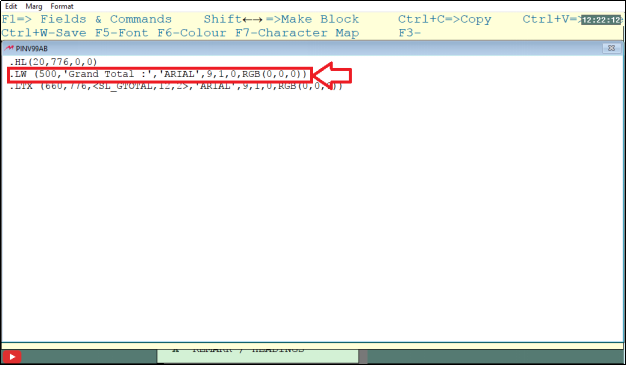
- To calculate grand total, the user will use the command total bill value (Rounded off). Using this command the total value will be calculated and then printed after rounding off.
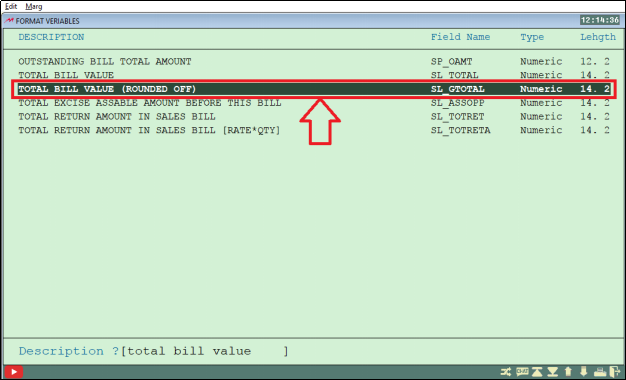
Fig 1.9 View of Format Variables window in Marg ERP Software

- The user can view in the invoice that the grand total is printed.

- Now in the sample invoice (Fig II), the user can view that the grand total value is printed in words.
- To print the amount in words, the user will use the command ‘amount in words’.

- In the invoice, the user can view that the amount is printed in words.

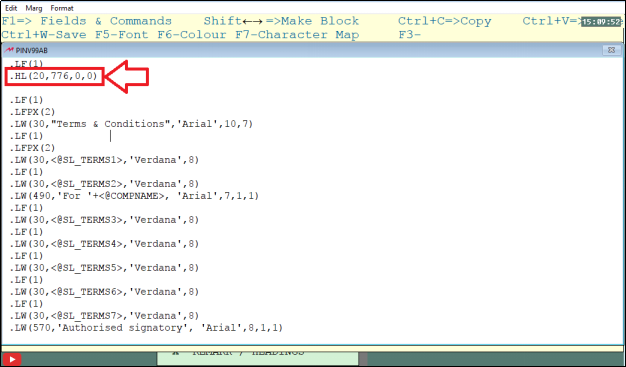
- In the sample invoice (Fig II), the user can view another horizontal line.
- Now the user will use .HL command again.
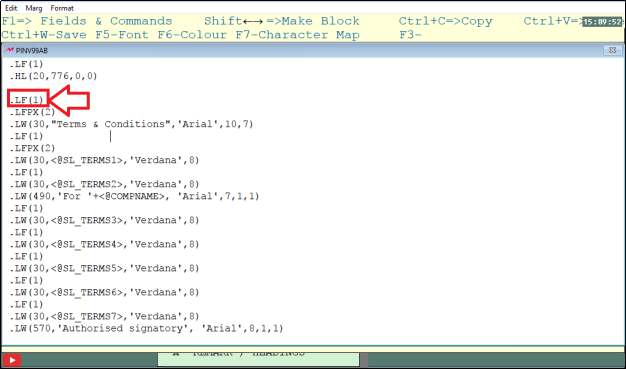
- Here the user can view that .LF command is used before .HL command.
- .LF command is basically used for one line command.
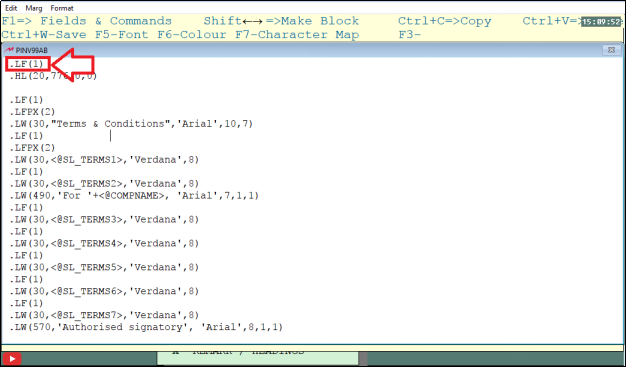
- So after entering the .LF command, the user will use the .HL command.
- Now again the user will use another .LF command to have another gap.
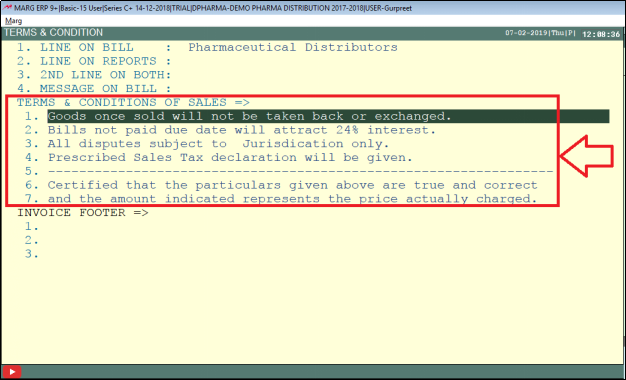
- The user will now enter the commands for Terms and Conditions.

- When the user will see its preview, the user can view that the terms and conditions are printed.
The user can view the default terms and conditions here.

- If the user wants to change the terms and conditions as per their requirement, then go to Invoice Format GUI window and select Terms and Conditions. Press Enter.

- A Terms and Conditions window will appear.
- The user will now enter the terms and conditions as per the requirement.
- Now the user can view that the grand total part is also completed.
- The user can also view that the Invoice is also completed.
- Now in Invoice Format-GUI window the user can view other options.
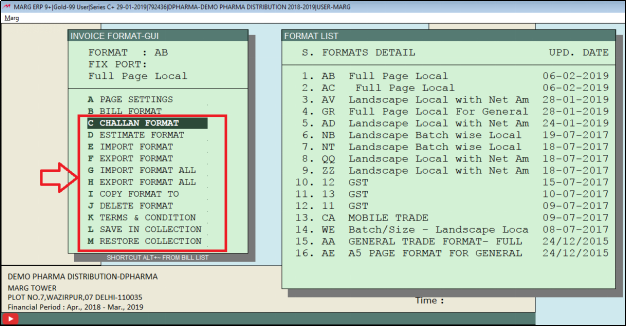
- If the user wants to design the challan, then the user will select ‘Challan Format’.

- Similarly, if the user wants to design Estimate, then select ‘Estimate Format’.

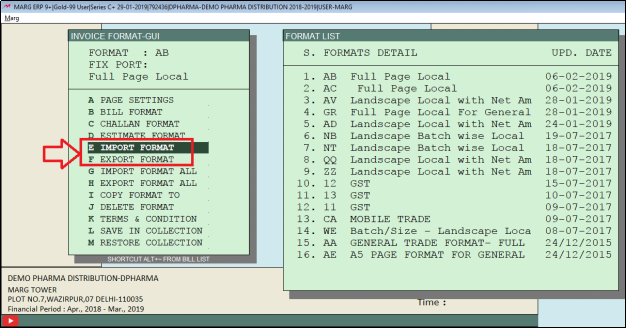
- If the user wants to import or export any format then select ‘Import Format’ or ‘Export Format’ as per the requirement.
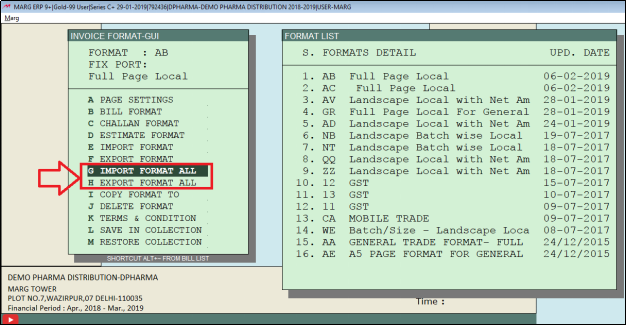
- If multiple formats are created & wants to import or export all of them then the user will select ‘Import Format All’ or ‘Export Format All’ as per the requirement.
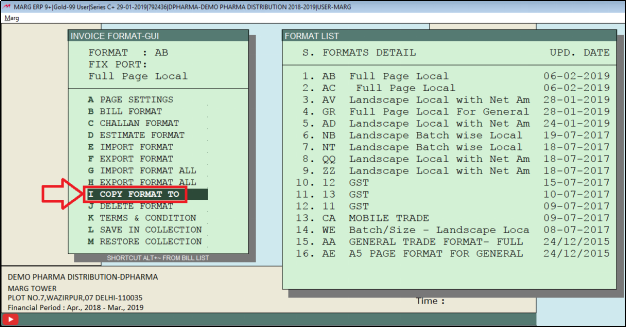
- Then if the user wants to copy one format to another format then select ‘Copy Format To’.
- Suppose, select ‘Copy Format to’. Then Copy Format to window will appear.
- Here suppose the user wants to copy Bill format to copy then the user will select ‘Bill’ in copy field.
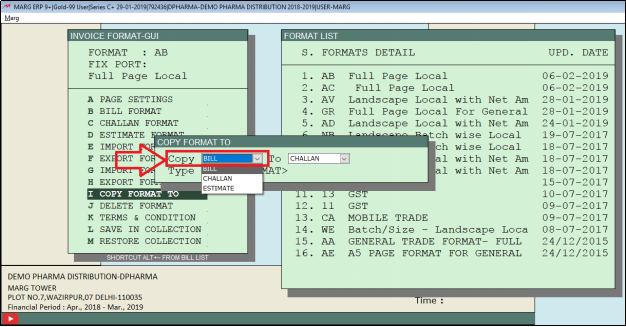
- Then in to field, the user will select ‘Challan’

- Now in Type <Copy Format’ the user will enter “COPY FORMAT”.

- If the user wants to delete any format, then select ‘Delete Format’.

- If the user wants to save the format which the user has created then the user will select ‘Save in Collection’.

- Now in restore collection, press enter.
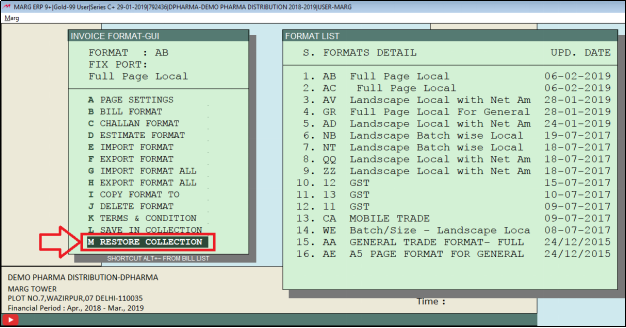
- If the user selects ‘Yes’ then the formats which the user has saved in the collection would be loaded.

- If the user will select ‘No’ then the default formats will be loaded.
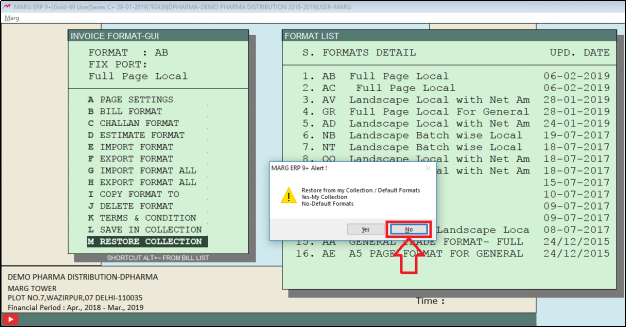
Fig 1.10 View of Alert window in Marg ERP Software


In This Page


