Search by Category
- Marg Digital Health
- ABHA 2.0 - Ayushman Bharat
- Marg Nano
- Swiggy & Zomato
- Marg Cloud
-
Masters
- Ledger Master
- Account Groups
- Inventory Master
- Rate and Discount Master
- Refresh Balances
- Cost Centre Master
- Opening Balances
- Master Statistics
- General Reminder
- Shortage Report
- Supplier Vs Company
- Temporary Limit
- Shop QRID and eBusiness
- Cloud Backup Setup
- Password and Powers
- Marg Licensing
- Marg Setup
- Target
- Budget
- Credit Limit Management
- Change ERP Edition
- Ease Of Gst Adoption
-
Transactions
- ERP To ERP Order
- Sale
- Purchase
- Sale Return
- Purchase Return
- Brk / Exp Receive
- Scrap Receive
- Brk / Exp Issue
- Scrap Issue
- GST Inward
- GST Outward
- Replacement Issue
- Replacement Receive
- Stock Issue
- Stock Receive
- Price Diff. Sale
- Price Diff. Purchase
- BOM
- Conversion
- Quotation
- Sale Order
- Purchase Order
- Dispatch Management
- ERP Bridger
- Transaction Import
- Download From Server
- Approvals
- Pendings
- Accounts
- Online Banking
-
Books
- Cash and Bank Book
- All Ledgers
- Entry Books
- Debtors Ledgers
- Creditors Ledger
- Purchase Register
- Sale Register
- Duties & Taxes
- Analytical Summaries
- Outstandings
- Collection Reports
- Depreciation
- T-Format Printing
- Multi Printing
- Bank Reconcilation
- Cheque Management
- Claims & Incentives
- Target Analysis
- Cost Centres
- Interest and Collection
- Final Reports
-
Stocks
- Current Stock
- Stock Analysis
- Filtered Stock
- Batch Stock
- Dump Stock
- Hold/Ban Stock
- Stock Valuation
- Minimum Level Stock
- Maximum Level Stock
- Expiry Stock
- Near Expiry Stock
- Stock Life Statement
- Batch Purchase Type
- Departments Reports
- Merge Report
- Stock Ageing Analysis
- Fast and Slow Moving Items
- Crate Reports
- Size Stock
-
Daily Reports
- Daily Working
- Fast SMS/E-Mail Reports
- Stock and Sale Analysis
- Order Calling
- Business on Google Map
- Sale Report
- Purchase Report
- Inventory Reports
- ABC Analysis
- All Accounting Reports
- Purchase Planning
- Dispatch Management Reports
- SQL Query Executor
- Transaction Analysis
- Claim Statement
- Upbhogkta Report
- Mandi Report
- Audit Trail
- Re-Order Management
- Reports
-
Reports Utilities
- Delete Special Deals
- Multi Deletion
- Multi Editing
- Merge Inventory Master
- Merge Accounts Master
- Edit Stock Balance
- Edit Outstanding
- Re-Posting
- Copy
- Batch Updation
- Structure/Junk Verificarion
- Data Import/Export
- Create History
- Voucher Numbering
- Group of Accounts
- Carry Balances
- Misc. Utilities
- Advance Utilities
- Shortcut Keys
- Exit
- Generals
- Backup
- Self Format
- GST Return
- Jewellery
- eBusiness
- Control Room
- Advance Features
- Registration
- Add On Features
- Queries
- Printing
- Networking
- Operators
- Garment
- Hot Keys
-
GST
- E-Invoicing
- Internal Audit
- Search GSTIN/PARTY
- Export Invoice Print
- Tax Clubbing
- Misc. GST Reports
- GST Self-Designed Reports
- GST Return Video
- GSTR Settings
- Auditors Details
- Update GST Patch
- Misc. GST Returns
- GST Register & Return
- GST RCM Statement
- GST Advance Statement
- GST Payment Statement
- Tax Registers and Summaries
- TDS/TCS Reports
- Form Iss./Receivable
- Mandi
- My QR Code
- E-Way Bill
- Marg pay
- Saloon Setup
- Restaurant
- Pharmanxt free Drugs
- Manufacturing
- Password and Power
- Digital Entry
Home > Margerp > Icici Banking > What is the process of auto bank reconciliation inside Marg ERP ?
What is the process of auto bank reconciliation inside Marg ERP ?
Reconcile Bank Statement Inside MARG ERP
Meaning & Introduction of Bank Reconciliation
Process to Reconcile Online ICICI Bank and Other Banks
Process of Online Bank Reconciliation of The Bank Accounts Mapped with Bank Ledgers
MEANING & INTRODUCTION OF BANK RECONCILIATION
Bank Reconciliation is a statement prepared to reconcile and explain the causes of difference between the bank balance as per cash book and the same as per pass book in accordance to a particular date.
With the help of Marg ERP Software, the user can easily and efficiently manage Bank Reconciliation which is a basic necessity of every business and other bank related work.
The user can easily do all the online banking related process through Marg ERP Software itself without logging into the Bank Portal like Bank Reconciliation.
PROCESS TO RECONCILE ONLINE ICICI BANK AND OTHER BANK
In Marg ERP Software, the user can reconcile their bank ledgers with more than 140 available banks by following the below process.
If the user has not completed the Admin Registration from any Online Banking option for any particular reason for example if the user will go to Banking>>Registration>>Select “Other Banks's RECO”.
An “Admin/Supervisor Details” window will appear where the software will ask the user to complete the process of Admin Registration.

Fig. 1.1 Menu View to Other Banks Option in Marg ERP Software
It is mandatory to fill the details as if someone takes the backup of the data and then restores it somewhere else or copy Marg Folder then with the help of this option the data will not get misused.
Any kind of operations related to other banks will not get executed. So, if any unknown user/unauthorized person visits to Marg Online Registration then the information will be sent to the Admin/Supervisor in form of an OTP.

Fig. 1.2 View of Admin/Supervisor Details Window in Marg ERP Software
The user will complete the Registration process details and then click on “Save & Register”.

Fig. 1.3 Process to Fill the Admin/Supervisor Details in Marg ERP Software
The details will be saved and then the connection will start getting established from the server.
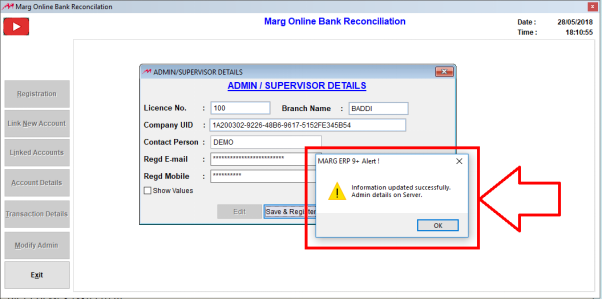
Fig. 1.4 Saving the Admin/Supervisor Details in Marg ERP Software
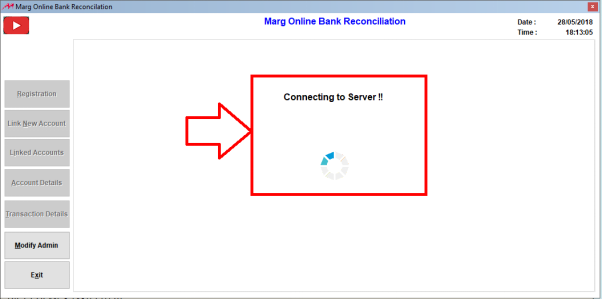
Fig. 1.5 Process of Establishing the Connection from Server
In case any issue occurs while establishing the connection from the server then a message will get displayed (as shown below). The user will then simply click on “Try Again”
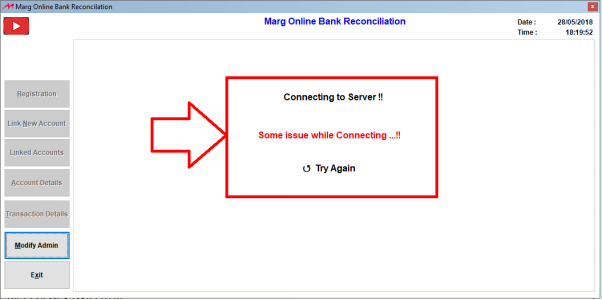
Fig. 1.6 View of Error while Establishing the Connection from Server
If the admin details are already registered then a window will get opened directly for user’s registration. Here, the user will enter/fill the details i.e. Username, Password, Confirm Password, First Name, Last Name, Mobile No., etc.
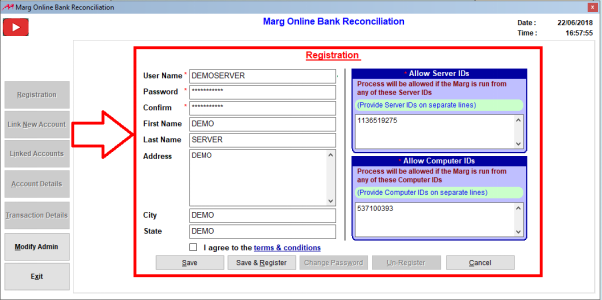
Fig. 1.7 View of Registration Window for Users
The fields against which the star is being placed are mandatory fields as well as the validation is also being kept in these fields like there is validation on Password field.

Fig. 1.8 Guidelines for Filling Details for users at time of Registration
Then next is Allow Server ID’s & Computer ID’s: Here, those ID’s will appear which the supervisor/admin will give the authority for executing the Online process of Marg.
The benefit of these is basically for System Verification i.e. the system from which the user is operating is authorised as any authorised person cannot execute any bank related operations from any unknown system.
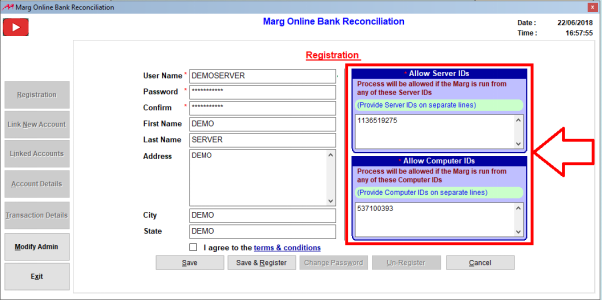
Fig. 1.9 Guidelines for Filling Details for users at time of Registration
If multiple users are using,then the Computer ID can be mentioned on the separate line. And similarly, if there are multiple servers then the multiple servers can also be mentioned on the separate line.
If the user doesn’t want to register and just want to save the data so that in future if any changes are required to be done in any field, then in that case the user will click on “Save”.
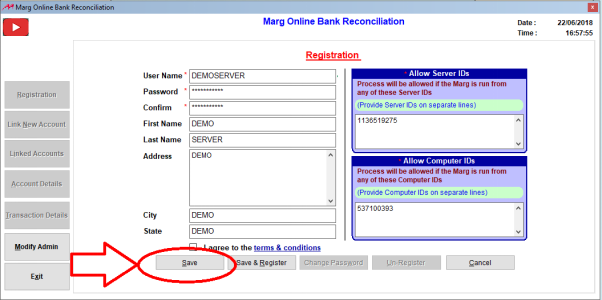
Fig. 1.10 Saving the Details for users at time of Registration
And if the user needs to register then click on “Terms & Conditions”>>Agree to the Terms & Conditions>>Click on “Save & Register”.

Fig. 1.11 Process to Register the Details for users
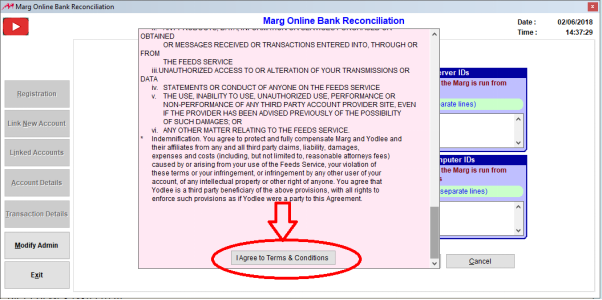
Fig. 1.12 Process to Register the Details for users

Fig. 1.13 Saving the Details for users
Once clicked on Save & Register the user will then get a session of 25 minutes for reconciling and on completion of 25 mins then a message will be received i.e. “Session Timed Out”. The user needs to again open the other bank option.
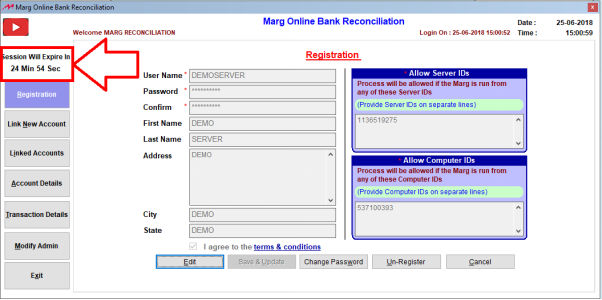
Fig. 1.14 View of Reconciling Session Time for users
After completing the registration process, an email of Confirmation will be received to the user with the Login Credentials and this can be used at time of restoring the data.
But if the user gets a message “Username already exists.” then it means that some other person has already registered with the same username.
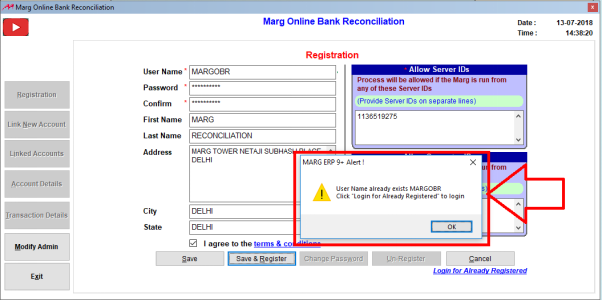
Fig. 1.15 View of an Alert Message in Marg ERP Software
If the user is registering for the first time, then the user can register by changing the Username.
But if the user has already registered and due to any reason like if Company has been changed or data has got corrupted or the data has been restored before getting registered then the user needs to click on “Login for Already Registered”.
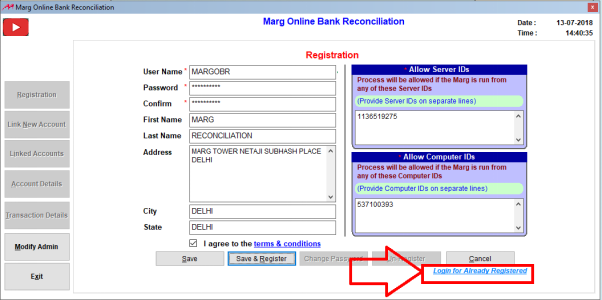
Fig. 1.16 View of an Alert Message in Marg ERP Software
Now, the user will enter the Login Credentials>>Click on “Login”.

Fig. 1.17 Entering the Login Credentials in Marg ERP Software
An Authentication pop up will get displayed if the login credentials gets matched and an OTP will be received on the admin registered email-id. If this particular user is registered on other admin email-id, then the user will receive an OTP on that email-id also.
After verifying both the OTP’s, click on “Submit”.

Fig. 1.18 Process to Verify OTP’s at time of Registration
A message of “User Restored Successfully” will be displayed and the user will click on “Ok”.
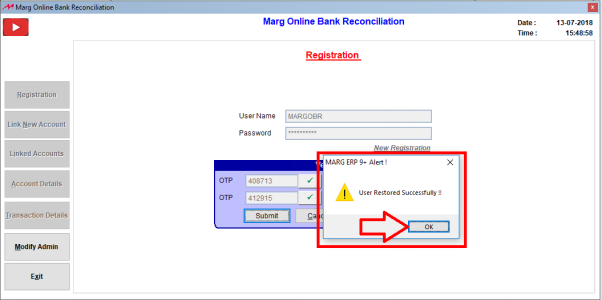
Fig. 1.19 View of an Alert Message at time of Registration
Then a “Registration” window will be displayed where the user can click on “Edit” in order to do any modifications.

Fig. 1.20 View of Registration Window in Marg ERP Software
Then is “Change Password” and “Unregistered”: In order to use both these options an authentication is required i.e. the email-id and phone number which is being entered in admin details or supervisor details; an authentication OTP will be sent on that email id and mobile number. It will not be proceeded further until the user verifies it.
Like, if the user change passwordthen it will ask here “To change password system authentication required. Do you want to continue?”
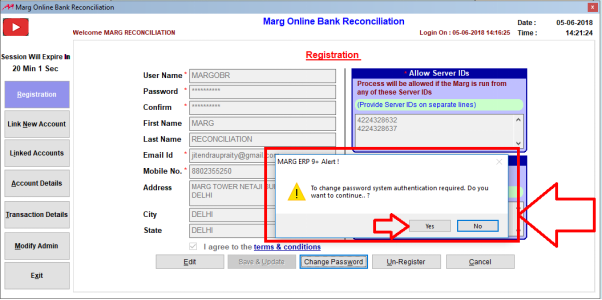
Fig. 1.21 View of Change Password Message in Marg ERP Software
If the user selects “Yes”then it will ask whether OTP must be sent on email-id or mobile or on both.

Fig. 1.22 View of Authentication Required Window in Marg ERP Software
Suppose the user selects mobileand click on “Generate OTP”.The user will enter the OTP which is being received and verify it.
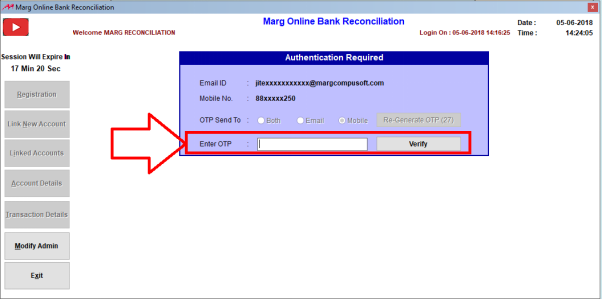
Fig. 1.23 Process to Change Password in Marg ERP Software
The same process will be applicable in case of “Un-register” as well.
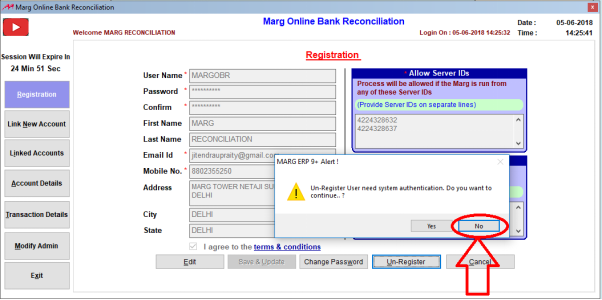
Fig. 1.24 Process to Change Password in Marg ERP Software
LINK NEW ACCOUNT
Now, the user requires to fetch the transactions details of banks and ledgers and for that the accounts needs to be linked. For that go toLink New Account.
The number of default banks will get displayed and the user can click any bank from here and can also search from 140 available banks too.
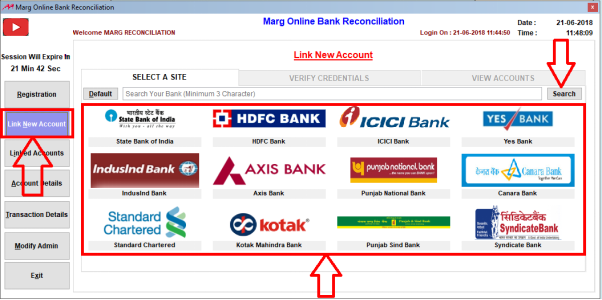
Fig. 1.25 Process to Link New Account in Marg ERP Software
If the user clicks on any bank i.e. ICICI bankthen all the banks related to that particular bank will be shown here like Corporate bank, Business banking, etc.
Now, suppose the user has the account in ICICI Corporate account then the user will click on ICICI Corporate.
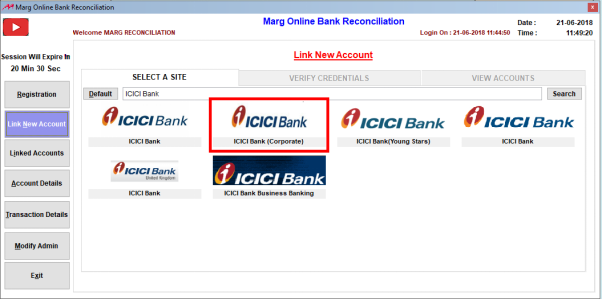
Fig. 1.26 Process to Link New Account in Marg ERP Software
Enter the ICICI Net Banking Login Credentials>> Then Click on “Register”.
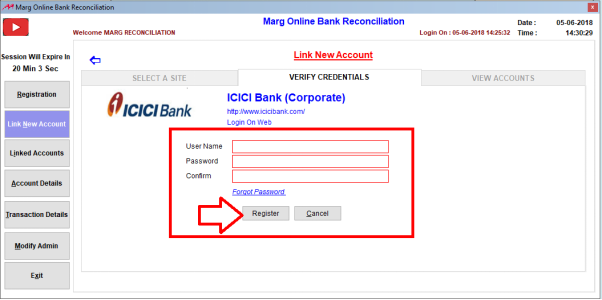
Fig. 1.27 Process to Verify Credentials in Marg ERP Software
Marg doesn’t save any kind of bank related information of any user.
As the user will register themselves then anAccount Reference ID will be provided i.e. Log ID.
The process which is being done for registration whether that login is Successful, Partial or Failed, the software keeps that log details within itself which is known as Account Reference ID.
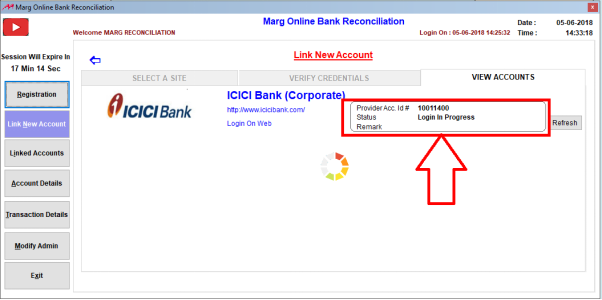
Fig. 1.28 Process to Check the Credentials in Marg ERP Software
If the Login Credentials gets verifiedand “Success” is shown in the status, whatever the number of accounts is linked with that particular Net Banking then all those accounts will be displayed here.

Fig. 1.29 Process to Check the Credentials Status in Marg ERP Software
If the multiple accounts are linked in it and from which the user uses only Corporate Account, then the rest of the accounts can be “Removed” from here.
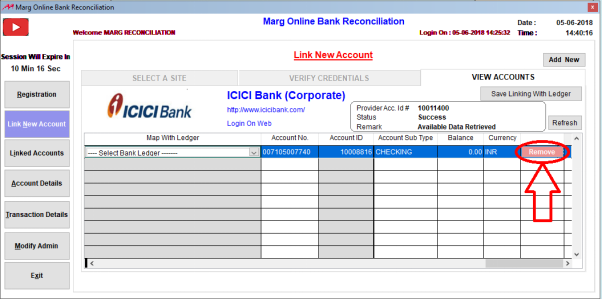
Fig. 1.30 Process to Remove Unused Accounts in Marg ERP Software
In case, if the Login Credentials doesn’t get verified i.e. in Remarks it shows “Incorrect Credentialsthen “Failed” will be shown in the Status. The user can click on back button and can verify the login credentials again.
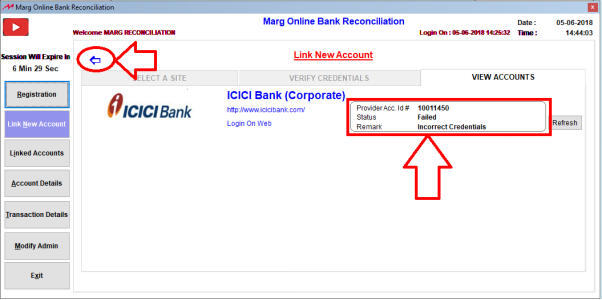
Fig. 1.31 Process to Verify the Failed Login Credentials in Marg ERP Software
LINKED ACCOUNTS
Linked Accounts: All the details will be displayed here for the linked accounts.
If the user doesn’t want to process further any particular account then it can be removed easily from here.
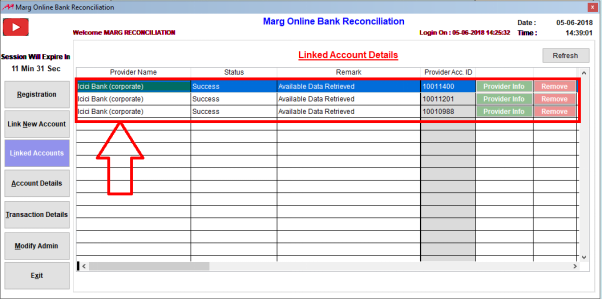
Fig. 1.32 View of Linked Accounts in Marg ERP Software
ACCOUNT DETAILS
Account Details: The user can select here that which type of Account details needs to be viewed.
Like, if the user selects “All Type” then the details of all the linked banks will be displayed here.
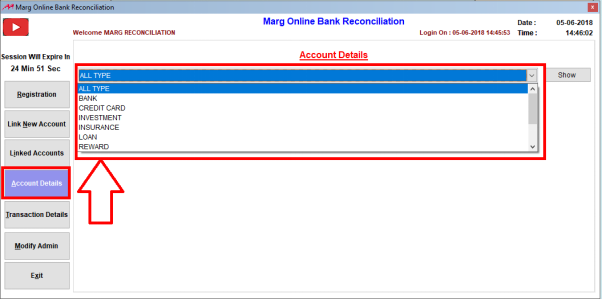
Fig. 1.33 View of Account Details in Marg ERP Software
Now, in order to map account with the ledger; click on “Account Map with Ledger”>> Select that ledger which needs to be mapped>>Then click on “Save mapping with ledger”.
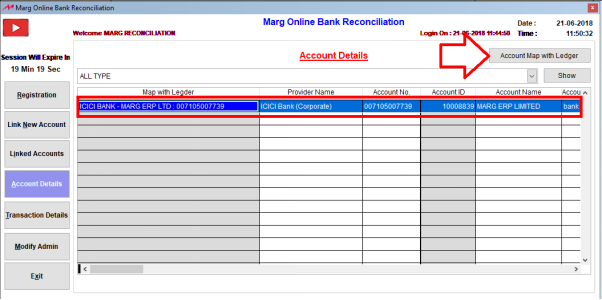
Fig. 1.34 Process to Map Account with Ledger in Marg ERP Software

Fig. 1.35 Process to Map Account with Ledger in Marg ERP Software
TRANSACTION DETAILS
Here, the user can check Transaction Details. In order to check transaction details; Select the Bank Account>>Specify the dates i.e. from which date till which date the Transaction Details>>Click on “Show”.
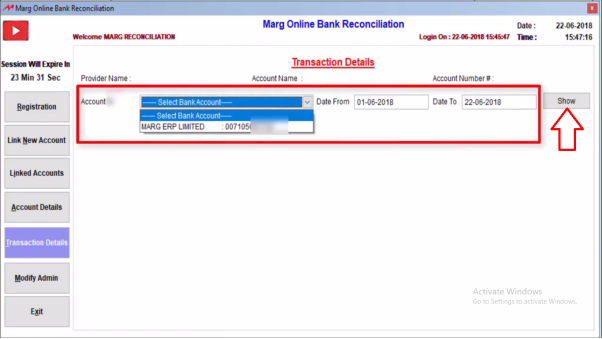
Fig. 1.36 Process to View Transaction Details in Marg ERP Software
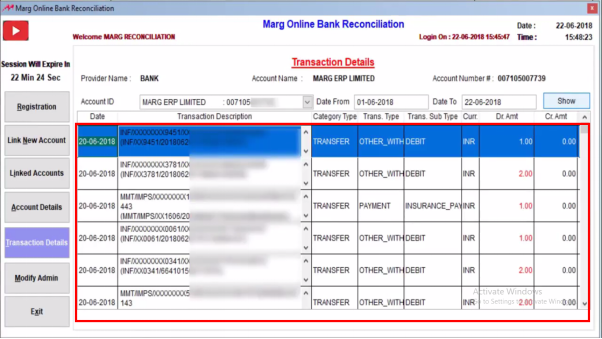
Fig. 1.37 View of Transaction Details in Marg ERP Software
MODIFY ADMIN
The admin can modify the details anytime as per their requirement.
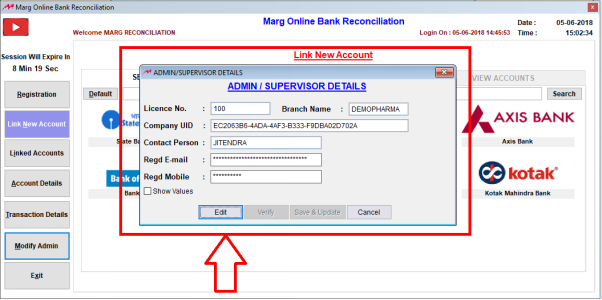
Fig. 1.38 View of Modify Admin in Marg ERP Software
If an admin has all the rights, then all the options can be accessed by them.
And if user does not have the admin rights and opens Link New Account window then the user has the accessibility of Link New Account, Linked Accounts, Account Details and Transaction Details only.
If Account is not registered i.e. the user is not registered with Marg Server, then a message will be received “Please Contact Your Supervisor”.
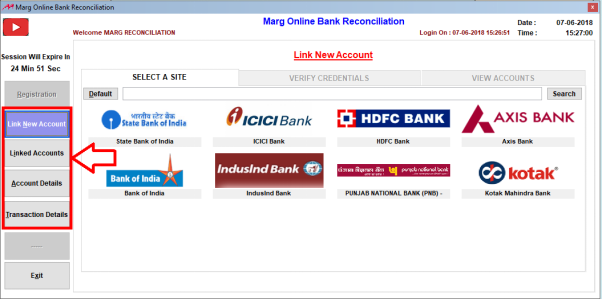
Fig. 1.39 Case in which user don’t have Admin Rights
PROCESS OF ONLINE BANK RECONCILIATION OF THE BANK ACCOUNT MAPPED WITH BANK LEDGER
Once the bank ledgers are being mapped and when the user does the bank reconciliation then data gets reconciled online and it fetches this data from the transaction details in order to do auto reconciliation.

Fig. 1.40 Menu View to Bank Reconciliation in Marg ERP Software

Fig. 1.41 View of Bank Reconciliation Window in Marg ERP Software
A Bank Reconciliation window will appear where the software will ask:
- Select Bank Name: Here, the user will select the Bank Name.
- Upto Date: Mention till which date the user requires to reconcile.
- Bank Account No: It displays the Account No. of the Bank.
Click on “Okay” and a window will appear where the user can view on left side there is ICICI’s Marg ledger and on the right side thereis Bank Statement.
The user can view that both are shown in red colour i.e. this is non-reconciled as there is no clearing date in it.

Fig. 1.42 View of Bank Reconciliation Process in Marg ERP Software
Example: The user has deposited Rs. 5000 on 2nd April 2017 but the date is not shown that when the bank has cleared that payment. Similarly, the user has deposited cheque of Rs. 10000 on 7th April 2017 but it is showing as “Pending” in the status.
If the user will click on “Reconcile” then on the basis of “Voucher Narration” and “Description in Statement”; the user will be able to view that the cheque number is here in which the narration contains 0 digit and in description, there is no 0 digit.
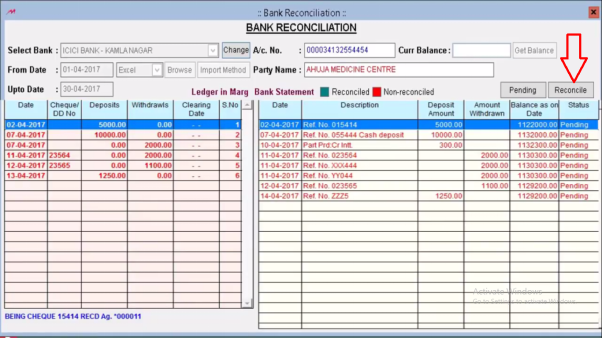
Fig. 1.43 View of Bank Reconciliation Process in Marg ERP Software
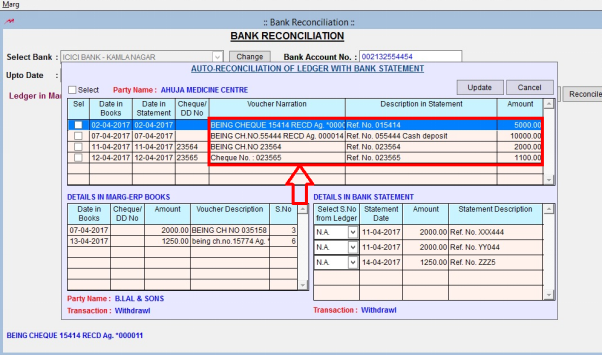
Fig. 1.44 View of Bank Reconciliation Process in Marg ERP Software
So, on the basis of this the software is matching the amount of both and also telling that the entries are reconciling with each other.
The entries which are not reconciling are shown below which are in Marg’s Ledger and in Bank Statement.
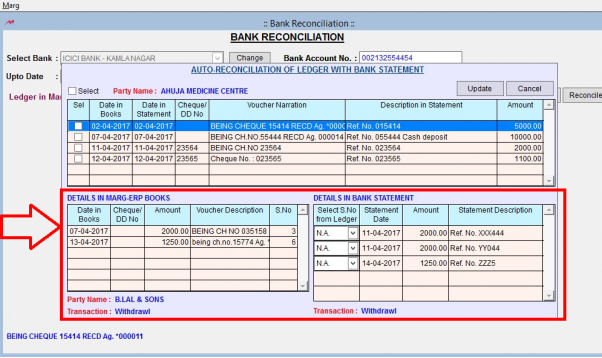
Fig. 1.45 View of Bank Reconciliation Process in Marg ERP Software
There are few entries and the user want that the software should show its intelligence by Auto-Reconciling these entries.

Fig. 1.46 View of Bank Reconciliation Process in Marg ERP Software
As these 4 entries are already reconciling with each other as the user can view that both in “Date in books” and in “Statement” its date is 2nd April. (There cannot be a date before that as if the user has given any cheque then either it will get clear today or later).
The entries which are not reconciled yet are shown in “Marg ERP books” and in “Details in Bank Statement”; there are those entries which are in statement but are not reconciled.
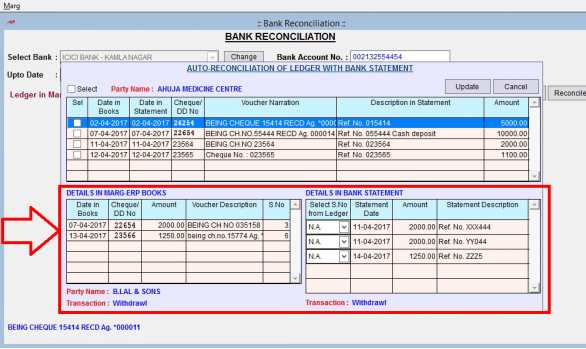
Fig. 1.47 View of Bank Reconciliation Process in Marg ERP Software
Suppose in Marg ERP books, serial number 3 is shown on 7th April and in Bank Details Statement, there are 2 entries of Rs. 2000. As the user is already aware that the serial number 3 belongs to the reference of the statement. So, the user will select 3 from “Details in Bank Statement”.
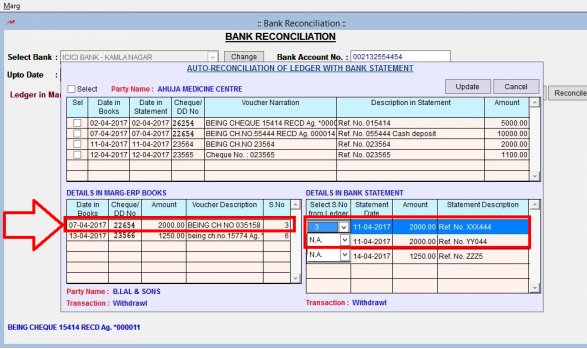
Fig. 1.48 View of Bank Reconciliation Process in Marg ERP Software
Similarly, the user knows that serial number 6 belongs to entry dated 13th April then select 6 from “Details in Bank Statement”.
Then click on “Update”.

Fig. 1.49 View of Bank Reconciliation Process in Marg ERP Software
A window of “Are you sure to save the changes in Books” will be displayed. Click “Yes” to save it.

Fig. 1.50 View of Bank Reconciliation Process in Marg ERP Software
Then the software will show an alert message with the number of entries that are being updated. Click “Ok”.
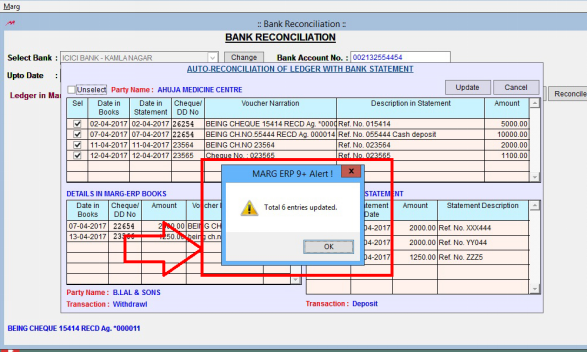
Fig. 1.51 View of Bank Reconciliation Process in Marg ERP Software
As the user will click on Ok then user can view that the entries in Green colour are those entries which are updated and reconciled. Andthose entries which are still not updated and reconciled are shown in Red colour.
In order to update and reconcile the entries which are in red colour, click on “Pending”.
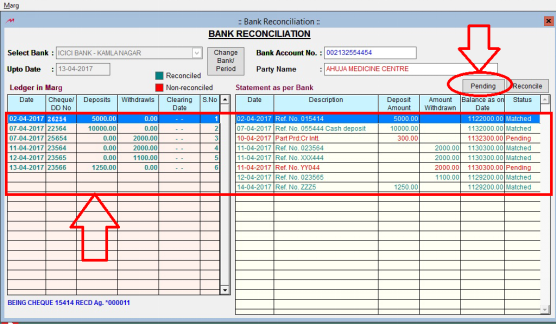
Fig. 1.52 View of Bank Reconciliation Process in Marg ERP Software
Then the software will show the pending entries and is also asking that against which ledger these pending entries are required to be put.
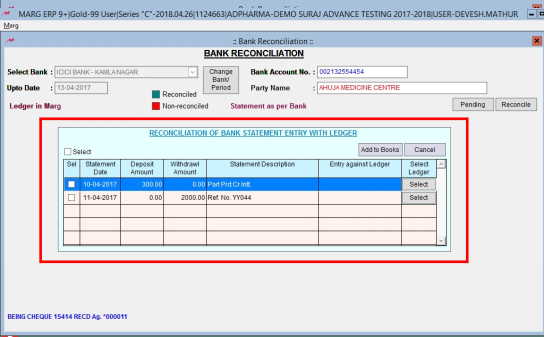
Fig. 1.53 View of Bank Reconciliation Process in Marg ERP Software
Suppose there is an entry of interest, so the user is required to do its entry in Marg first. In order to do its entry, the user will Select the ledger from here>>Select Bank & Ledger. So, the user can view that the bank charges will get displayed in “Entry against ledger”.
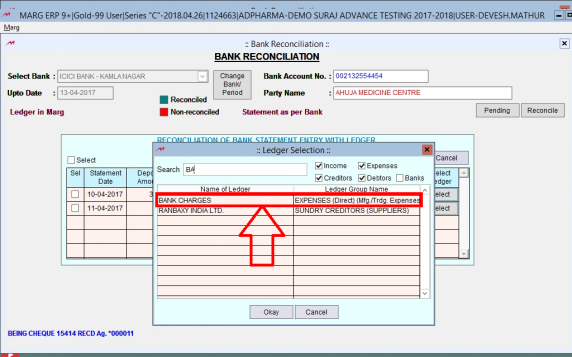
Fig. 1.54 View of Bank Reconciliation Process in Marg ERP Software
Then click on “Add to books” and the entry will be saved in Marg Books.
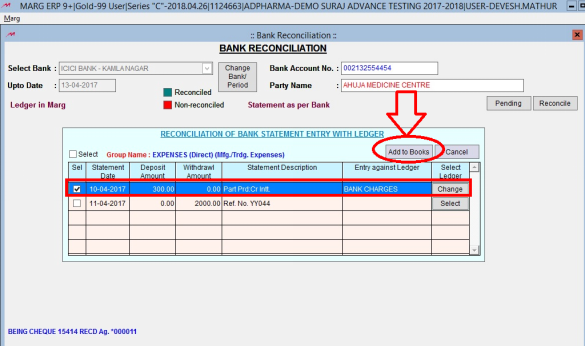
Fig. 1.55 View of Bank Reconciliation Process in Marg ERP Software
Click on “Yes” to save the changes.
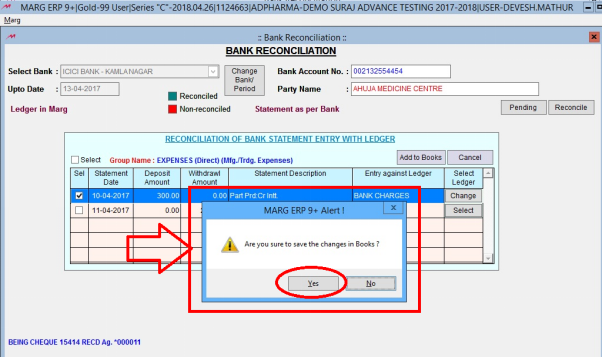
Fig. 1.56 View of Bank Reconciliation Process in Marg ERP Software


 -
Marg ERP 9+


