
Welcome to  -
Marg ERP 9+
-
Marg ERP 9+
Home > Margerp > Icici Registeration > What is the Process of Online Banking Registration with Other bank in Marg Software ?
What is the Process of Online Banking Registration with Other bank in Marg Software ?

In Marg ERP Software, the user can reconcile their bank ledgers with more than 140 available banks by following the below process.
If the user has not completed the Admin Registration from any Online Banking option for any particular reason for example if the user will go to Banking>>Registration>>Select “Other Banks's RECO”.
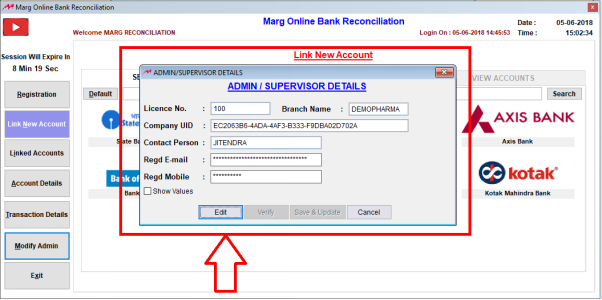
An “Admin/Supervisor Details” window will appear where the software will ask the user to complete the process of Admin Registration.

Fig. 1.1 Menu View to Other Banks Option in Marg ERP Software
It is mandatory to fill the details as if someone takes the backup of the data and then restores it somewhere else or copy Marg Folder then with the help of this option the data will not get misused.
Any kind of operations related to other banks will not get executed. So, if any unknown user/unauthorized person visits to Marg Online Registration then the information will be sent to the Admin/Supervisor in form of an OTP.

Fig. 1.2 View of Admin/Supervisor Details Window in Marg ERP Software
The user will complete the Registration process details and then click on “Save & Register”.

Fig. 1.3 Process to Fill the Admin/Supervisor Details in Marg ERP Software
The details will be saved and then the connection will start getting established from the server.
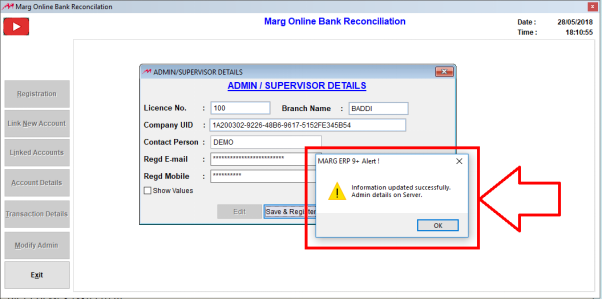
Fig. 1.4 Saving the Admin/Supervisor Details in Marg ERP Software
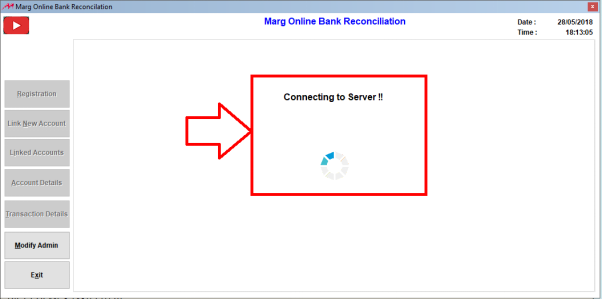
Fig. 1.5 Process of Establishing the Connection from Server
In case any issue occurs while establishing the connection from the server then a message will get displayed (as shown below). The user will then simply click on “Try Again”
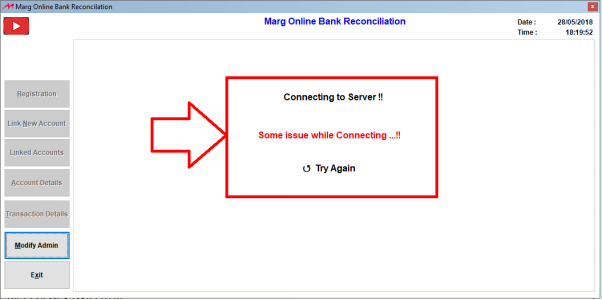
Fig. 1.6 View of Error while Establishing the Connection from Server
If the admin details are already registered then a window will get opened directly for user’s registration. Here, the user will enter/fill the details i.e. Username, Password, Confirm Password, First Name, Last Name, Mobile No., etc.
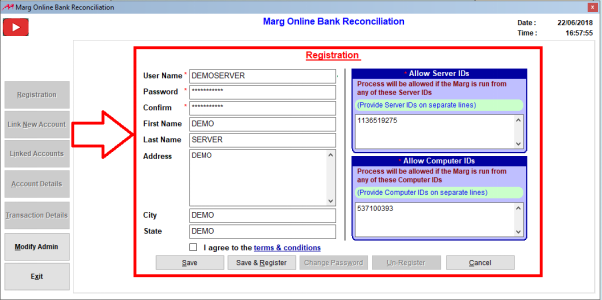
Fig. 1.7 View of Registration Window for Users
The fields against which the star is being placed are mandatory fields as well as the validation is also being kept in these fields like there is validation on Password field.

Fig. 1.8 Guidelines for Filling Details for users at time of Registration
Then next is Allow Server ID’s & Computer ID’s: Here, those ID’s will appear which the supervisor/admin will give the authority for executing the Online process of Marg.
The benefit of these is basically for System Verification i.e. the system from which the user is operating is authorised as any authorised person cannot execute any bank related operations from any unknown system.
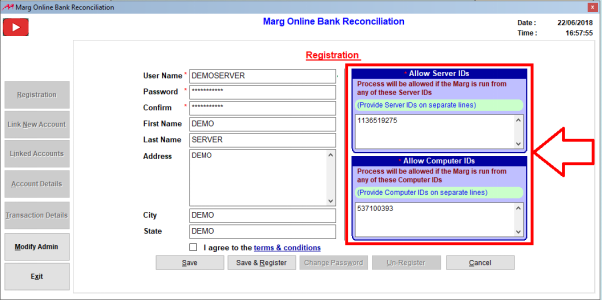
Fig. 1.9 Guidelines for Filling Details for users at time of Registration
If multiple users are using,then the Computer ID can be mentioned on the separate line. And similarly, if there are multiple servers then the multiple servers can also be mentioned on the separate line.
If the user doesn’t want to register and just want to save the data so that in future if any changes are required to be done in any field, then in that case the user will click on “Save”.
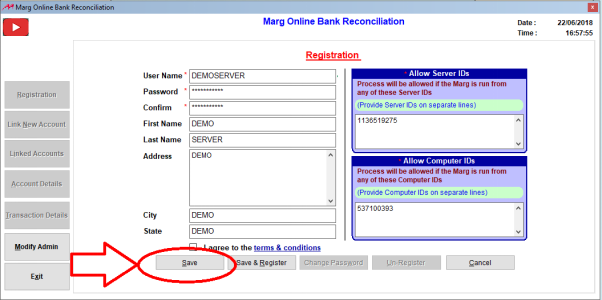
Fig. 1.10 Saving the Details for users at time of Registration
And if the user needs to register then click on “Terms & Conditions”>>Agree to theTerms & Conditions>>Click on “Save & Register”.

Fig. 1.11 Process to Register the Details for users
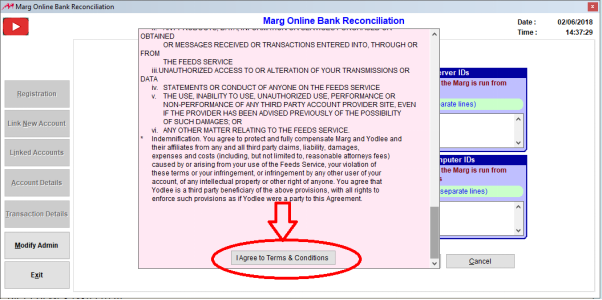
Fig. 1.12 Process to Register the Details for users

Fig. 1.13 Saving the Details for users
Once clicked on Save & Register the user will then get a session of 25 minutes for reconciling and on completion of 25 mins then a message will be received i.e. “Session Timed Out”. The user needs to again open the other bank option.
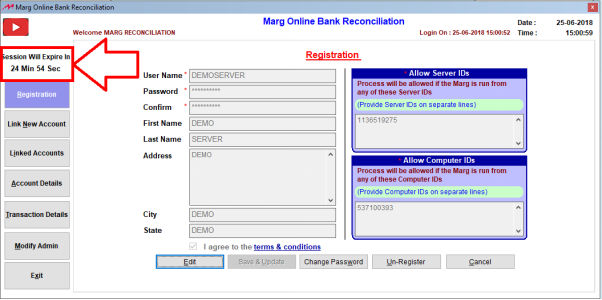
Fig. 1.14 View of Reconciling Session Time for users
After completing the registration process, an email of Confirmation will be received to the user with the Login Credentials and this can be used at time of restoring the data.
But if the user gets a message “Username already exists.” then it means that some other person has already registered with the same username.
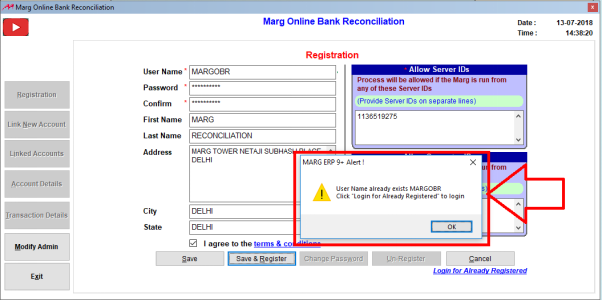
Fig. 1.15 View of an Alert Message in Marg ERP Software
If the user is registering for the first time, then the user can register by changing the Username.
But if the user has already registered and due to any reason like if Company has been changed or data has got corrupted or the data has been restored before getting registered then the user needs to click on “Login for Already Registered”.
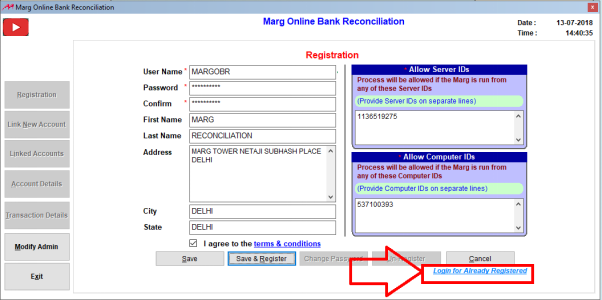
Fig. 1.16 View of an Alert Message in Marg ERP Software
Now, the user will enter the Login Credentials>>Click on “Login”.

Fig. 1.17 Entering the Login Credentials in Marg ERP Software
An Authentication pop up will get displayed if the login credentials gets matched and anOTP will be received on the admin registered email-id. If this particular user is registered on other admin email-id, then the user will receive an OTP on that email-id also.
After verifying both the OTP’s, click on “Submit”.

Fig. 1.18 Process to Verify OTP’s at time of Registration
A message of “User Restored Successfully” will be displayed and the user will click on “Ok”.
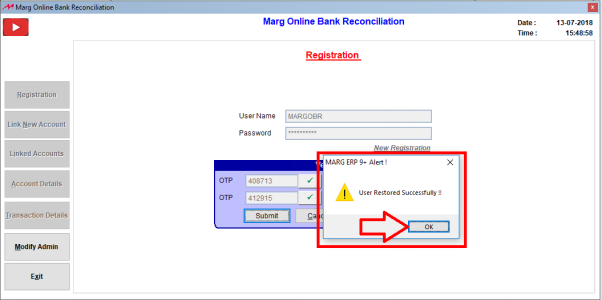
Fig. 1.19 View of an Alert Message at time of Registration
Then a “Registration” window will be displayed where the user can click on “Edit” in order to do any modifications.

Fig. 1.20 View of Registration Window in Marg ERP Software
Then is “Change Password” and “Unregistered”: In order to use both these options an authentication is required i.e. the email-id and phone number which is being entered in admin details or supervisor details; an authentication OTP will be sent on that email id and mobile number. It will not be proceeded further until the user verifies it.
Like, if the user change passwordthen it will ask here “To change password system authentication required. Do you want to continue?”
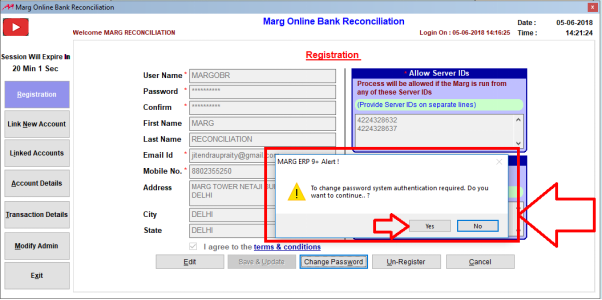
Fig. 1.21 View of Change Password Message in Marg ERP Software
If the user selects “Yes”then it will ask whether OTP must be sent on email-id or mobile or on both.

Fig. 1.22 View of Authentication Required Window in Marg ERP Software
Suppose the user selects mobileand click on “Generate OTP”.The user will enter the OTP which is being received and verify it.
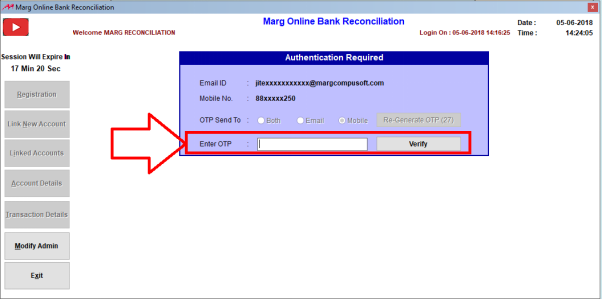
Fig. 1.23 Process to Change Password in Marg ERP Software
The same process will be applicable in case of “Un-register” as well.

Fig. 1.24 Process to Change Password in Marg ERP Software
LINK NEW ACCOUNT
Now, the user requires to fetch the transactions details of banks and ledgers and for that the accounts needs to be linked. For that go toLink New Account.
The number of default banks will get displayed and the user can click any bank from here and can also search from 140 available banks too.
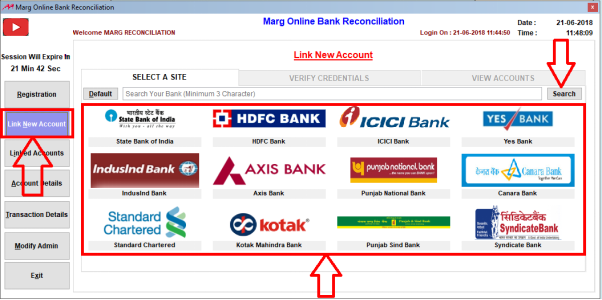
Fig. 1.25 Process to Link New Account in Marg ERP Software
If the user clicks on any bank i.e. ICICI bankthen all the banks related to that particular bank will be shown here like Corporate bank, Business banking, etc.
Now, suppose the user has the account in ICICI Corporate account then the user will click on ICICI Corporate.
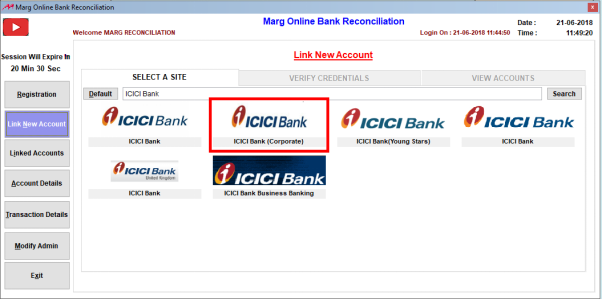
Fig. 1.26 Process to Link New Account in Marg ERP Software
Enter the ICICI Net Banking Login Credentials>> Then Click on “Register”.
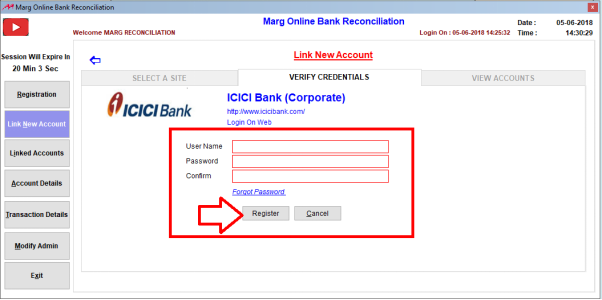
Fig. 1.27 Process to Verify Credentials in Marg ERP Software
Marg doesn’t save any kind of bank related information of any user.
As the user will register themselves then anAccount Reference ID will be provided i.e. Log ID.
The process which is being done for registration whether that login isSuccessful, Partial or Failed, the software keeps that log details within itself which isknown as Account Reference ID.
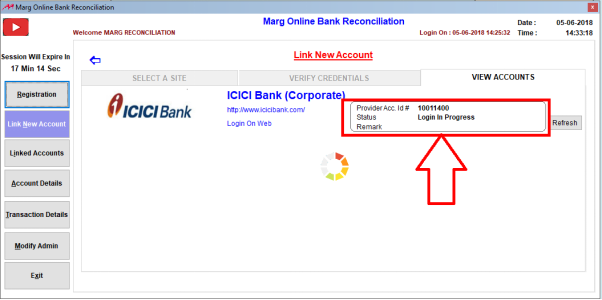
Fig. 1.28 Process to Check the Credentials in Marg ERP Software
If the Login Credentials gets verifiedand “Success” is shown in the status, whatever thenumber of accounts is linked with that particular Net Banking then all those accounts will be displayed here.

Fig. 1.29 Process to Check the Credentials Status in Marg ERP Software
If the multiple accounts are linked in it and from which the user uses only Corporate Account, then the rest of the accounts can be “Removed” from here.
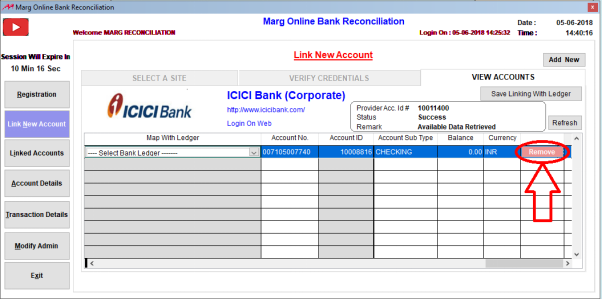
Fig. 1.30 Process to Remove Unused Accounts in Marg ERP Software
In case, if the Login Credentials doesn’t get verified i.e. in Remarks it shows “Incorrect Credentialsthen “Failed” will be shown in the Status. The user can click on back button and can verify the login credentials again.
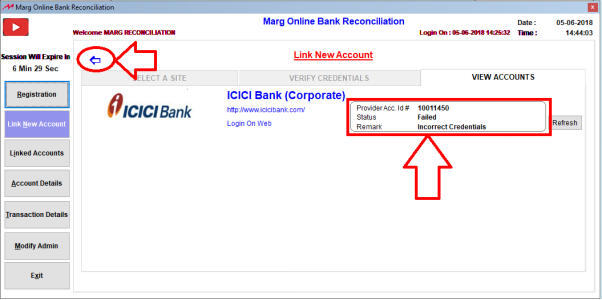
Fig. 1.31 Process to Verify the Failed Login Credentials in Marg ERP Software
LINKED ACCOUNTS
Linked Accounts: All the details will be displayed here for the linked accounts.
If the user doesn’t want to process further any particular account then it can be removed easily from here.

Fig. 1.32 View of Linked Accounts in Marg ERP Software
ACCOUNT DETAILS
Account Details: The user can select here that which type of Account details needs to be viewed.
Like, if the user selects “All Type” then the details of all the linked banks will be displayed here.
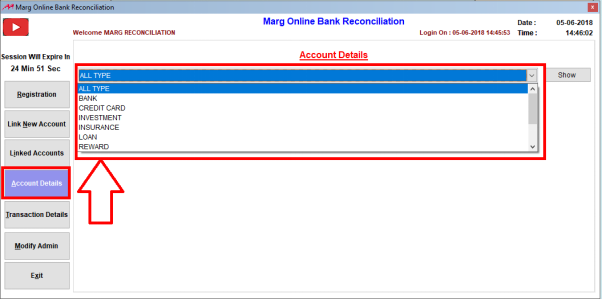
Fig. 1.33 View of Account Details in Marg ERP Software
Now, in order to map account with the ledger; click on “Account Map with Ledger”>> Select that ledger which needs to be mapped>>Then click on “Save mapping with ledger”.
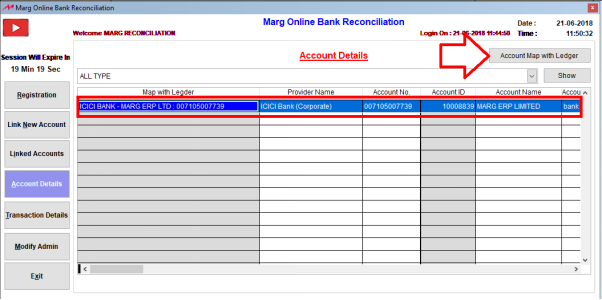
Fig. 1.34 Process to Map Account with Ledger in Marg ERP Software

Fig. 1.35 Process to Map Account with Ledger in Marg ERP Software
TRANSACTION DETAILS
Here, the user can check Transaction Details. In order to check transaction details; Select the Bank Account>>Specify the dates i.e. from which date till which date the Transaction Details>>Click on “Show”.
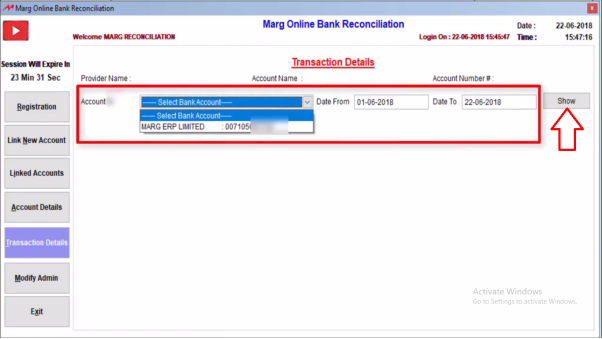
Fig. 1.36 Process to View Transaction Details in Marg ERP Software
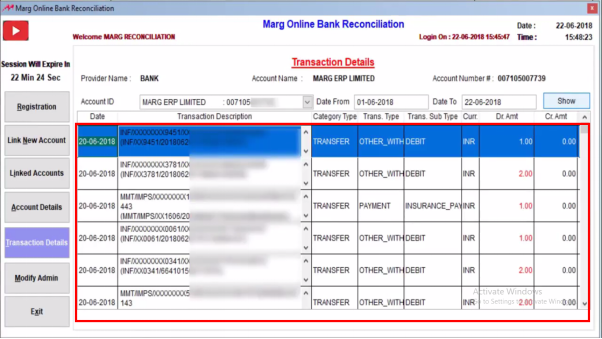
Fig. 1.37 View of Transaction Details in Marg ERP Software
MODIFY ADMIN
The admin can modify the details anytime as per their requirement.