

Welcome to  -
Marg ERP 9+
-
Marg ERP 9+
Home > Margerp > Marg Payy > What is Marg Pay and how to Register with Marg Pay ?
What is Marg Pay and how to Register with Marg Pay ?

Process to Register for Marg Pay in Marg ERP Software
OVERVIEW OF MARG PAY
-
Generally, when a distributor receives the payment online, they are not able to identify which retailer/customer has sent the payment and from which state. Most of the time, the distributor doesn’t even know that against which bill the payment has been received.
-
Also, in order to fight the Corona epidemic, maintaining physical distancing has become a necessity today. So, keeping this into consideration; Marg has introduced the world’s first and unique collection platform ‘MARG PAY’.
-
Marg Pay is a platform to promote business payment digitization & automate all the repetitive & time-consuming processes involved from invoicing to payment. Thus, improving the accuracy of captured data, increasing consistency & reducing the operational expenses.
BENEFITS OF MARG PAY
- Schedule Payments
- Automatic Reminders to Customers (Send SMS)
- Effortless & Auto- Reconciliation
- Payment from UPI, Net Banking, Credit/ Debit card, NBFC & Wallet
- Exemption from delay in Collecting and Depositing Payment
- No need to carry Cash
- No more Payment Frauds and much more!
- Stay Safe, Follow Social Distancing
PROCESS TO REGISTER FOR MARG PAY IN MARG ERP SOFTWARE
- Go to Masters >> Passwords & Powers >> Operator’s.
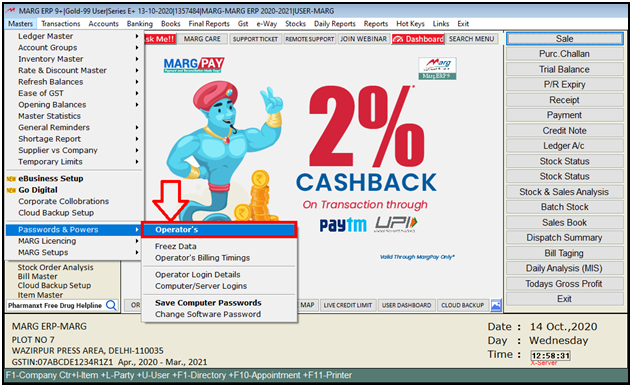
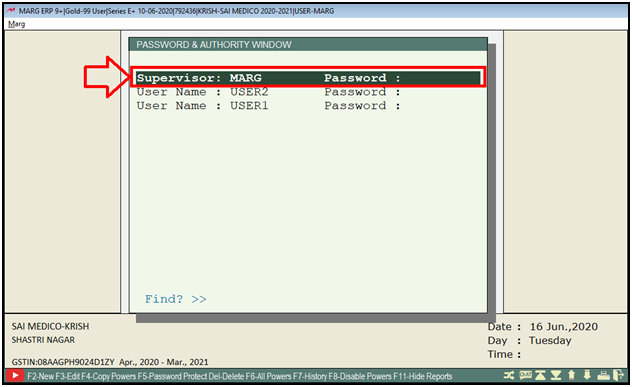
- A ‘Password & Authority’ window will appear.
- Select the user to whom the permission of Digital Payment Collection needs to be given.
- A ‘Powers’ window will appear in which the user will search ‘Digital’.
- Then click on ‘Accept’.

- A ‘Digital’ window will appear.
- In ’Digital Collection’ option, the user will set ‘Y’ i.e. yes.

- Press ‘Escape’ key in order to save the changes.
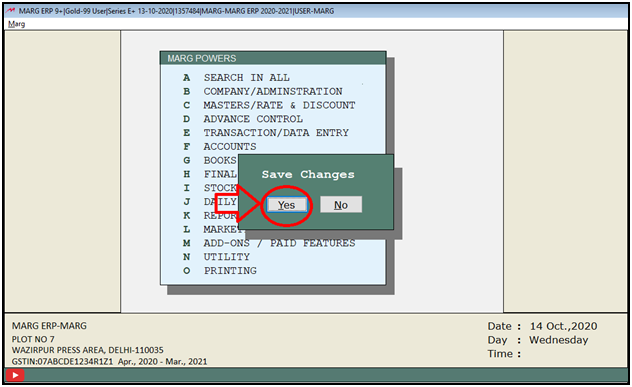
- The user can view that an alert message of ‘Powers Change’ will appear.

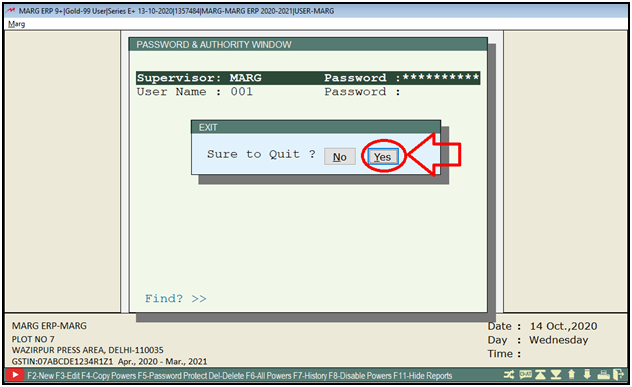
- Again press ‘Escape’ key.

- An ‘Exit’ window will appear in which the user will click on ‘Yes’.
- Now press ‘CTRL+U’ on the home screen of the software.
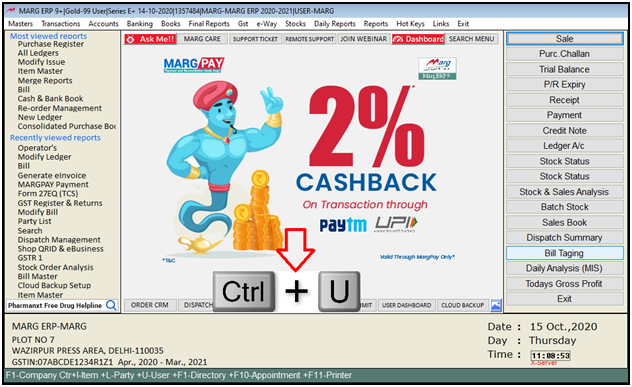
- The user will Re-login to Marg ERP Software.
- A Change User window will appear in which the user will enter the User-ID & User Password.
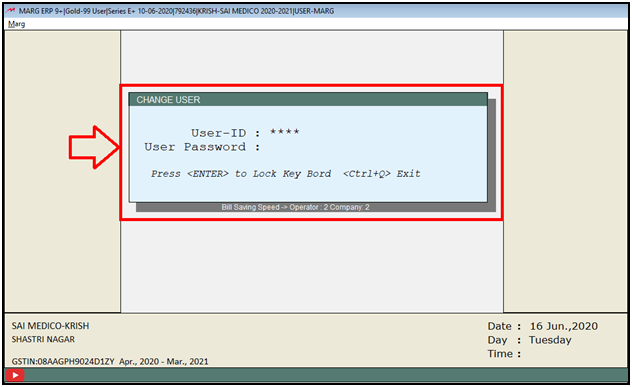
- Again, a Change User window will appear in which the user will press ESC Key.

- Now the user will go to Banking >> Registration >> Digital Collection.

- A ‘Digital Collection’ window will appear.
- The user will click on ‘Edit’ and select the ‘Bank Charges Ledger’ and ‘Discount Ledger’.

Fig. 1.1 View of Digital Collection Window in Marg ERP Software

- Then click on ‘Save’.

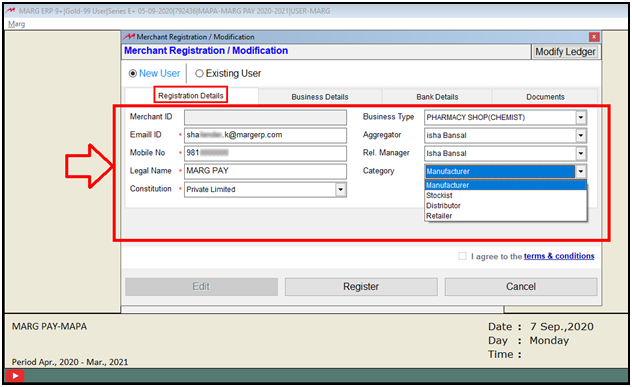
- A ‘Merchant Registration/Modification’ window will appear with different tabs:
1. Registration Details:
a. E-mail ID: In this, the E-mail ID will get auto-filled as mentioned at the time of Company Creation.
b. Mobile No.: In this, the Mobile No. will get auto-filled as mentioned at the time of Company Creation.
c. Legal Name: Here, the Legal Name will be mentioned. Suppose ‘Marg Pay’.
d. Constitution: Here, the user will select the Constitution as per the requirement i.e. whether the company is Private Limited or is a Partnership firm or Public Limited. Suppose ‘Private Limited’.
e. Business Type: Select the ‘Business Type’ as per the requirement. Suppose, ‘Pharma Distribution Batch’.
f. Aggregator Name: Select the ‘Aggregator Name’ as per the requirement.
g. Relationship Manager: Select the ‘Relationship Manager’ as per the requirement.
h. Category: Select the ‘Category’ as per the requirement.
2. Business Details:
Here, the user will fill the below details:
a. CIN: Mention the CIN details.(Mandatory for 'Private Ltd. & OPC Firms)
b. PAN: Mention the PAN details.
It is a must for the proprietor to fill the PAN details
In case of a Private Limited company, both CIN and PAN details are mandatory to be filled.
c. GSTIN, Website & Address: The details of GSTIN, Website and Address will get auto-filled as mentioned at the time of Company Creation.
d. City: Mention the City as per the requirement.
e. State: Mention the State as per the requirement.
f. Pin: Mention the Pin Code as per the requirement

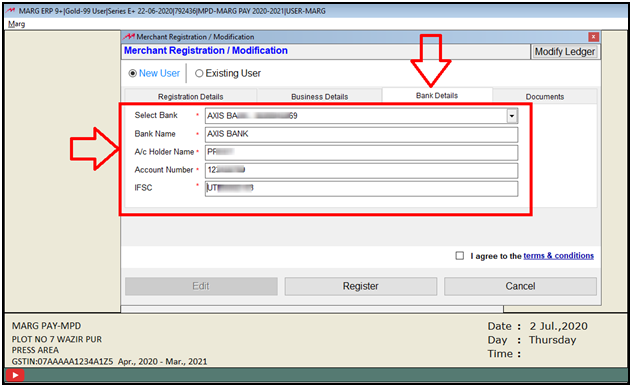
3. Bank Details:
Here, the user will fill the below details:
a. Select Bank: Here, the user will select the bank as per the requirement.
As the user will select the Bank then Bank Name, A/c Holder Name, Account Number and IFSC Code will get displayed on behalf of the selected bank.
These details will only be shown here if the user has mentioned in the bank details.
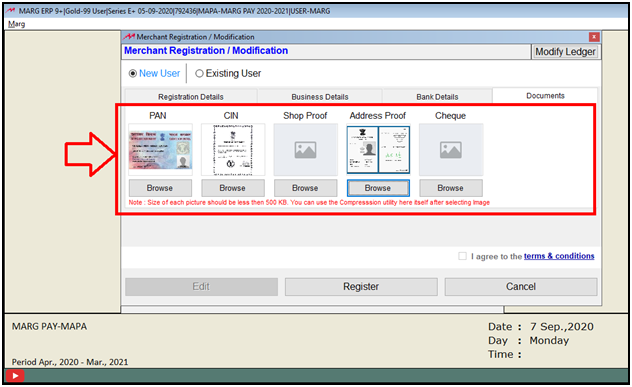
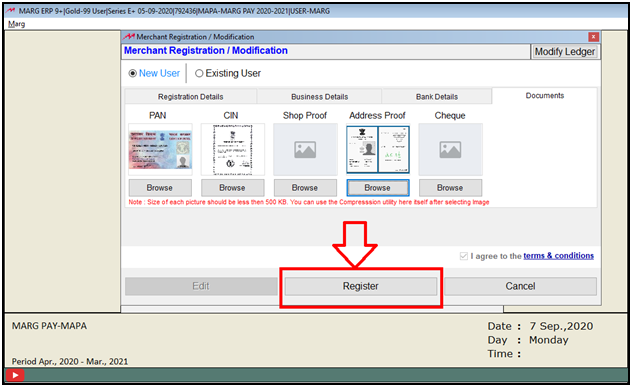
4. Documents:
Here, the user will click on ‘Browse’ in order to attach the required documents i.e. PAN Card, CIN, Shop Proof, Address Proof etc.
The size of each document must be less than 500 KB and file should be in JPG format.
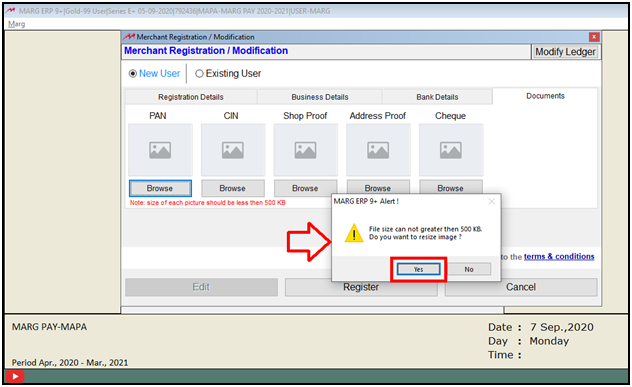
- If the size of the document is more than 500 KB then an alert message will get displayed ‘File size is greater than 500 KB. Do you want to resize image?’
- The user will click on ‘Yes’.
- The document column is not changeable after approved Marchant.
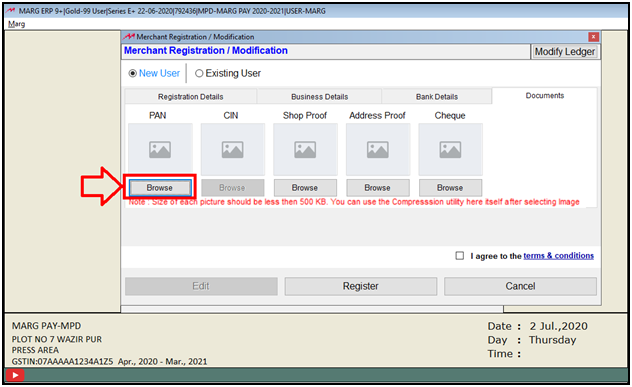
Fig. 1.20 View of Merchant Registration/Modification Window in Marg ERP Software
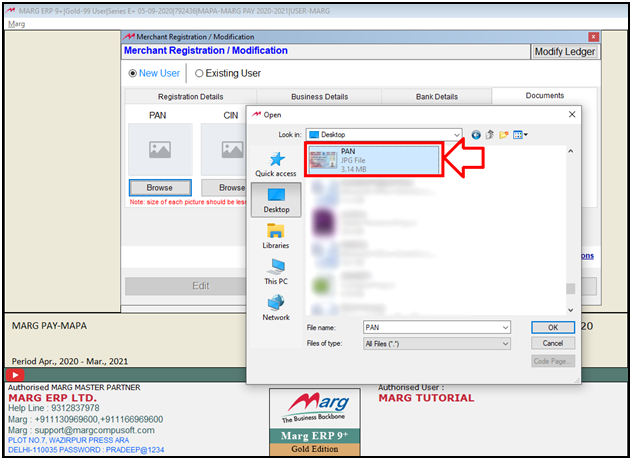
Fig. 1.2 View of Merchant Registration/Modification Window in Marg ERP Software
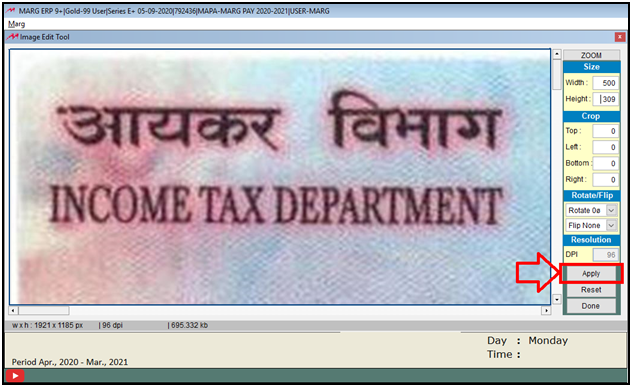
- An ‘Image Edit Tool’ window will appear in order to compress the image.
- Here, the user will mention the ‘Width’ and ‘Height’ of the image and then click on ‘Apply’.
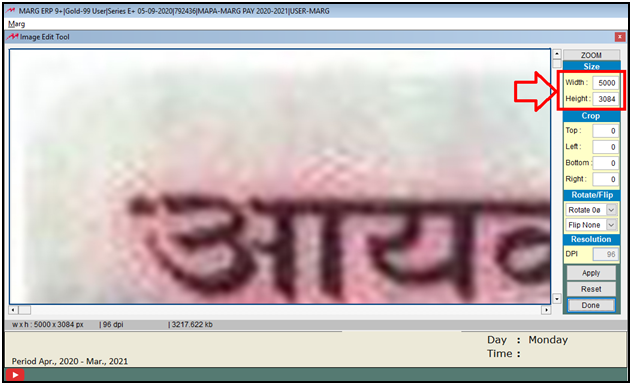
Fig. 1.3 View of Image Edit Tool Window in Marg ERP Software
- Click on ‘Done’.

- A ‘Successfully Image Saved’ pop up will appear.
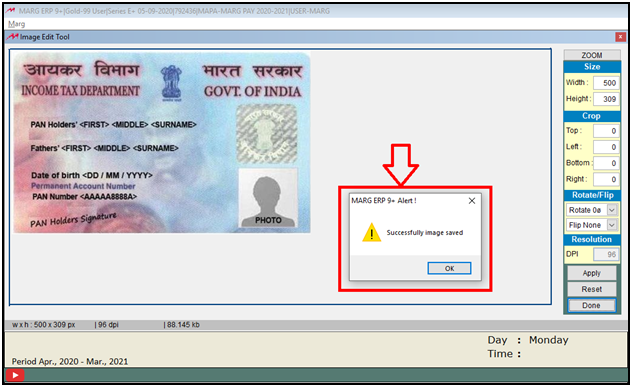
- Now the user can view that the image has been successfully attached.

- So in this way the user will attach the required documents.
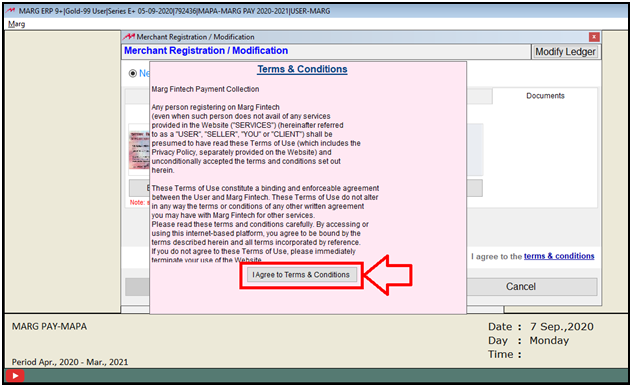
- Once all the details have been filled, the user will tick on ‘Terms & Conditions’.

- A ‘Terms and Conditions’ window will appear in which the user will tick on ‘I Agree To Terms and Conditions’.
- Then the user will click on ‘Register’.
- Now the software will ask whether the user needs to save the given information. The user will click on ‘Yes’.
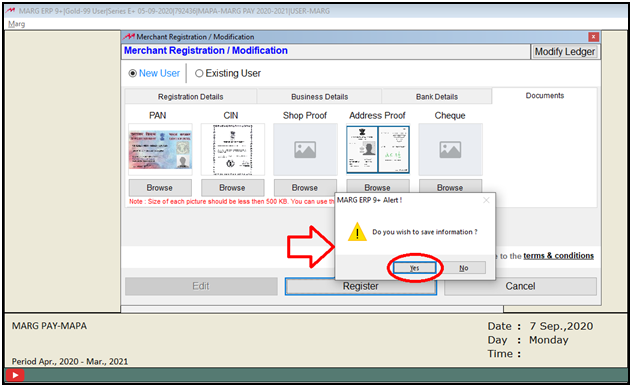
- Then an alert message of ‘Do you wish to register as Merchant?’ will appear.
- The user will click on ‘Yes’.

- The user will receive an OTP on the Registered Email ID and Registered Mobile number.
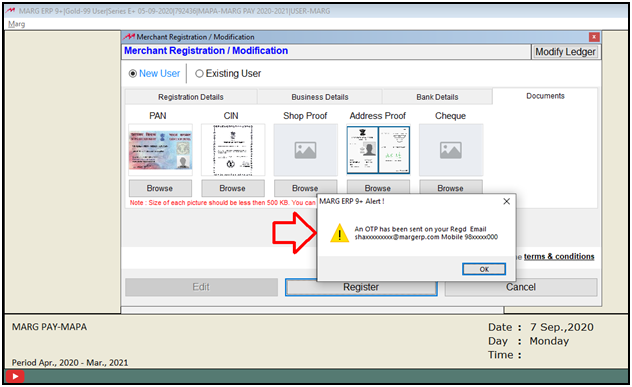
- The user will fill the OTP received on the Registered Email ID and Registered Mobile number and Verify it.
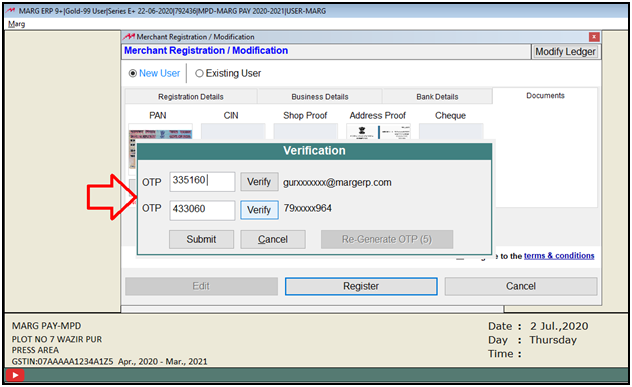
Fig. 1.4 View of Verification Window in Marg ERP Software
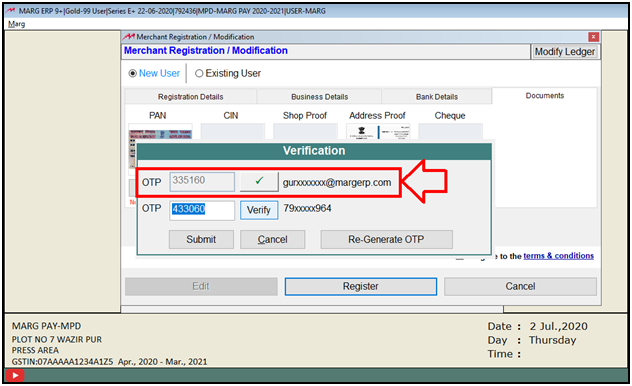
Fig. 1.5 View of Verification Window in Marg ERP Software

- Then click on ‘Submit’.

- Now an alert message of ‘Merchant Registered Successfully’ will appear.
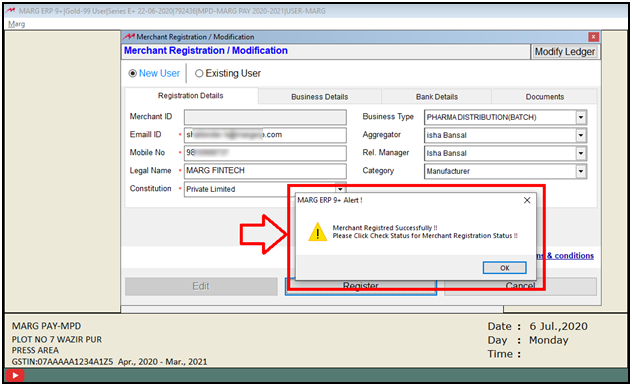
- Once the Merchant is registered successfully then the user can view that the Merchant ID automatically gets created.
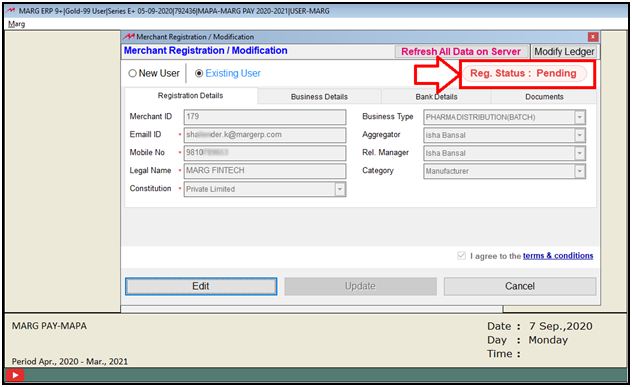
- And when the user registers for the first time then it displays the status as ‘Pending’.
The user will receive an E-mail regarding the registration status once it gets approved by Marg Fintech. So in order to approve the Pending Registration Status, the user will click on ‘Check Status’.

In This Page


