

Welcome to  -
Marg ERP 9+
-
Marg ERP 9+
Home > Margerp > Multi Printing > What is the Process of Multi printing in Marg Software ?
What is the Process of Multi printing in Marg Software ?

Multi Printing In Marg ERP Software
Overview of Multi Ledger Printing in Marg ERP Software
Process of Multi Ledger Printing in Marg ERP Software
Process of Multi Voucher Printing in Marg ERP Software
Process of Trial Balance Printing in Marg ERP Software
Process of Interest and TDS in Marg ERP Software
OVERVIEW OF MULTI LEDGER PRINTING IN MARG ERP SOFTWARE
In Marg ERP Software, the option of Multi Printing facilitates the user to view/print the report of multiple ledgers/transactions/vouchers etc.
The main purpose is to have a detailed account of all the entries made by an organisation at one place.
PROCESS OF MULTI LEDGER PRINTING IN MARG ERP SOFTWARE
Firstly, Go to Books >> Multi Printing >> Multi Ledger Printing. Press Enter.
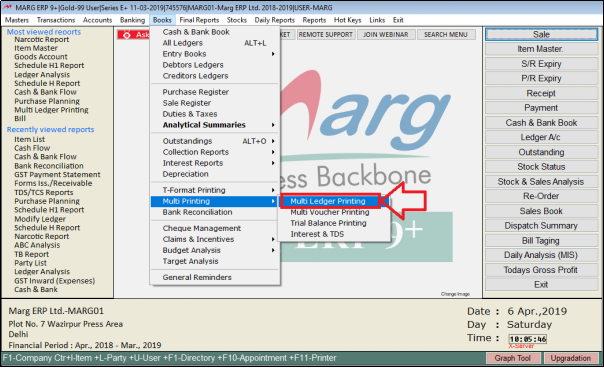
Fig 1.1 Menu view to Multi Ledger Printing in Marg ERP Software
A Select Group window will appear.
The user will select a group by pressing Space bar key and to select all groups press Shift + * key.
Suppose, press Space bar to select ‘Sundry Debtors’ then press Enter.
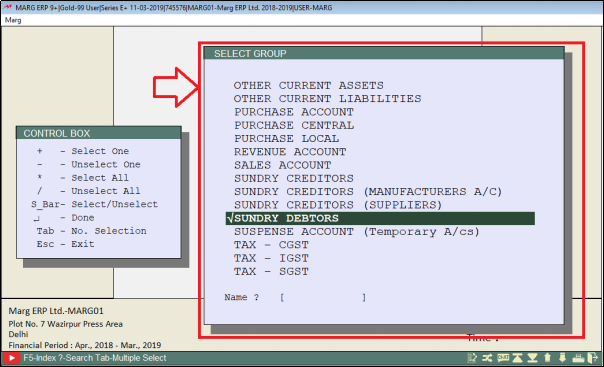
Fig 1.2 View of Select Group window in Marg ERP Software
A Select Group window will appear.
Index On: Select the field on which the printing is to be done. Suppose, select ‘Ledger’.
Closing Balance: Select whether to print the close balance as per the requirement from the drop down. Suppose, select ‘All’.
Selected Station: Select whether to print the station or not. Suppose, select ‘N’.
Selected Area: Select whether to print the area or not. Suppose, select ‘N’.
Selected M.R.: Select whether to print the M.R. or not. Suppose, select ‘N’.
Selected Route: Select whether to print the Route or not. Suppose, select ‘N’.
The user will now click on ‘Accept’.

Fig 1.3 View of Selection window in Marg ERP Software
Again, a Selection window will appear.
From- Enter the date from when to print. Suppose, enter “01-04-2018”.
To- Enter the date till when to print. Suppose, enter “31-03-2019”.
From (A-Z) & To (A-Z) - Enter the alphabet to filter the ledgers alphabetically.
Debtors/ Creditors- Select whether to include Debtors/Creditors. Suppose, select ‘Yes’.
Now the user will click on ‘Accept’.
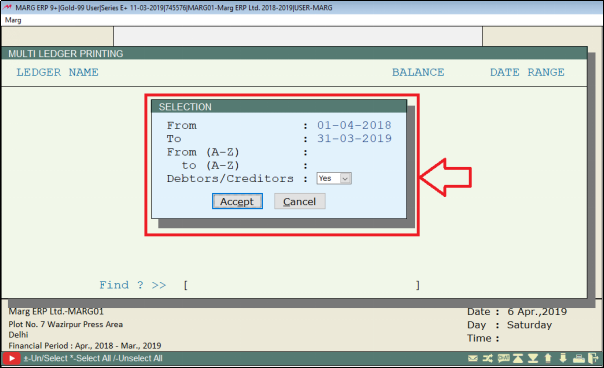
Fig 1.4 View of Selection window in Marg ERP Software
A detailed view of ledgers will be displayed. Press Alt + P.
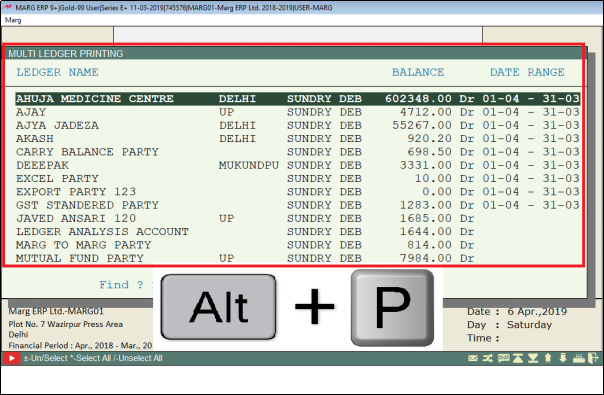
Fig 1.5 View of detailed view of ledgers in Marg ERP Software
A Controls window will appear.
The user will now define the required details.
To view, the user will click on ‘View’ or to print click on ‘Print’ etc.
Suppose, click on ‘View’.
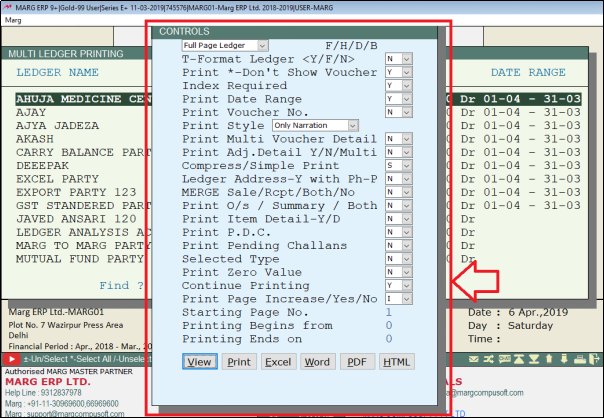
Fig 1.6 View of Controls window in Marg ERP Software
The user can view the summarised multi ledger balance.
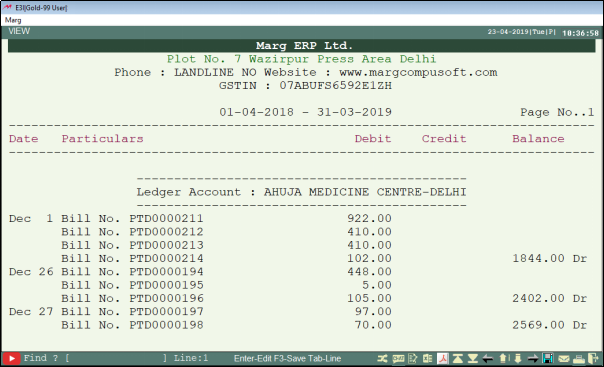
Fig 1.7 View of summarised multi ledger balance in Marg ERP Software
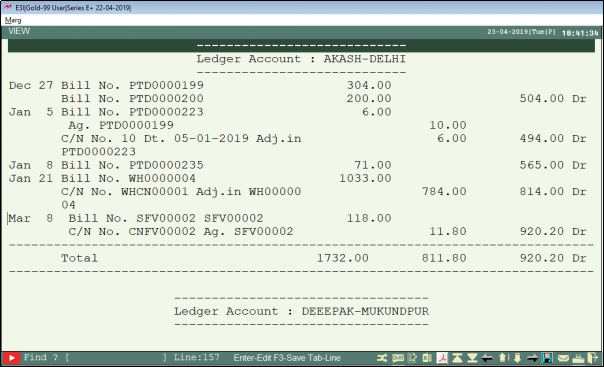
Fig 1.8 View of summarised multi ledger balance in Marg ERP Software
PROCESS OF MULTI VOUCHER PRINTING IN MARG ERP SOFTWARE
Firstly, Go to Books >> Multi Printing >> Multi Voucher Printing. Press Enter.
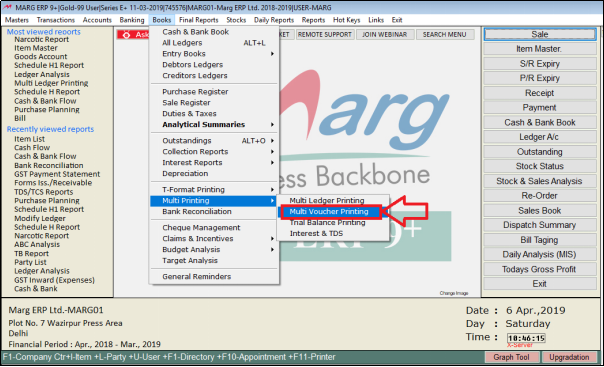
Fig 2.1 Menu view to Multi Voucher Printing in Marg ERP Software
A Multi Voucher Printing window will appear.
Other Cash- Select whether to print other cash as per the requirement. Suppose, select ‘No’.
From Date- Enter the date from when to print the vouchers. Suppose, enter ’01-04-2018’.
To Date- Enter the date till when to print the vouchers. Suppose, enter ’31-03-2019’.
From Voucher & To Voucher- Specify the voucher numbers i.e. from which voucher no. till which voucher no. the user needs to print. Select as per the requirement.
Voucher Type- Select the voucher type as per the requirement. Suppose, select ‘All’.
Print Format- Select the print format as per the requirement. Suppose, select ‘Voucher’.
Ledger Heads- Select whether to print ledger heads or not. Suppose, select ‘Yes’.
Bill Details- Select whether to print bill details or not. Suppose, select ‘Yes’.
Print Copies- Enter the number of copies to print. Suppose, enter ‘1’.
Single Party- Select whether to print single party or not. Suppose, select ‘No’.
To view, the user will click on ‘View’ or to print click on ‘Print’ etc.
Suppose, click on ‘View’.
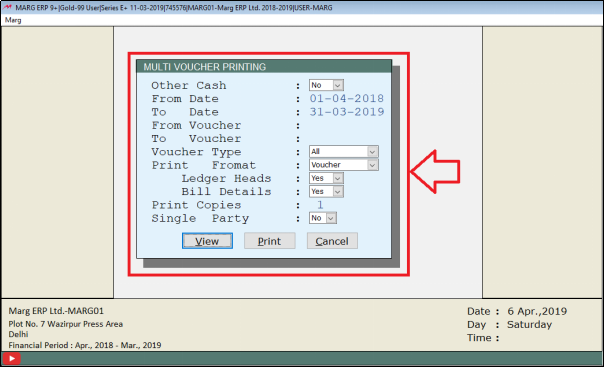
Fig 2.2 View of Multi Voucher Printing window in Marg ERP Software
The user can view the summarised view of the multi vouchers.
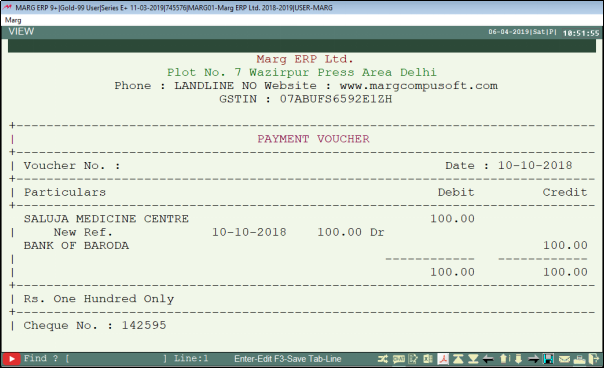
Fig 2.3 View of summarised view of multi vouchers in Marg ERP Software

Fig 2.4 View of summarised view of multi vouchers in Marg ERP Software
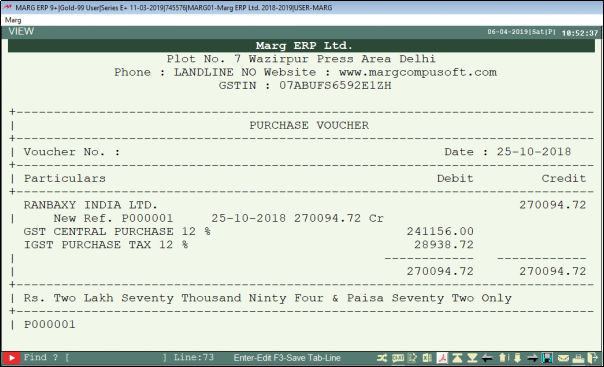
Fig 2.5 View of summarised view of multi vouchers in Marg ERP Software
PROCESS OF TRIAL BALANCE PRINTING IN MARG ERP SOFTWARE
Firstly, Go to Books >> Multi Printing >> Trial Balance Printing. Press Enter
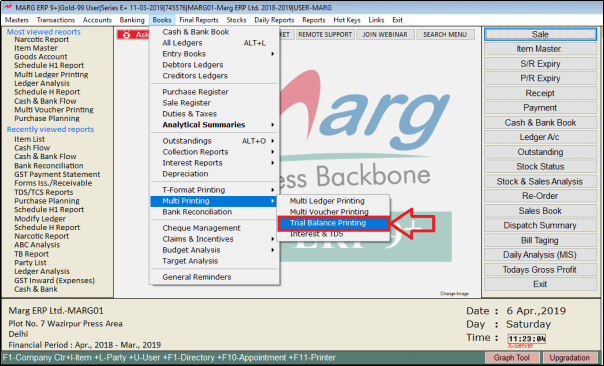
Fig 3.1 Menu view to Trial Balance Printing in Marg ERP Software
A Select Group window will appear.
The user will select a group by pressing Space bar key and to select all groups press Shift + * key.
Suppose, press Space bar key to select ‘Sundry Debtors’. Press Enter.
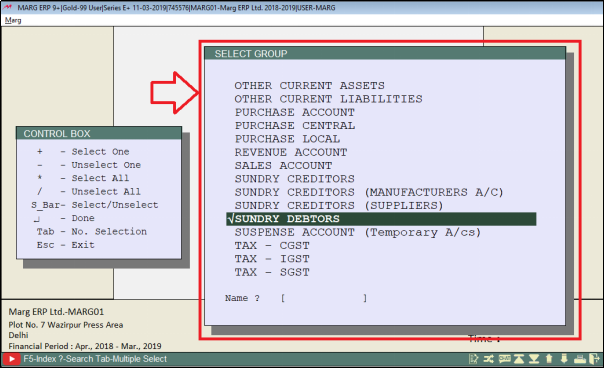
Fig 3.2 View of Select Group window in Marg ERP Software
A Selection window will appear.
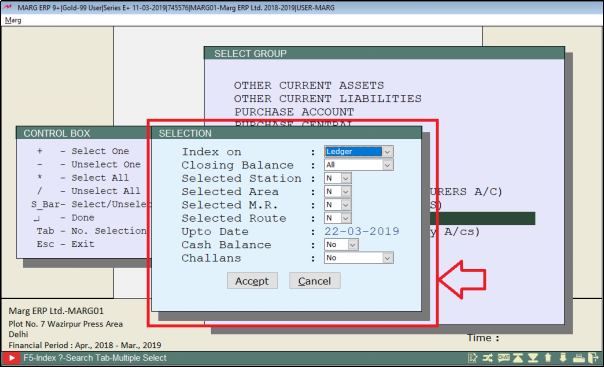
Fig 3.3 View of Selection window in Marg ERP Software
Index On: Select the field on which the printing is to be done. Suppose, select ‘Ledger’.
Closing Balance: Select whether to print the close balance as per the requirement from the dropdown.Suppose, select ‘All’.
Selected Station: Select whether to print the station or not. Suppose, select ‘N’.
Selected Area: Select whether to print the area or not. Suppose, select ‘N’.
Selected M.R.: Select whether to print the M.R. or not. Suppose, select ‘N’.
Selected Route: Select whether to print the Route or not. Suppose, select ‘N’.
Upto Date- Enter the date up to when user wants to print the trial balances. Suppose, enter “31-03-2019”.
Cash Balance- Select whether to print the Cash balance as per the requirement from the dropdown. Suppose, select ‘No’.
Challans- Select whether to print challans or not. Suppose, select ‘No’.
Now the user will click on ‘Accept’.

Fig 3.4 View of Selection window in Marg ERP Software
Again, a Selection window will appear.
From (A-Z) & To (A-Z) - Enter the alphabet to filter the ledgers alphabetically.
Debtors/ Creditors – Select whether to include Debtors/Creditors. Suppose, select ‘Yes’.
Now the user will click on ‘Accept’.
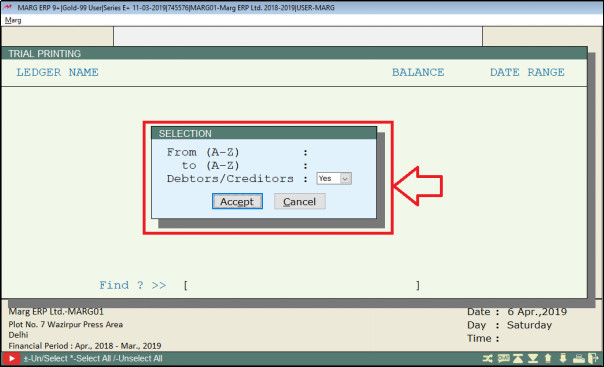
Fig 3.5 View of Selection window in Marg ERP Software
A detailed view of trial balance will be displayed. Press Alt + P.
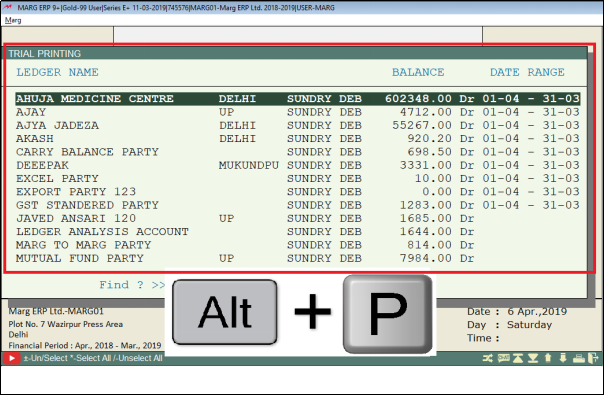
Fig 3.6 View of detailed view of Trial balance in Marg ERP Software
A Print Trial window will appear.
Without Opening: Select whether to print with or without opening balance. Suppose, select ‘Y’.
Print Due Details: Select whether or not to print due details. Suppose, select ‘N’.
Print Contact Details: Select whether or not to print contact details. Suppose, select ‘N’.
To view, the user will click on ‘View’ or to print click on ‘Print’ etc.
Suppose, the user will click on ‘View’.
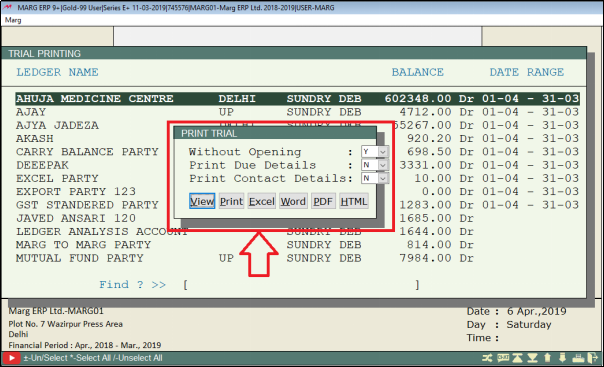
Fig 3.7 View of Print Trial window in Marg ERP Software
The user can view the summarised view of multi trial balance.
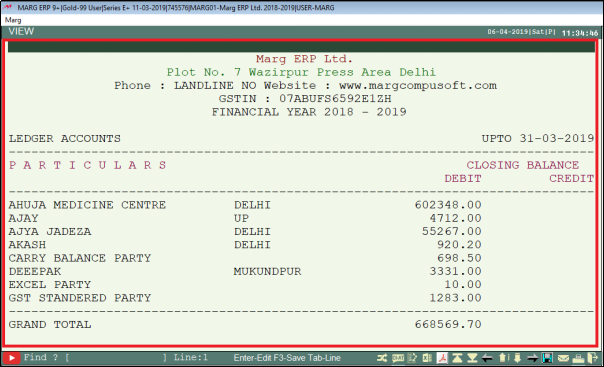
Fig 3.8 View of summarised view of multi trial balance in Marg ERP Software
PROCESS OF INTEREST AND TDS IN MARG ERP SOFTWARE
Firstly, Go to Books >> Multi Printing >> Interest & TDS. Press Enter.
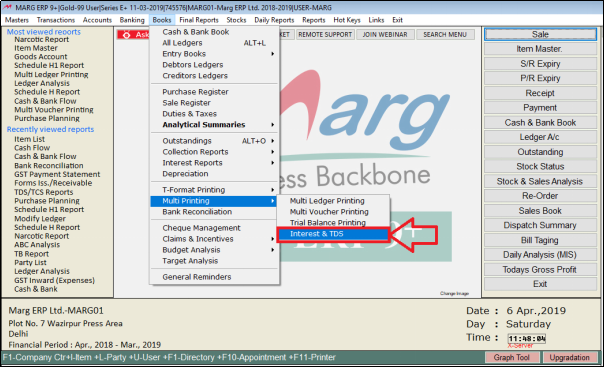
Fig 4.1 Menu view to Interest & TDS in Marg ERP Software
A Select Group window will appear.
The user will select a group by pressing Space bar key and to select all groups press Shift + * key. Press Enter.

Fig 4.2 View of Select Group window in Marg ERP Software
A Selection window will appear.
Index On: Select the field on which the printing is to be done. Suppose, select ‘Ledger’.
Closing Balance: Select whether to print the close balance as per the requirement from the dropdown. Suppose, select ‘All’.
Selected Station: Select whether to print the station or not. Suppose, select ‘N’.
Selected Area: Select whether to print the area or not. Suppose, select ‘N’.
Selected M.R.: Select whether to print the M.R. or not. Suppose, select ‘N’.
Selected Route: Select whether to print the Route or not. Suppose, select ‘N’.
The user will click on ‘Accept’.

Fig 4.3 View of Selection window in Marg ERP Software
An Interest window will appear.
Days - Select the number of days as per the requirement. Suppose, select ‘365’.
From - Enter the date from when to print. Suppose, enter “01-04-2018”.
To - Enter the date till when to print. Suppose, enter “31-03-2019”.
Opening days on - Select the opening date as per the requirement. Suppose, select ‘1-365’.
Cr. Days from Bill – Select whether to include Cr. Days from bill. Suppose, select ‘Yes’.
Default Cr. Days – If selected Cr. Days from bill, enter the default Cr. Days.
TDS% - Enter the TDS% as per the requirement.
TDS Exclusive – Select whether or not to include TDS Exclusive. Suppose, select ‘Yes’.
The user will click on ‘Accept’
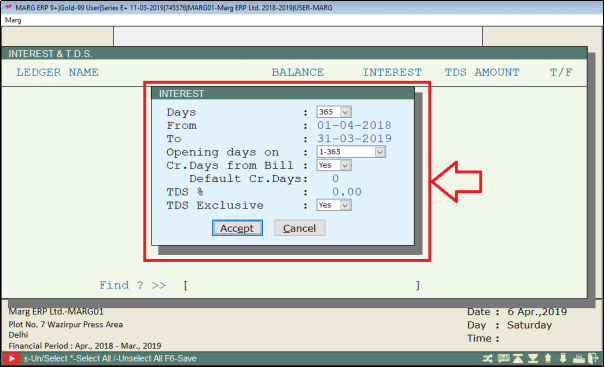
Fig 4.4 View of Interest window in Marg ERP Software
A detailed view of Interest & TDS will be displayed. Press Alt + P.
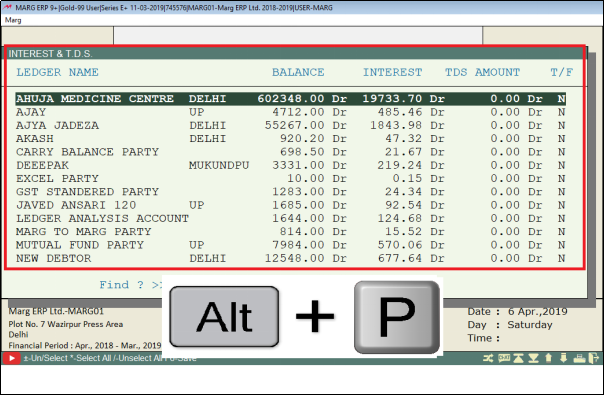
Fig 4.5 View of detailed view of Interest & TDS in Marg ERP Software
A Print window will appear.
To print a simple list, select ‘Print Simple List’ and to print interest ledger select ‘Interest Ledger’.
Suppose, select ‘Print Simple List’. Press Enter.
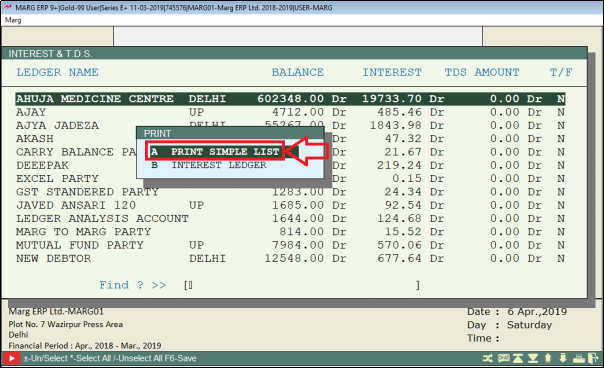
Fig 4.6 View of Print window in Marg ERP Software
To view, the user will click on ‘View’ or to print click on ‘Print’ etc.
Suppose, click on ‘View’.

Fig 4.7 View of process to print Interest & T.D.S in Marg ERP Software
The summarised view of Interest & T.D.S will be displayed.
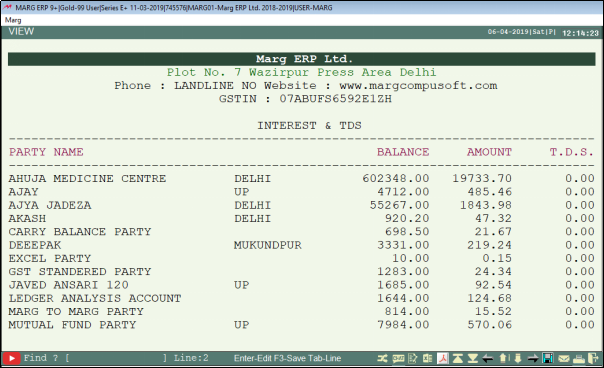
Fig 4.8 View of summarised view of Interest & T.D.S in Marg ERP Software
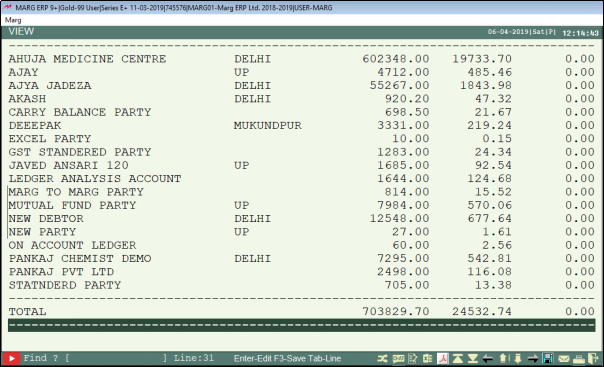
Fig 4.9 View of summarised view of Interest & T.D.S in Marg ERP Software

In This Page


