

Welcome to  -
Marg ERP 9+
-
Marg ERP 9+
Home > Margerp > Payment Gateway > How to enable bijlipay option in Marg Erp software ?
How to enable bijlipay option in Marg Erp software ?

Bijlipay Option in Marg ERP Software
Overview of Bijlipay Option in Marg ERP Software
Process of Bijlipay in Marg ERP Software
Process to View How Users Can Receive the Payments through Bijlipay POS Device
OVERVIEW OF BIJLIPAY OPTION IN MARG ERP SOFTWARE
Bijli pay is a card swipe device that offers an end to end payment solution.
With the help of using Bijlipay, Marg users can easily conduct seamless POS transactions with the advantage of invoice and payment reconciliation.
PROCESS OF BIJLIPAY IN MARG ERP SOFTWARE
 The user requires to login the software from the supervisor’s id.
- Firstly, the user needs to enable the Bijlipay option from the Control Room.
- Go to Masters>> Marg Setups>>Control Room.

Fig. 1.1 Menu View to Control Room Option in Marg ERP Software
- A “Control Room” window will appear in which the user will select “Search in all” option.
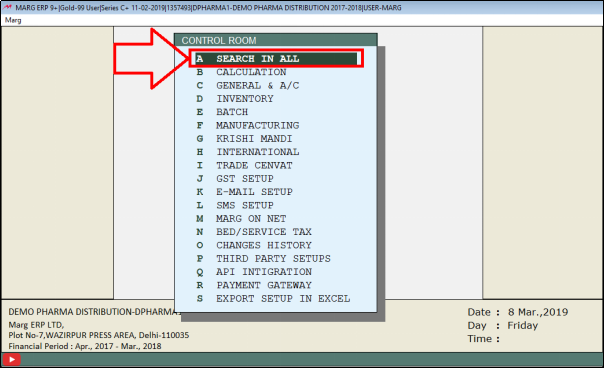
Fig. 1.2 View of Control Room Window in Marg ERP Software
- A “Controls” window will appear in which the user will search for “Bijli” in “Search” field.
- Then click on “Accept”.
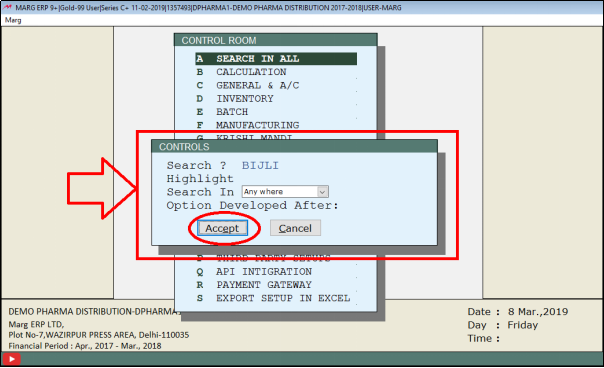
Fig. 1.3 View of Controls Window in Marg ERP Software
- A “Bijli” window will appear in which the user will set this field “BijliPay Payment Gateway” to “Y” means Yes.
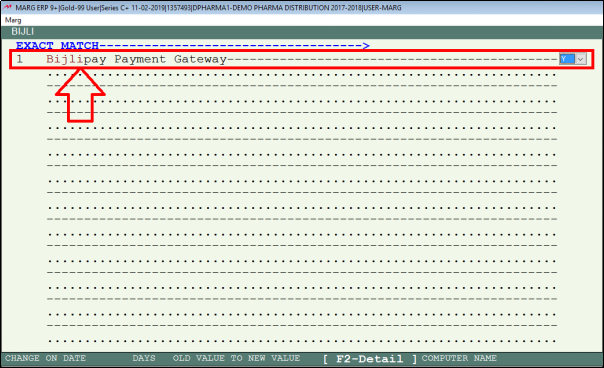
Fig. 1.4 View of Bijlipay Window in Marg ERP Software
- Press “Escape” key twice and click on “Yes” to save the changes.
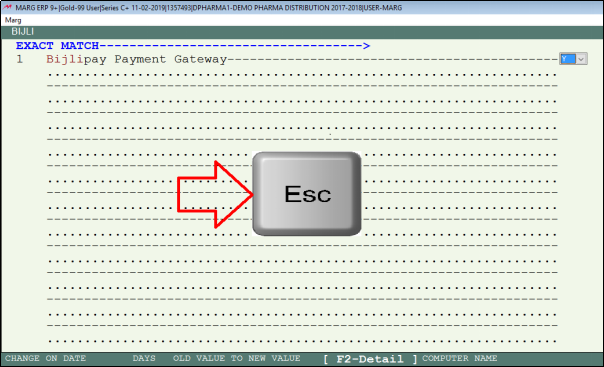
Fig. 1.5 Saving the Changes in Marg ERP Software

Fig. 1.6 Saving the Changes in Marg ERP Software
- Now, go to Masters>>Payment Gateways>>Bijlipay.
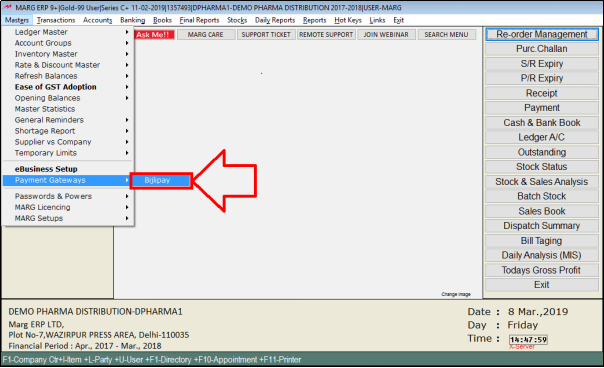
Fig. 1.7 Menu View to Bijlipay Option in Marg ERP Software
- A “Marg Bijlipay Integration” window will appear with different fields:
a. Business Name: The user will mention the business name here. Suppose, Demo Pharma Distribution.
Now, in order to enter the details, click on “Edit”.
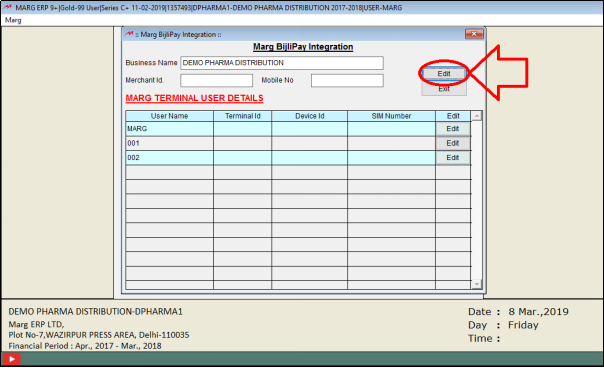
Fig. 1.8 View of Marg BijliPay Integration Window in Marg ERP Software
b. Merchant Id: The Merchant Id will be provided to the user through Bijlipay in case the user has taken Bijlipay configuration.
c. Mobile Number: Mention the mobile number.
- Once the user will fill the details, click on “Save”.
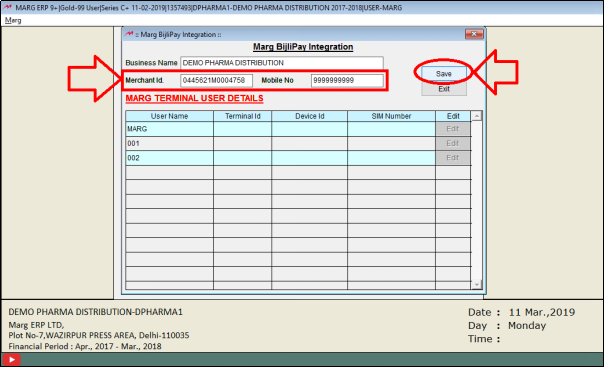
Fig. 1.9 View of Marg BijliPay Integration Window in Marg ERP Software
- As the user will click on “Save” button, the number of created users in the software will get displayed.
- Here Terminal ID will appear which is known as “Unique ID” and Username ID will be linked to that system from whom the user receives the payment.
- Suppose, there can be 2 users who receives payment from the same device then in that case, the same Terminal ID will appear in Terminal Field.
- And if the payment is being received from a different device then the user will define here different Terminal ID.
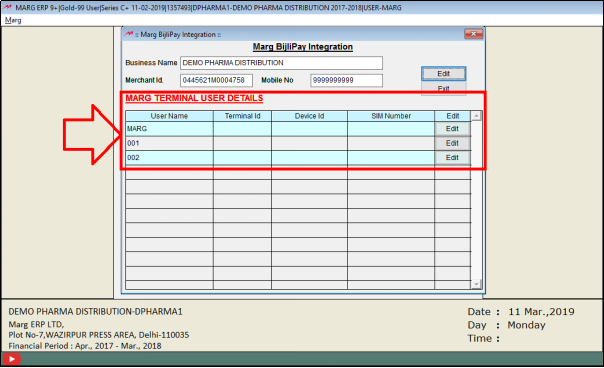
Fig. 1.10 View of Marg BijliPay Integration Window in Marg ERP Software
- The Terminal ID will be shown to the user with the name of” TID” i.e. Terminal ID on the upper side of the device of Bijli Pay.
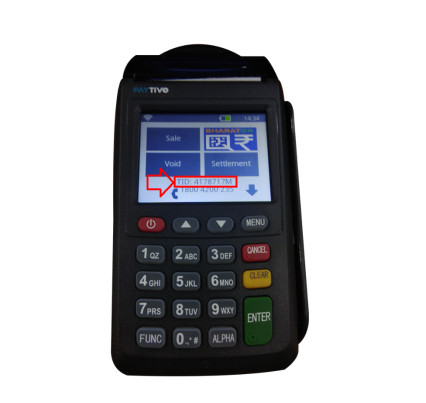
Fig. 1.11 View of BijliPay Machine
- In order to enter this ID, the will click on “Edit from “Marg BijliPay Integration” window.
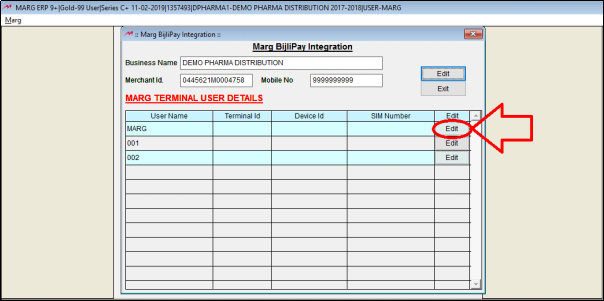
Fig. 1.12 View of Marg BijliPay Integration Window in Marg ERP Software
- A “Marg Terminal User Details” window will appear in which the software will auto pick the “Username”.
- Then enter the “Terminal ID”.
- The “Device id” and “Sim Number” are for future purpose so, it is not mandatory to fill these fields right now. The user will keep these fields as blank for now.
- And then click on “Save”.
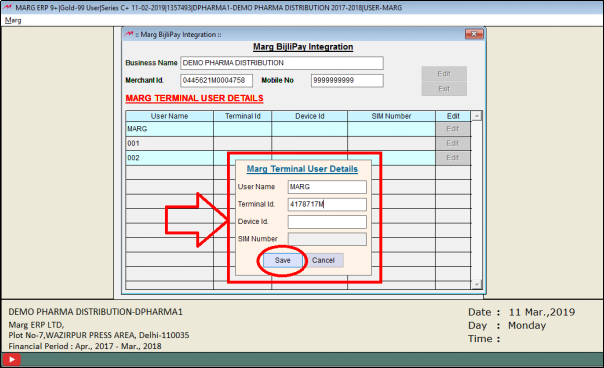
Fig. 1.13 View of Marg Terminal User Details Window in Marg ERP Software
- If in case the Terminal id is not entered besides to any of the user, then the software will not do the bill patch from Bijli Pay device.
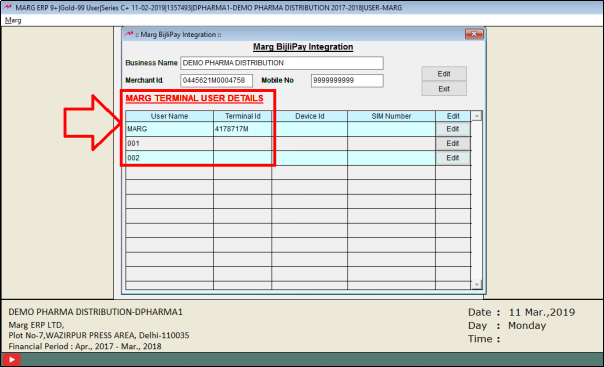
Fig. 1.14 View of Marg BijliPay Integration Window in Marg ERP Software
- The user will come out from this window by clicking on” Yes”.

Fig. 1.15 View of Marg BijliPay Integration Window in Marg ERP Software
PROCESS TO VIEW HOW USERS CAN RECEIVE THE PAYMENTS THROUGH BIJLIPAY POS DEVICE
- Firstly, the user will enable the Multi-Mode of payment for which go to Masters>>Marg Setups>>Control Room.

Fig. 1.16 Menu View to Control Room Option in Marg ERP Software
- A “Control Room” window will appear in which the user will click on “Search in All” option.

Fig. 1.17 View of Control Room Window in Marg ERP Software
- The user will search “Split”.
- Then click on ‘Accept’.
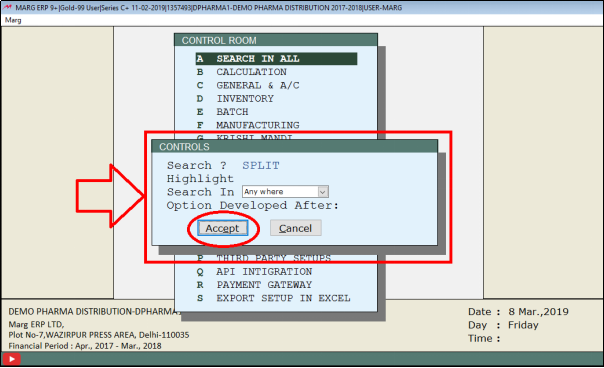
Fig. 1.18 View of Controls Window in Marg ERP Software
- A ‘Split’ window will appear.
- In ‘Cash/Credit No H-Half Split M-Multi R-Credit C-Cash P-Party B-Party” option, the user will set ‘M’ i.e. Multi.
- If the user will set ‘Half’, ‘Cash’ or ‘Credit’ then only these options will be shown at the time of payment and the option of Bijli Pay will not appear.
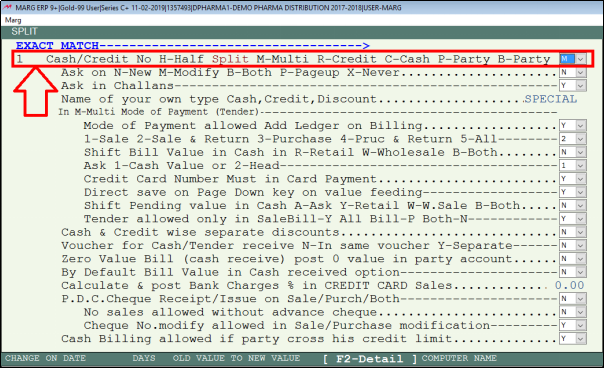
Fig. 1.19 View of Split Window in Marg ERP Software
- So, after setting this field to Multi means ‘M’; the user will press ‘Escape’ key.
- Then click on ‘Yes’ to save the changes.
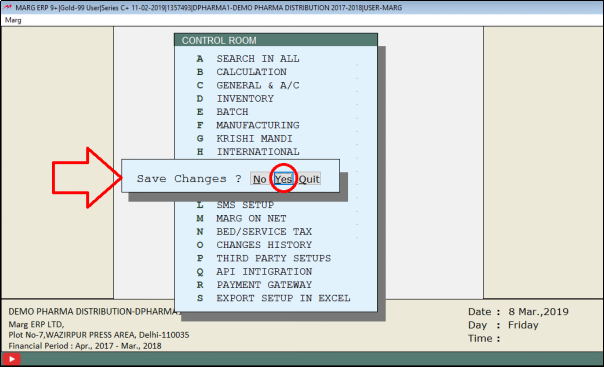
Fig. 1.20 Saving the Changes in Marg ERP Software
- Now, the user will create a sale bill.
- Go to Transactions>>Sale>>Bill.
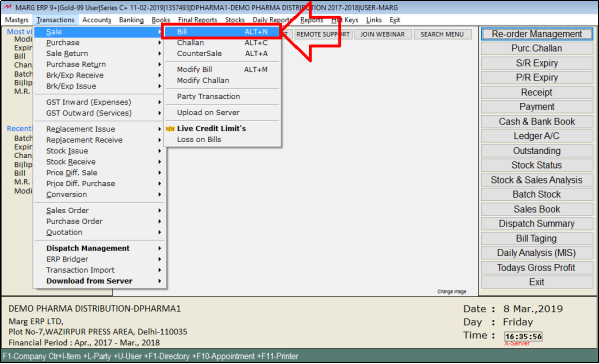
Fig. 1.21 Menu View to Creation of Sale Bill in Marg ERP Software
- The user will load the items in the Sale Bill.
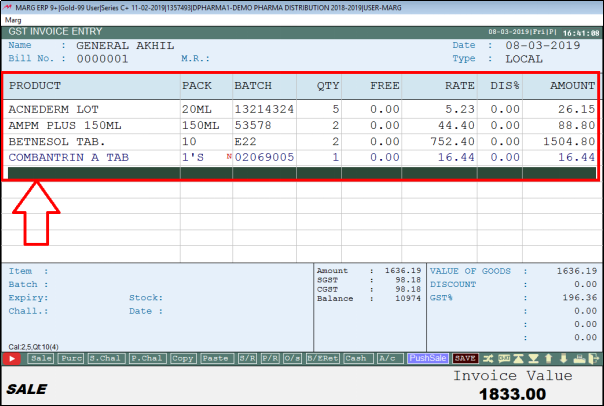
Fig. 1.22 Process to Create Sale Bill in Marg ERP Software
- After loading the items in the bill, when the user will press ‘End’ key to save this bill then a window of ‘Mode of Payment’ will appear.
- On the left side, the user can view ‘Bijli Pay’ Payment mode in multi-mode of payment.
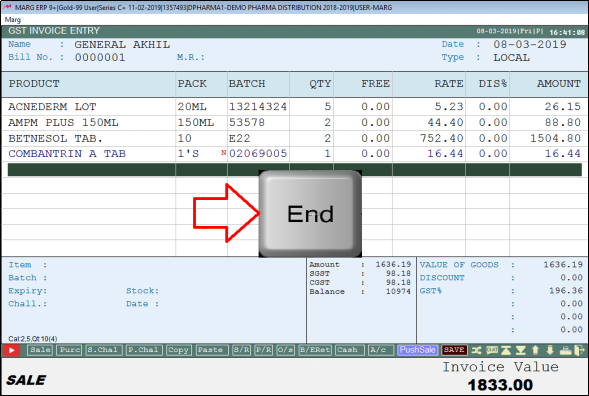
Fig. 1.23 Saving the Sale Bill in Marg ERP Software
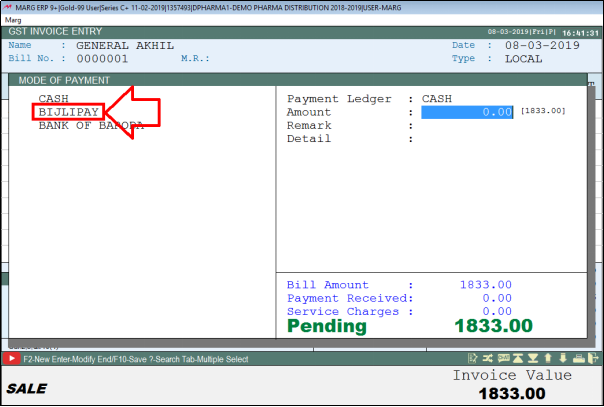
Fig. 1.24 View of Mode of Payment Window in Marg ERP Software
- The user will now adjust the bill for which click on the “Bijli Pay’ mode.
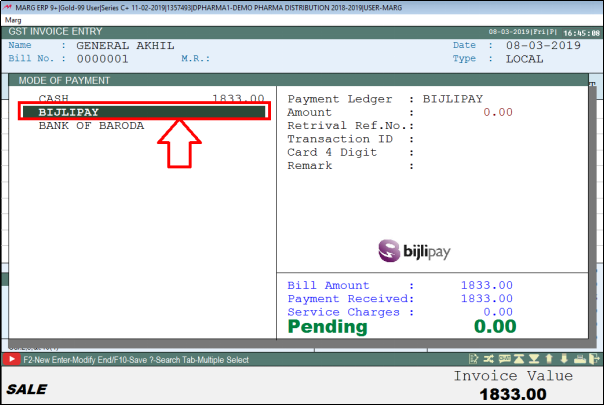
Fig. 1.25 View of Mode of Payment Window in Marg ERP Software
- Then in ‘Amount’ field, the user will mention the amount which needs to be paid.
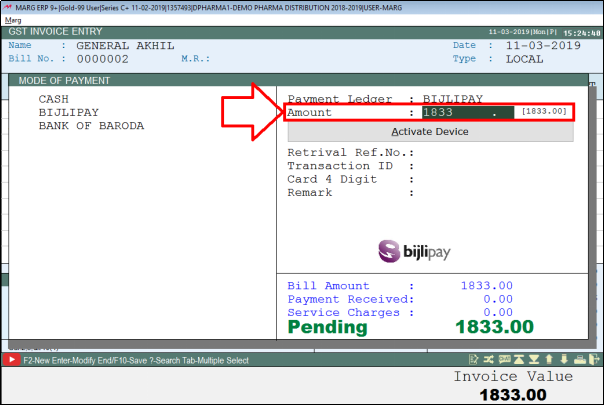
Fig. 1.26 View of Mode of Payment Window in Marg ERP Software
- The user will click on ‘Activate Device’ and take care of one thing that Bijli-Pay must be connected with an Internet Connection.

Fig. 1.27 View of Mode of Payment Window in Marg ERP Software
- Now, the user will click on ‘Down’ arrow button in the Bijli Pay device.
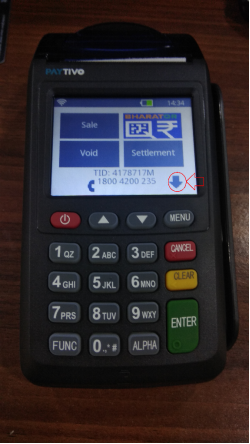
Fig. 1.28 Process to Adjust the Bill through Bijli Pay Device
- Again, the user will click on “Down” arrow link.
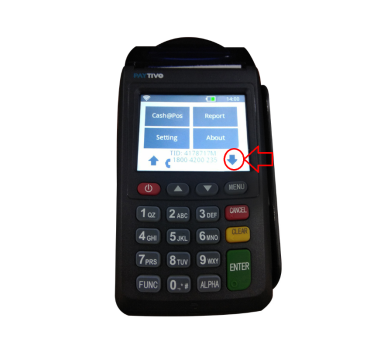
Fig. 1.29 Process to Adjust the Bill through Bijli Pay Device
- Select ‘Retail’.

Fig. 1.30 Process to Adjust the Bill through Bijli Pay Device
- After clicking on ‘Retail, the user can view that the Bill Amount will be shown in the Device.
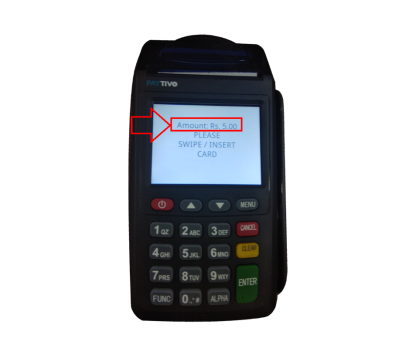
Fig. 1.31 Process to Adjust the Bill through Bijli Pay Device
- Now, the user will swipe the card of the customer/party in Bijli pay device.
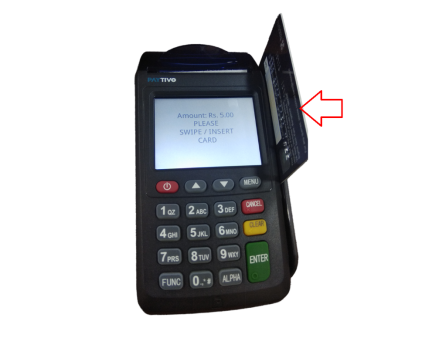
Fig. 1.32 Process to Adjust the Bill through Bijli Pay Device
- Now, the customer/party will enter their Pin number.
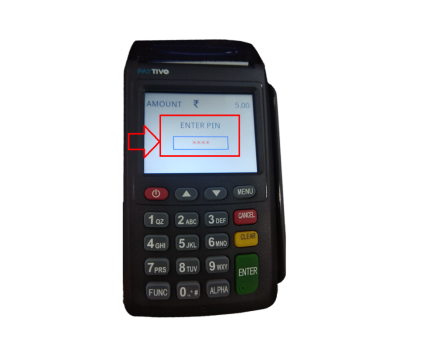
Fig. 1.33 Process to Adjust the Bill through Bijli Pay Device
- Then the user will enter the customer’s mobile number.

Fig. 1.34 Process to Adjust the Bill through Bijli Pay Device
- Then is ‘Send Receipt or ‘Print Receipt’ i.e. if the customer wants the receipt on their mobile number then select ‘Send Receipt’.
- And if customer wants the print out of receipt, so click on ‘Print Receipt’, and from here the print out of the receipt will come.
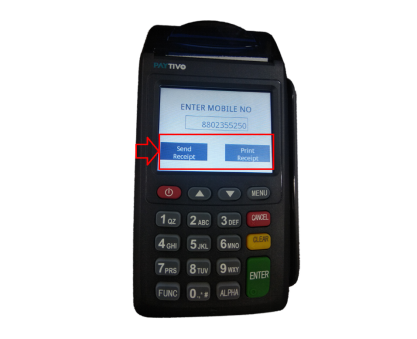
Fig. 1.35 Process to Adjust the Bill through Bijli Pay Device
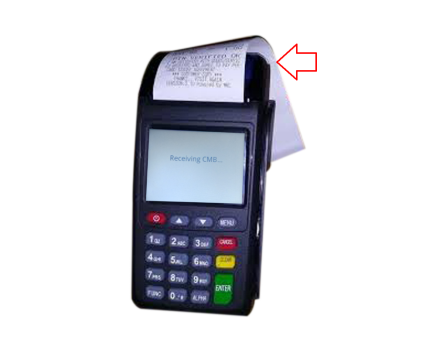
Fig. 1.36 Process to Adjust the Bill through Bijli Pay Device
- Once the details will be patched from the terminal then in the software, the user will click on the ‘Swipe Card’.
- The software will auto pick the given fields like Retrieval Ref No., Transaction ID, Card 4 digit.
- The user can give any remark in remark field as per the requirement.
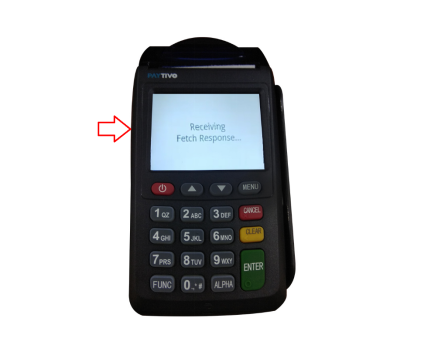
Fig. 1.37 Process to Adjust the Bill through Bijli Pay Device

Fig. 1.38 Process to Adjust the Bill through Bijli Pay Device
- So, in this way the payment process will get completed.
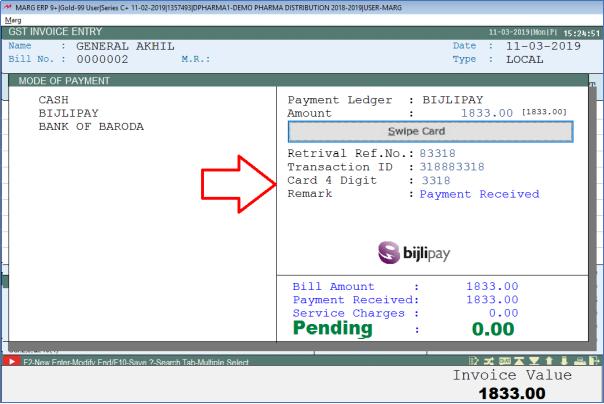
Fig. 1.39 Process to Receive Payment through Bijli Pay Device

In This Page


