

Welcome to  -
Marg ERP 9+
-
Marg ERP 9+
Home > Margerp > Purchase Analysis > How to view Purchase Return Book in Marg Software ?
How to view Purchase Return Book in Marg Software ?

Overview of Purchase Return Book Option in Marg ERP Software
Process to View Purchase Return Book in Marg ERP Software
OVERVIEW OF PURCHASE RETURN BOOK OPTION IN MARG ERP SOFTWARE
- Purchase Return Book Option in Marg ERP Software enables the user to easily view or print the purchase Return book.
- The user can view the bill-by-bill detail of the purchase returns including the tax & other details of the transactions based on the filter settings and requirement.
PROCESS TO VIEW PURCHASE RETURN BOOK IN MARG ERP SOFTWARE
- Click on Reports >> Purchase Analysis >> Purchase Return Book.

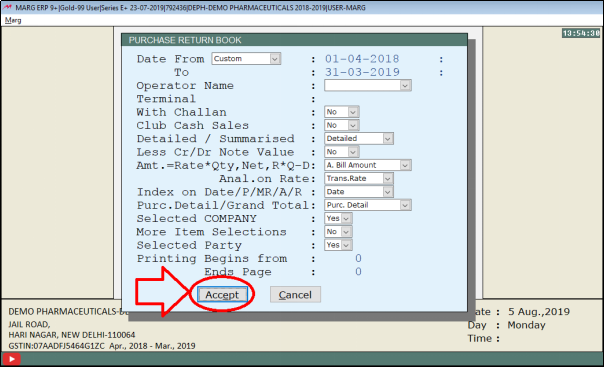
- A “Purchase Return Book” window will appear with the following fields in which the user will enter the desired details in order to view the purchase return book:
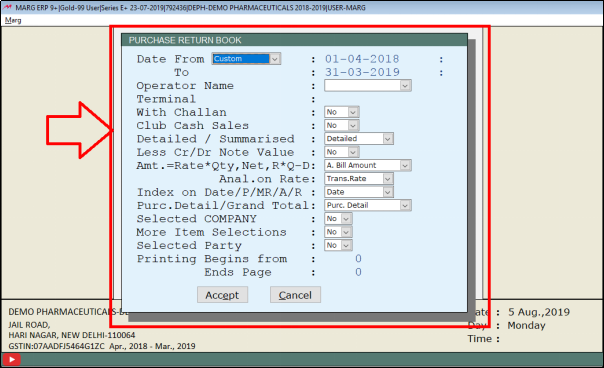
1. Date From (Custom) & To- Define the date range between which the user wants to view the Purchase Return Book. (Suppose, select “All Time” i.e. 1st April 2018 to 31st March 2019)
2. Operator Name- If the user wants to view the purchase return book operator wise, then select the operator.
3. Terminal- Specify the name where the system is operating.
4. With Challan- Select whether to view the Purchase Return Book with challan or without challan. (Suppose, select No)
5. Club Cash Sales- Select whether to club cash sales as Yes, No or WoP as per the requirement. (Suppose, select No)
6. Detailed/Summarised- Select whether to view the detailed report or summarised report.
If the user will select the option ‘Detailed’ then it will show the bill-by-bill detail of all the purchase return transactions day-wise. If the user will select the option ‘Summarized’ then it will show only the net purchase return transactions of each day in the purchase return book. (Suppose, select Detailed)
7. Less Cr/Dr Note value- Select whether to deduct the Cr/Dr Note value or not. (Suppose, select No)
8. Amt. =Rate* Quantity, Net, R*Q-D- Select the base on which to calculate the amount from the dropdown. (Suppose, select “B. Rate*Qty”)
9. Anal. On Rate- Select the base on which to analyze the rate. (Suppose, select Trans Rate)
10. Index on Date/P/ MR/A/R- Select whether to index report on the basis of Date, Party, MR, Area or Route. (Suppose, select Date)
11. Purchase Detail/ Grand Total- Select whether to view the purchase return book report in Detail of purchase only/Grand total/Purchase Detail with Credit & Debits.
If the user will select the option ‘P/D + Dr / Cr’ then it will show the tax details & other details and debit / credit adjustments against each purchase bill.
If the user will select the option ‘Purchase Detail’ then it will show the tax details & other details of each purchase bill in the purchase return book.
If the user will select ‘Grand Total’ will show only the net billed amount of each purchase bill in the purchase return book (no tax details & other details).
(Suppose, select Purchase Detail)
12. Selected Company- Select whether to view the Purchase Return book report company wise or not. (Suppose, select “Yes”)

- The user will now select the companies by pressing ‘Spacebar’ key of whose Purchase Return Book needs to be viewed.
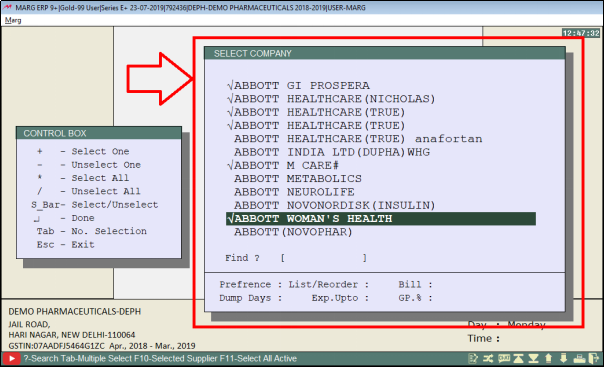
- If the user doesn’t need to view the Purchase Return Book of the selected company, select ‘No’.
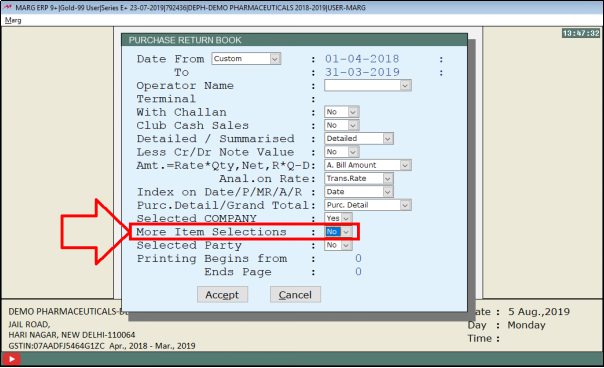
13. More Item Selections- Select “Yes” to view more selections to filter the report.
- Then a “More Options for Filter Item” window will appear.

Fig. 1.1 Process to View Purchase Return Book in Marg ERP Software

- Suppose, select “No”.
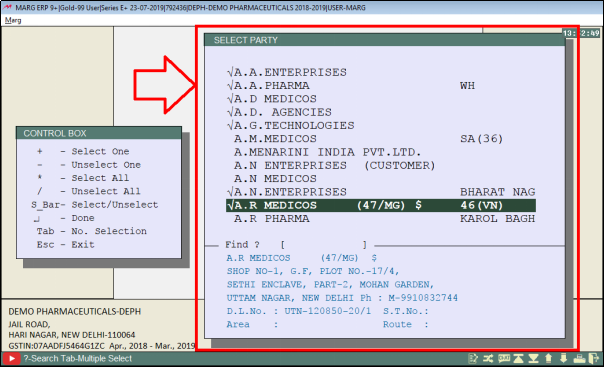
14. Selected Party: Select whether to view the Purchase Return Book report Party wise or not. (Suppose, select Yes)
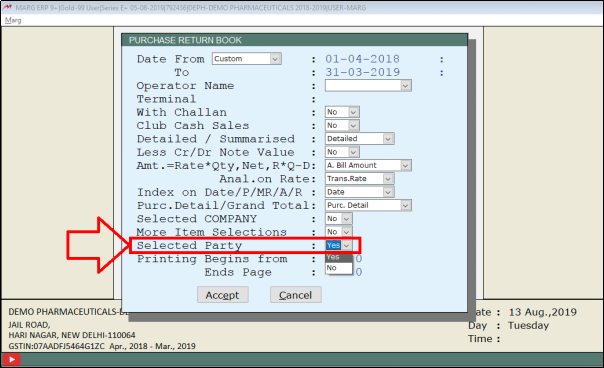
- A ‘Select Party’ window will appear in which the user will select that parties whose Purchase Return Book needs to be viewed by pressing ‘Spacebar’ key.
15. Printing Begins from & Ends Page- Define the starting and end page in order to print the Purchase Return Book report as per the requirement.

- Once the user has filled the desired details then click on “Accept”.
- The user can view that the Purchase Return Book Report has been generated.
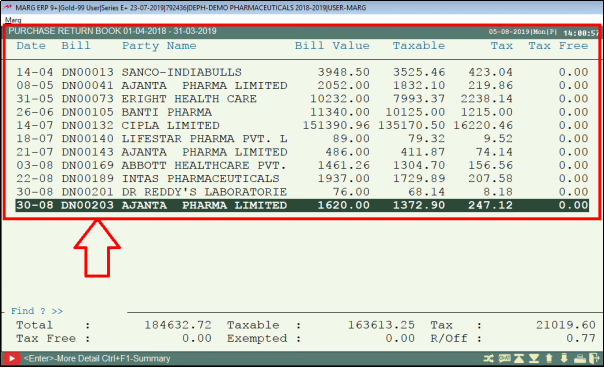
- In order to view the further details of any party’s bill, press “Enter”.
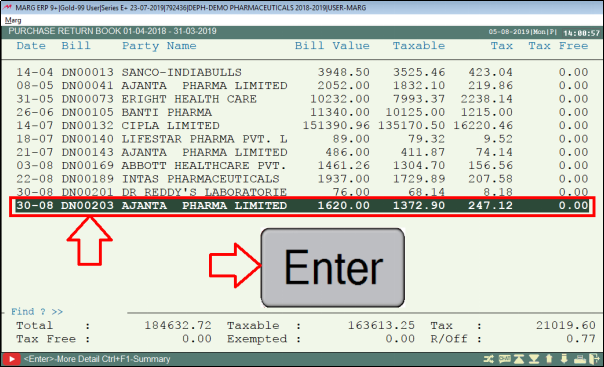
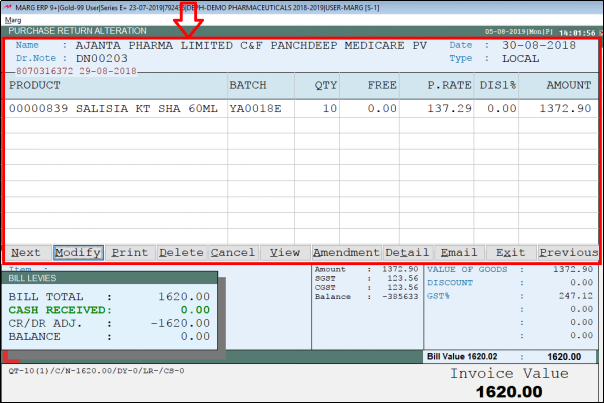
- A “Purchase Return Alteration” window will appear where the user can easily view/modify/print any bill of the party as per their requirement.

1. Go to Transactions > Purchase Return > Modify D/Note.
2. The modify window will appear. The user will select the options as per the Requirement i.e. bill no, bill date etc.
3. Now a 'Purchase Return' as on window will appear. Press Alt+P.
4. Then Feed date range and select other filter options as per the requirement.
5. Then click on View/Excel/Print option.
In This Page


