Search by Category
- Marg Digital Health
- ABHA 2.0 - Ayushman Bharat
- Marg Nano
- Swiggy & Zomato
- Marg Cloud
-
Masters
- Ledger Master
- Account Groups
- Inventory Master
- Rate and Discount Master
- Refresh Balances
- Cost Centre Master
- Opening Balances
- Master Statistics
- General Reminder
- Shortage Report
- Supplier Vs Company
- Temporary Limit
- Shop QRID and eBusiness
- Cloud Backup Setup
- Password and Powers
- Marg Licensing
- Marg Setup
- Target
- Budget
- Credit Limit Management
- Change ERP Edition
- Ease Of Gst Adoption
-
Transactions
- ERP To ERP Order
- Sale
- Purchase
- Sale Return
- Purchase Return
- Brk / Exp Receive
- Scrap Receive
- Brk / Exp Issue
- Scrap Issue
- GST Inward
- GST Outward
- Replacement Issue
- Replacement Receive
- Stock Issue
- Stock Receive
- Price Diff. Sale
- Price Diff. Purchase
- BOM
- Conversion
- Quotation
- Sale Order
- Purchase Order
- Dispatch Management
- ERP Bridger
- Transaction Import
- Download From Server
- Approvals
- Pendings
- Accounts
- Online Banking
-
Books
- Cash and Bank Book
- All Ledgers
- Entry Books
- Debtors Ledgers
- Creditors Ledger
- Purchase Register
- Sale Register
- Duties & Taxes
- Analytical Summaries
- Outstandings
- Collection Reports
- Depreciation
- T-Format Printing
- Multi Printing
- Bank Reconcilation
- Cheque Management
- Claims & Incentives
- Target Analysis
- Cost Centres
- Interest and Collection
- Final Reports
-
Stocks
- Current Stock
- Stock Analysis
- Filtered Stock
- Batch Stock
- Dump Stock
- Hold/Ban Stock
- Stock Valuation
- Minimum Level Stock
- Maximum Level Stock
- Expiry Stock
- Near Expiry Stock
- Stock Life Statement
- Batch Purchase Type
- Departments Reports
- Merge Report
- Stock Ageing Analysis
- Fast and Slow Moving Items
- Crate Reports
- Size Stock
-
Daily Reports
- Daily Working
- Fast SMS/E-Mail Reports
- Stock and Sale Analysis
- Order Calling
- Business on Google Map
- Sale Report
- Purchase Report
- Inventory Reports
- ABC Analysis
- All Accounting Reports
- Purchase Planning
- Dispatch Management Reports
- SQL Query Executor
- Transaction Analysis
- Claim Statement
- Upbhogkta Report
- Mandi Report
- Audit Trail
- Re-Order Management
- Reports
-
Reports Utilities
- Delete Special Deals
- Multi Deletion
- Multi Editing
- Merge Inventory Master
- Merge Accounts Master
- Edit Stock Balance
- Edit Outstanding
- Re-Posting
- Copy
- Batch Updation
- Structure/Junk Verificarion
- Data Import/Export
- Create History
- Voucher Numbering
- Group of Accounts
- Carry Balances
- Misc. Utilities
- Advance Utilities
- Shortcut Keys
- Exit
- Generals
- Backup
- Self Format
- GST Return
- Jewellery
- eBusiness
- Control Room
- Advance Features
- Registration
- Add On Features
- Queries
- Printing
- Networking
- Operators
- Garment
- Hot Keys
-
GST
- E-Invoicing
- Internal Audit
- Search GSTIN/PARTY
- Export Invoice Print
- Tax Clubbing
- Misc. GST Reports
- GST Self-Designed Reports
- GST Return Video
- GSTR Settings
- Auditors Details
- Update GST Patch
- Misc. GST Returns
- GST Register & Return
- GST RCM Statement
- GST Advance Statement
- GST Payment Statement
- Tax Registers and Summaries
- TDS/TCS Reports
- Form Iss./Receivable
- Mandi
- My QR Code
- E-Way Bill
- Marg pay
- Saloon Setup
- Restaurant
- Pharmanxt free Drugs
- Manufacturing
- Password and Power
- Digital Entry
Home > Margerp > Sale > If Current Date does not Pick while billing then how to resolve it in Marg Software ?
If Current Date does not Pick while billing then how to resolve it in Marg Software ?
Cause:
1. This issue appears when the user has created a Future Date entry.
2. System Date wrong
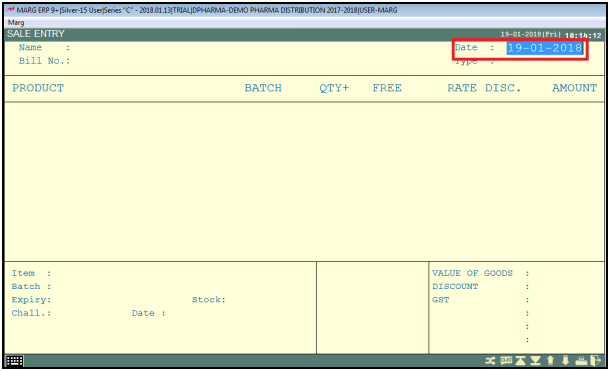
In order to Pick the Current Date, the user needs to follow the below steps:
Case 1.
Firstly, check if there is any entry of Future date in the software.
Case 2.
If the issue remains the same the user needs to check System Date.
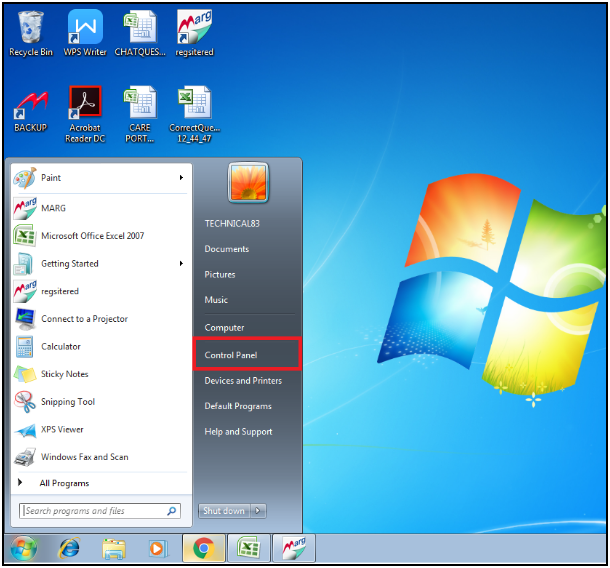
- Go to Start > Control Panel.
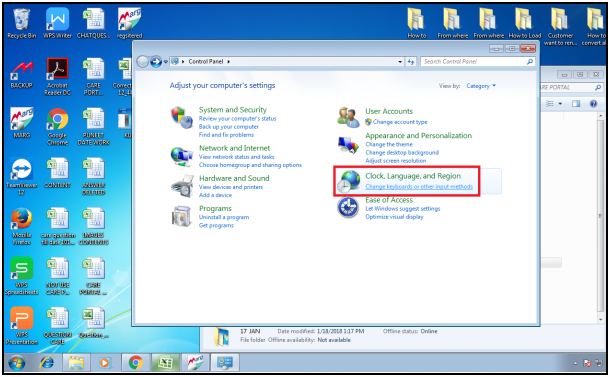
- Click on 'Clock, Language and Region' option.
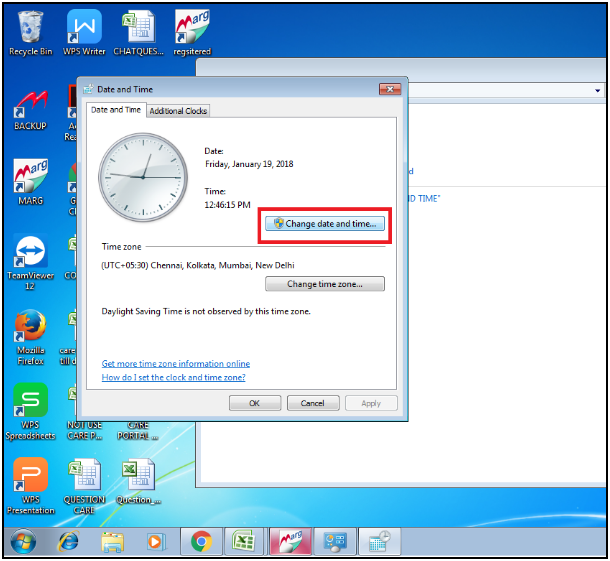
- Click on 'Date And Time' option.
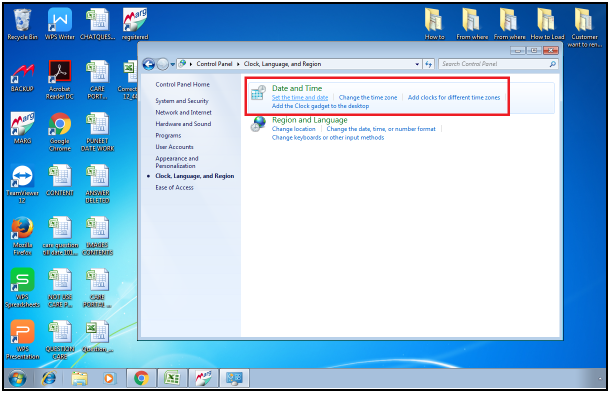
- Click on the 'Change Date And Time' Button.
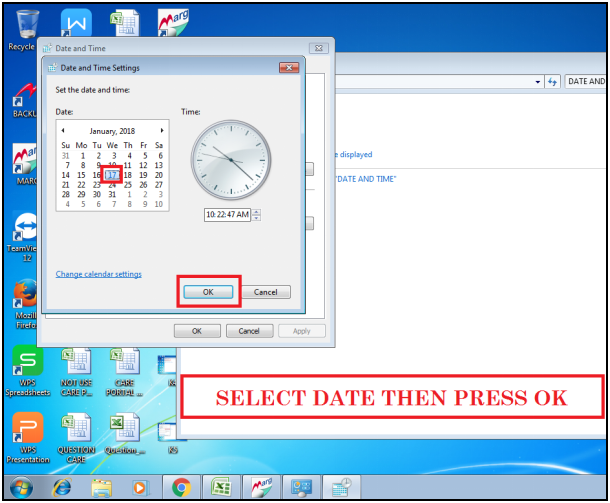
- Now select the current date and then click 'OK' button.
- Thereafter, the user needs to Restart the software.
After following the above steps, the Current Date will get picked while billing in Marg Software.
1. Firstly, Press Alt+X on main window of the software.
2. A 'List of Companies' window will appear. Press 'F3' key on the selected company.
3. Then a 'Company Alteration' window will appear. In 'Date Type' option, the user will select 'English'.
4. Press 'Ctrl+W' key to save the changes.
1. Go to Masters > Passwords & Powers > Operator's.
2. A 'Password & Authority' window will appear.
3. Select the user to make the desired changes. Press 'Enter' key.
4. A 'Powers' window will appear in which the user will select ‘Search In All’.
5. A 'Powers' window will appear in which the user will search 'Date'. Click on ‘Accept’.
6. A 'Working Date' window will appear. In 'All/Single Date working S-Todays Date F-From Server', the user will select 'A/S'.
7. The user will now press 'ESC' key.
8. Again press 'ESC' key and then click on ‘Yes’ to save the changes.
9. A ‘Powers Change’ Pop-Up will appear and then the user will press 'ESC' key.
10. Press 'ESC' key and then click on ‘Yes’.
11. Now for Re- login the user will press 'Ctrl+U' key on the main screen.
12. A 'Change User' window will appear in which the user will enter the User ID and Password.
13. A 'Change User' window will appear in which the user will press 'ESC' Key.


 -
Marg ERP 9+


