

Welcome to  -
Marg ERP 9+
-
Marg ERP 9+
Home > Margerp > Self Programming Hooks > What is the process of Self-Programming with Hooks in Marg Software ?
What is the process of Self-Programming with Hooks in Marg Software ?

Self-Programming with Hooks in Marg ERP Software
Overview of Self-Programming with Hooks in Marg ERP Software
Process of Self-Programming with Hooks in Marg ERP Software
OVERVIEW OF SELF-PROGRAMMING WITH HOOKS IN MARG ERP SOFTWARE
- Hooks in Marg ERP Software are the additions for programming to modify the functions of the software.
- Hooks option enables the user to perform the self-programming as per their requirement.
- The user can easily customize their invoice and reports, add/edit any value to modify the process.
PROCESS OF SELF-PROGRAMMING WITH HOOKS IN MARG ERP SOFTWARE
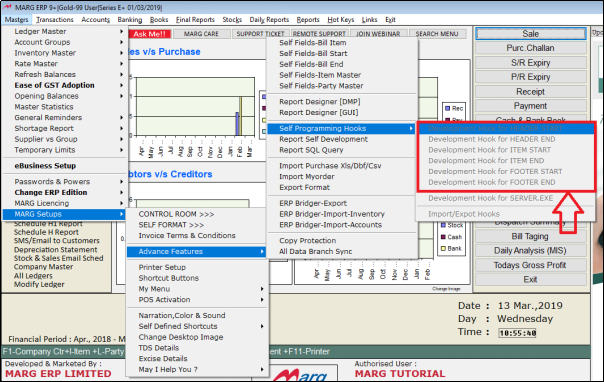
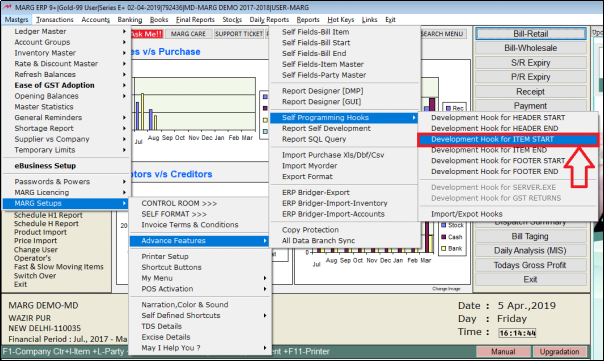
- Go to Masters >> Marg Setups >> Advance Features >> Self Programming Hooks.
- The user can view that all these options of Self Programming Hooks are disabled.
 R
R
Fig 1.1 Menu view to Self Programming Hooks in Marg ERP Software
- To enable these options, go to Masters >> Marg Setups >> CONTROL ROOM.Press Enter.
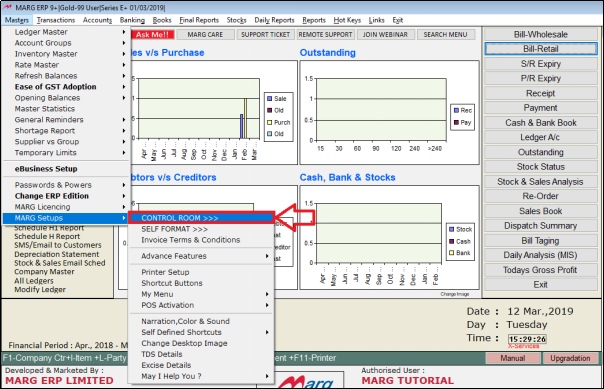
Fig 1.2 Menu view to Control Room in Marg ERP Software
- A Control Room window will appear.
- The user will select ‘Search in all’. Press Enter.
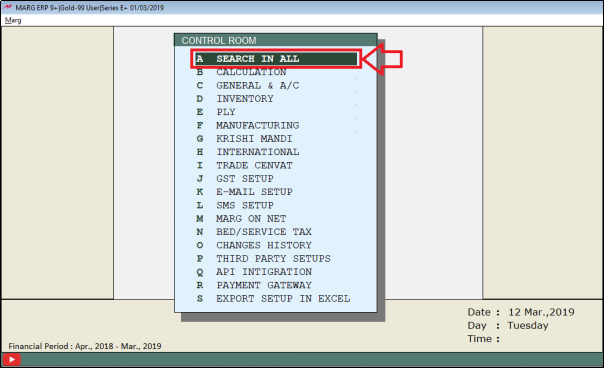
Fig 1.3 View of Search in all window in Marg ERP Software
- A Controls window will appear.
- The user will search ‘Hooks’ and then click on ‘Accept’.
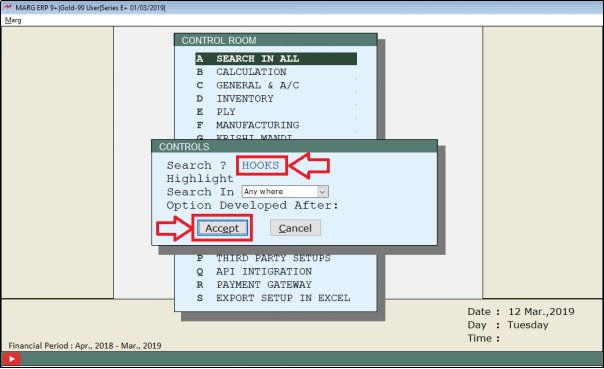
Fig 1.4 View of Controls window in Marg ERP Software
- A Hook window will appear.
- In ‘Self Programming Hooks Required in 1-Inventory 2-Accounting 3-Both’ the user will select where to do self-programming.
- Suppose, the user wants to do self-programming in inventory then set ‘1’.
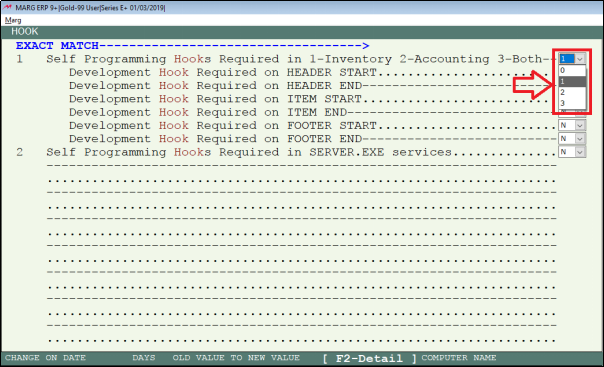
Fig 1.5 View of Hook window in Marg ERP Software
- In ‘Development Hook Required on HEADER START’ the user will define whether or not to define Hook at the bill starting where details of the party are filled as ‘Yes’ or ‘No’.
- Suppose, select ‘Y’.
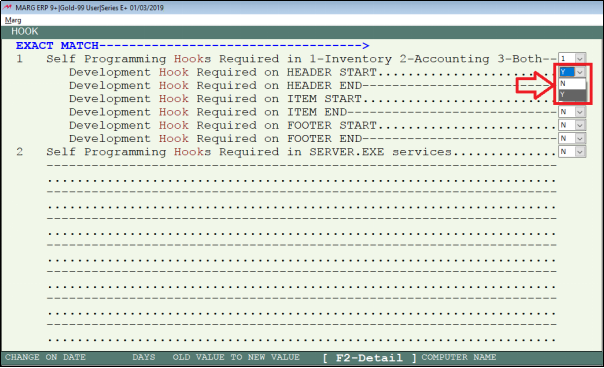
Fig 1.6 View of Hook window in Marg ERP Software
- In ‘Development Hook Required on HEADER END’ the user will define whether or not to define Hook at the end of the header as ‘Yes’ or ‘No’.
- Suppose, select ‘Y’.
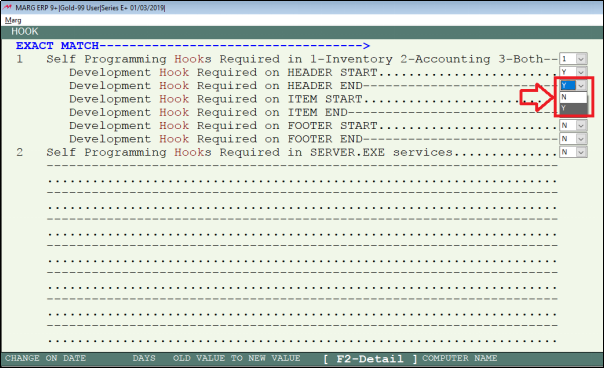
Fig 1.7 View of Hook window in Marg ERP Software
- In ‘Development Hook Required on ITEM START’ the user will define whether or not to define Hook at the item start as ‘Yes’ or ‘No’.
- Suppose, select ‘Y’.
- In ‘Development Hook Required on ITEM END’ the user will define whether or not to define Hook at the item end as ‘Yes’ or ‘No’.
- Suppose, select ‘Y’.
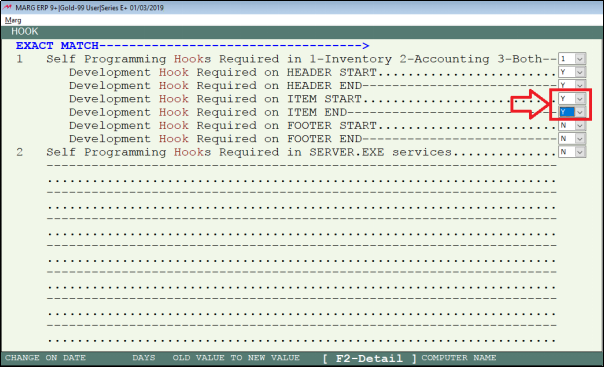
Fig 1.8 View of Hook window in Marg ERP Software
- In ‘Development Hook Required on FOOTER START’ the user will define whether or not to define Hook at the footer start as ‘Yes’ or ‘No’.
- Suppose, select ‘Y’.
- In ‘Development Hook Required on FOOTER END’ the user will define whether or not to define Hook at the footer end as ‘Yes’ or ‘No’.
- Suppose, select ‘Y’.
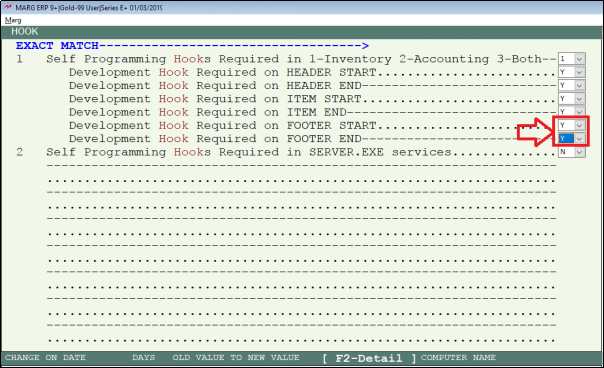
Fig 1.9 View of Hook window in Marg ERP Software
- The user will now press escape key and then click on ‘Yes’ to save the changes.
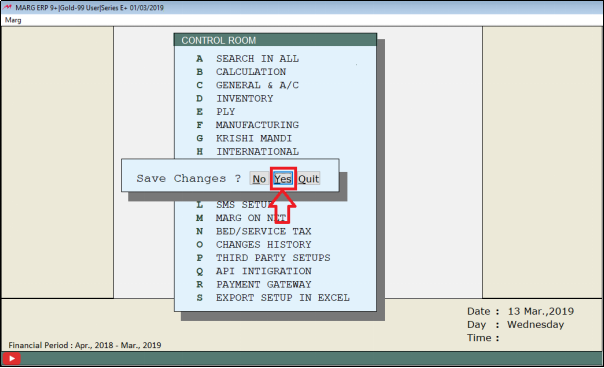
Fig 1.10 View to save changes in Marg ERP Software
- Now again, Go to Masters >> Marg Setups >> Advance Features >> Self Programming Hooks.
- The user can view that now these options of Self Programming Hooks are enabled.
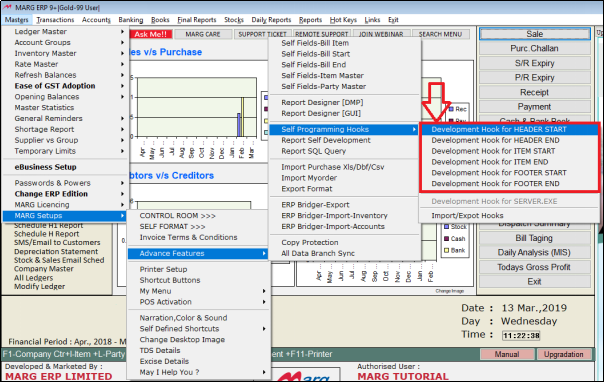
Fig 1.11 Menu view to Self Programming Hooks in Marg ERP Software
- To define hook in the starting of the bill, the user will go to Masters >> Marg Setups >> Advance Features >> Self Programming Hooks >> Development Hook for HEADER START.
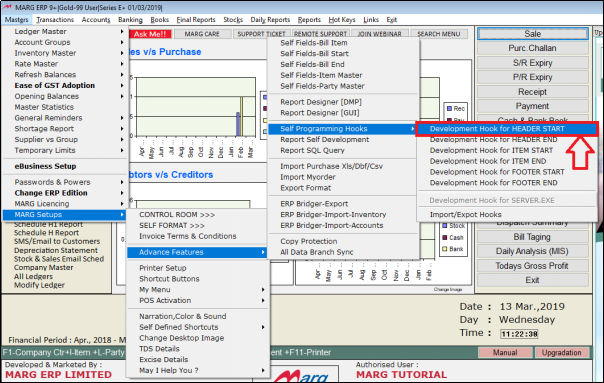
Fig 1.12 Menu view to Development Hook for HEADER START in Marg ERP Software
- A Development Hook for Header Start window will appear.
- The user will select ‘Commands’. Press Enter.
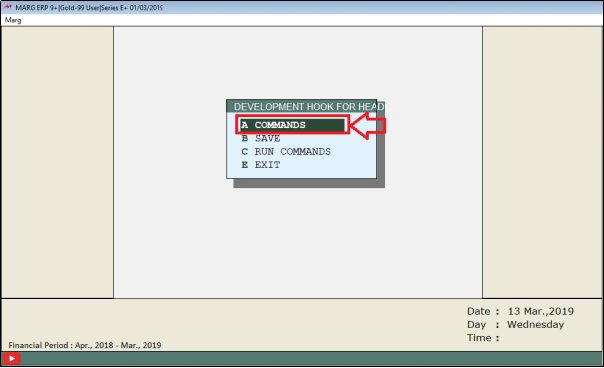
Fig 1.13 View of Development Hook for Header Start window in Marg ERP Software
- A Commands window will appear.
- The user can view the default sample code which is commented.
- The user can also uncomment to use this code or can define the code as per the requirement.
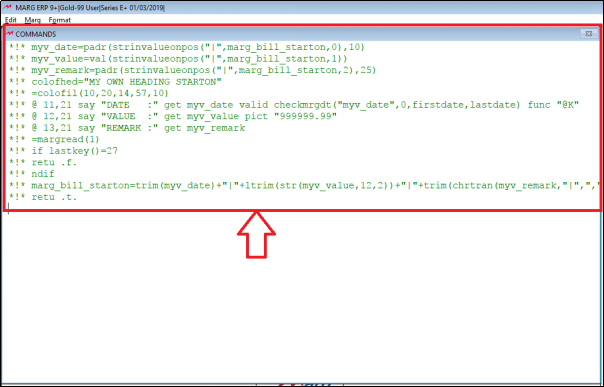
Fig 1.14 View of Commands window in Marg ERP Software
- Suppose, uncomment this code.
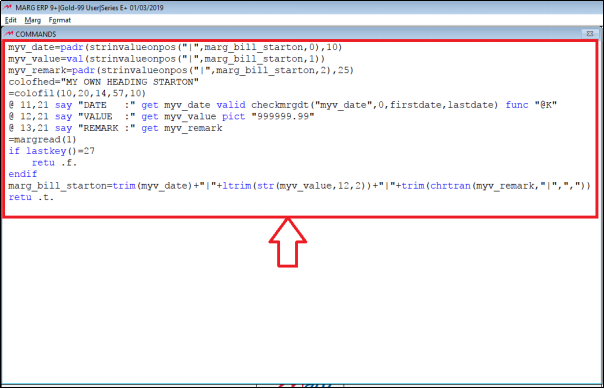
Fig 1.15 View of Commands window in Marg ERP Software
- Now here, if the user wants to ask date, name and remarkthen define this code.
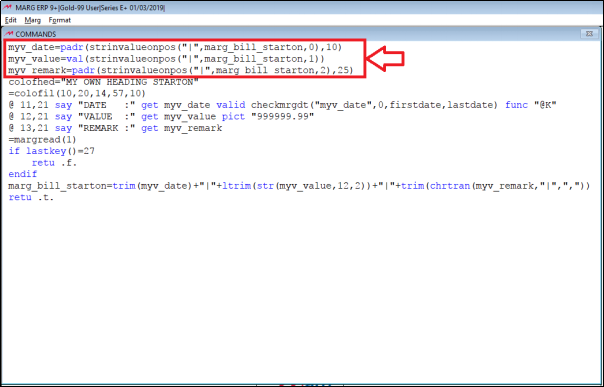
Fig 1.16 View of Commands window in Marg ERP Software
- The user can view that variable for date is defined as ‘myv_date’.
- The user can also define this variable as per the requirement.
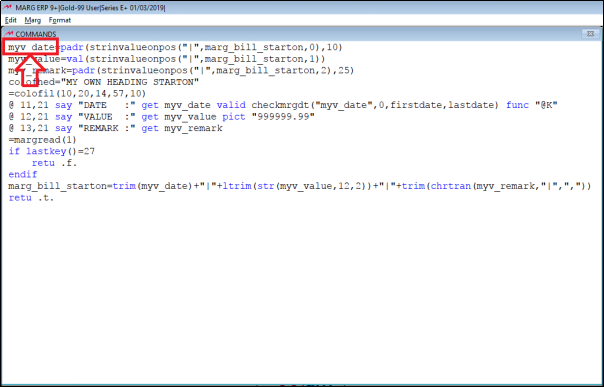
Fig 1.17 View of Commands window in Marg ERP Software
- Then, user can view ‘marg_bill_starton’ which is the predefined variable for bill start.
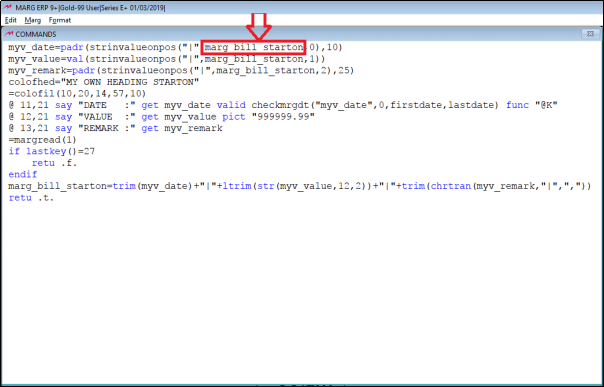
Fig 1.18 View of Commands window in Marg ERP Software
- Now, here ‘0’, ‘1’, ‘2’ are the serial numbers defined for the defined variables.
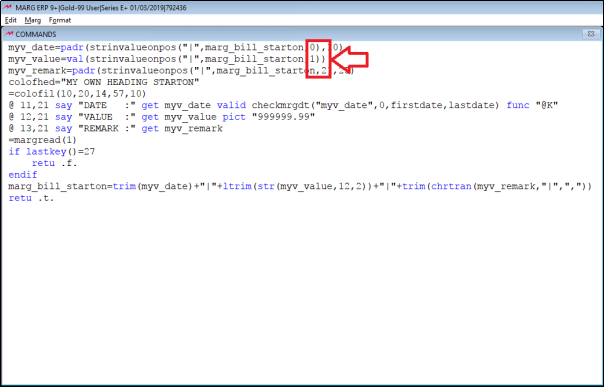
Fig 1.19 View of Commands window in Marg ERP Software
- Then, the user can view that the heading is also defined i.e. the prompt for date, value and remark.
- The user can also change the heading as per the requirement.
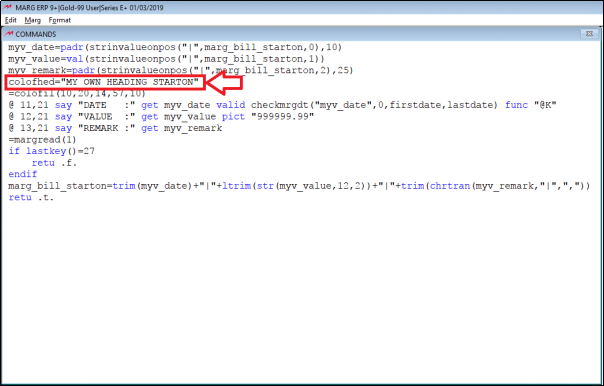
Fig 1.20 View of Commands window in Marg ERP Software
- Then, the user can view the coordinates of prompt box i.e. the margin from top, right, left and bottom and the color scheme.

Fig 1.21 View of Commands window in Marg ERP Software
- Now, accordingly the user can get the values of the variables.
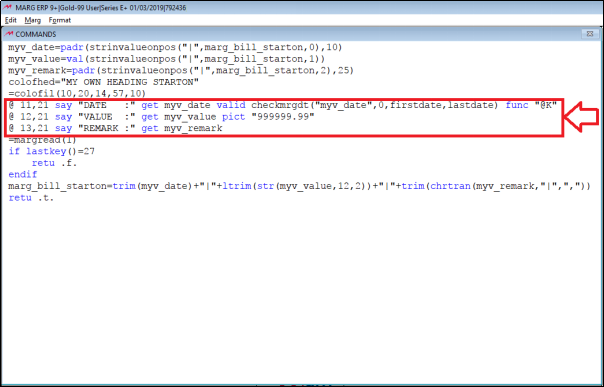
Fig 1.22 View of Commands window in Marg ERP Software
- The ‘=margread(1)’ function is a default function which reads the values that the user has get.
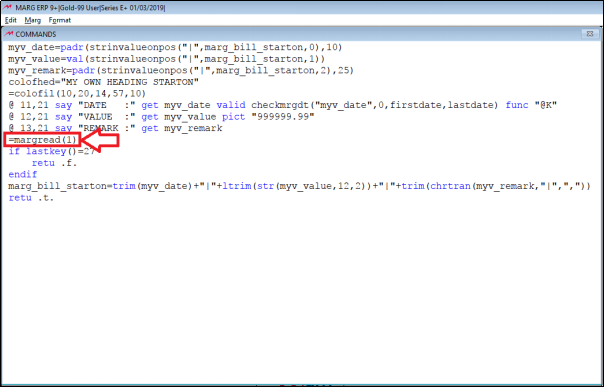
Fig 1.23 View of Commands window in Marg ERP Software
- Then, the ‘last key()=27’ i.e the last key function is defined which is equal to 27.
- This function is used for escape key i.e. when the prompt opens and the user does not want to use it then the user can press esc key & it will be false return.
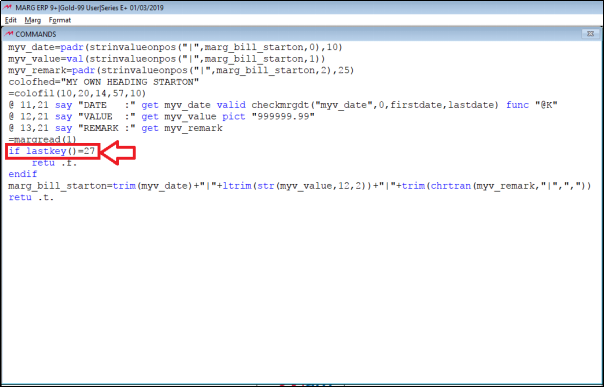
Fig 1.24 View of Commands window in Marg ERP Software
- However, if the last key function is true then the date, value and remark would trim the spaces and those values will be displayed.
NOTE: The user must to save values in string in that sequence in which position it has been defined in the starting and must separate it with pipe sign ‘|’.
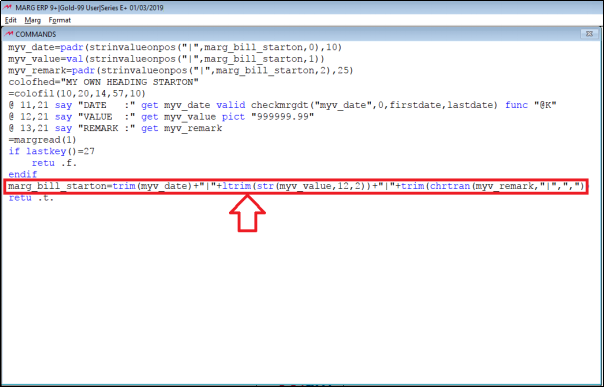
Fig 1.25 View of Commands window in Marg ERP Software
- To save the code, press CTRL+W.
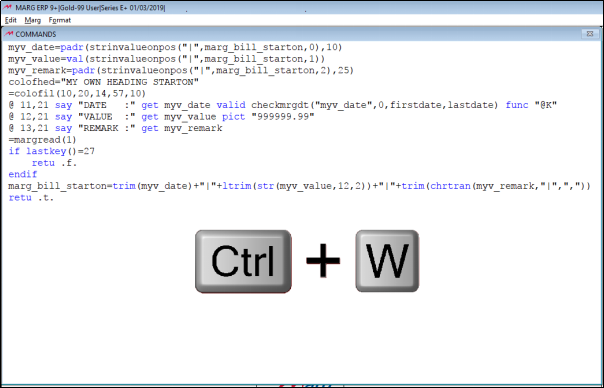
Fig 1.26 View of Commands window in Marg ERP Software
- Then in Development hook for Header Start window, the user will select Save and then press Enter.
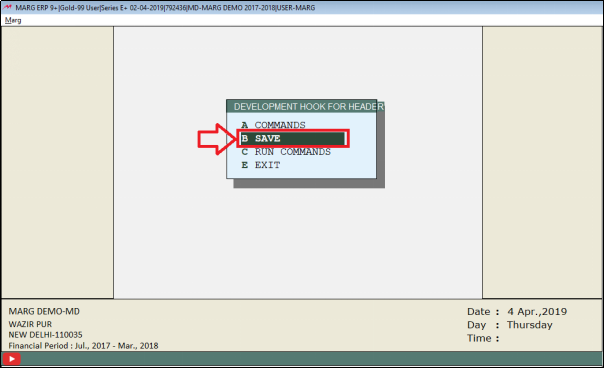
Fig 1.27 View of Development hook for Header Start window in Marg ERP Software
- To view the preview of the code that the user has saved, select ‘Run Commands’. Press Enter.
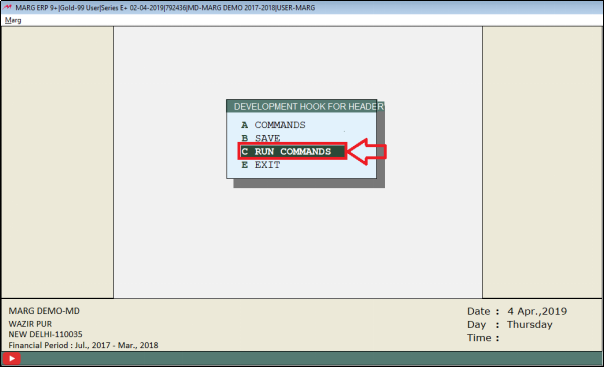
Fig 1.28 View of Development hook for Header Start window in Marg ERP Software
- The user can view the prompt preview.
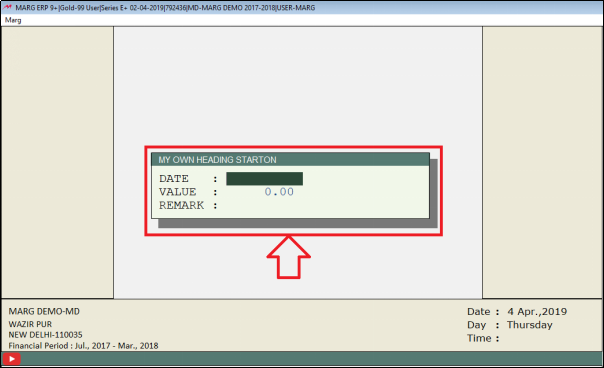
Fig 1.29 View of prompt preview in Marg ERP Software
EXAMPLE 1: if the user wants that the bill should not be created until 10 digit mobile number is mentioned in ‘Code/F1’.
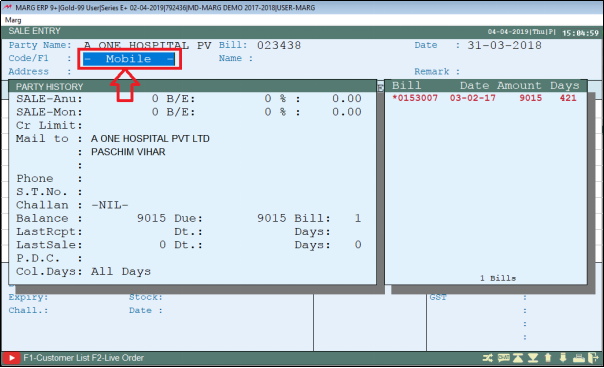
Fig 1.30 View of Sale Entry window in Marg ERP Software
- So, the user will firstly select that field and then press Shift + ~ key.
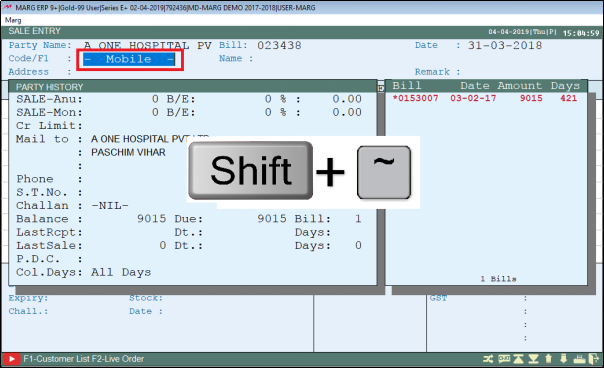
Fig 1.31 View of Sale Entry window in Marg ERP Software
- The user can view the variable of mobile field i.e. ‘invopho’.
NOTE: The variable will only be displayed when hook is enabled.
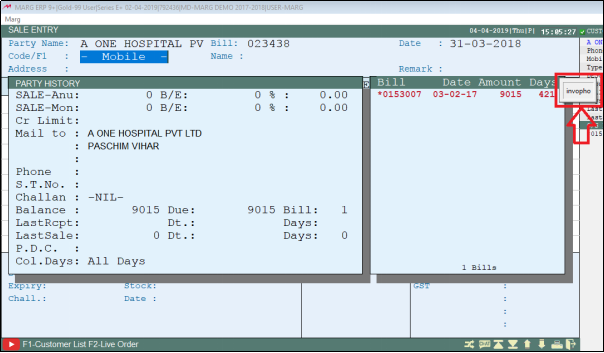
Fig 1.32 View of Sale Entry window in Marg ERP Software
- The user will now apply this command in ‘Development Hook for HEADER END’ because if this code is applied in Header start, then software will not be able to check mobile number as mobile number is after the start of header.
- So, go to Masters >> Marg Setups >> Advance Features >> Self Programming Hooks >> Development Hook for HEADER END. Press Enter.

Fig 1.33 Menu view to Development Hook for HEADER END in Marg ERP Software
- A Commands window will appear.
- The user will define the command in which firstly if there will be any spaces in left or right then it will be trimmed.
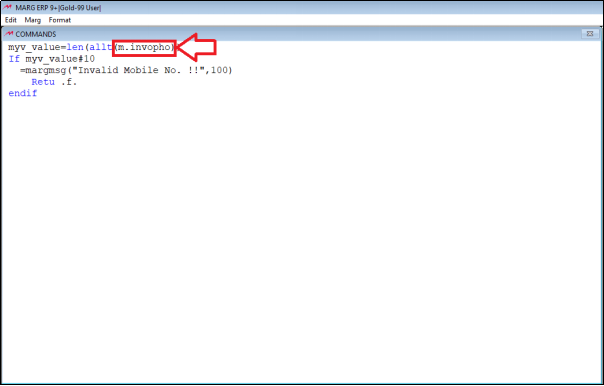
Fig 1.34 View of Commands window in Marg ERP Software
- Then, whatever value will be derived after trimming it should be stored in ‘myv_value’.
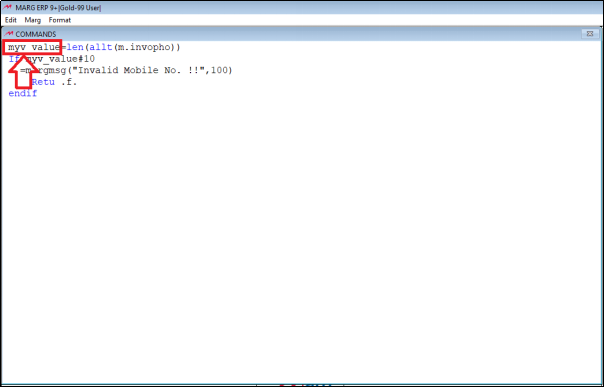
Fig 1.35 View of Commands window in Marg ERP Software
- Now enter the condition ‘myv_name#10’ i.e. if the myv_value is not equal to 10 then a message will be displayed “Invalid Mobile No.”
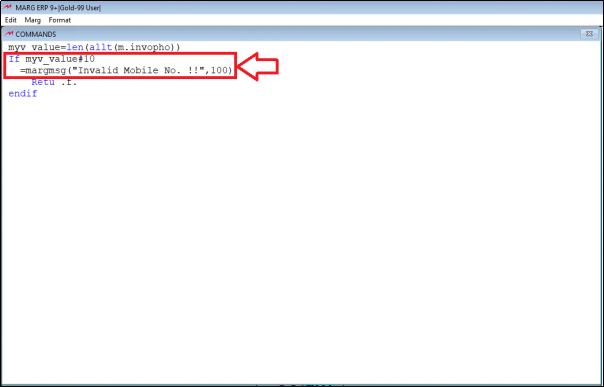
Fig 1.36 View of Commands window in Marg ERP Software
- The user will now press CTRL+W to save.
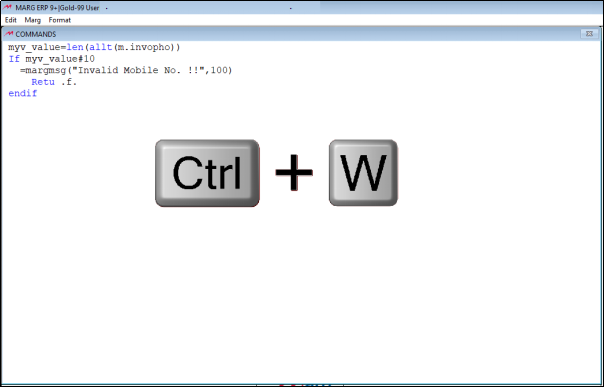
Fig 1.37 View of Commands window in Marg ERP Software
- A Development Hook for HEADER END window will appear.
- The user will select ‘Save’. Press Enter.
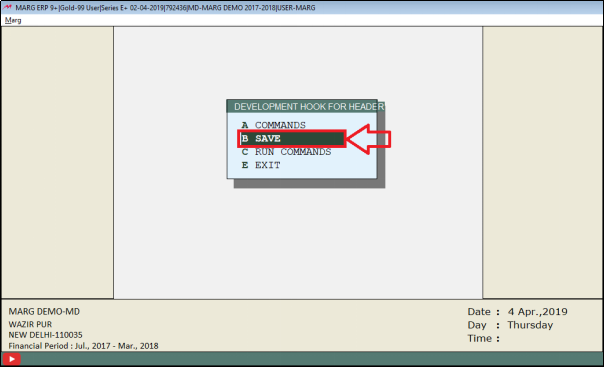
Fig 1.38 View of Development hook for Header End window in Marg ERP Software
- Now the user will select ‘Exit’ and then press enter.
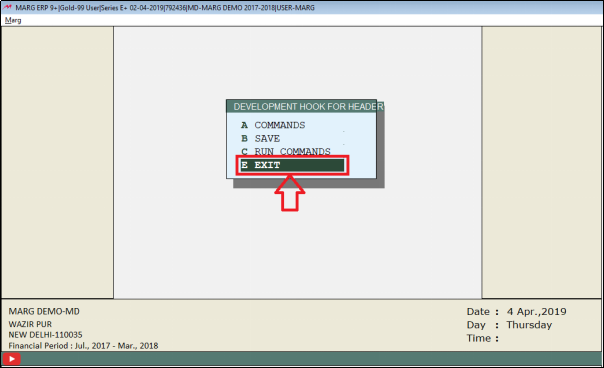
Fig 1.39 View of Development hook for Header End window in Marg ERP Software
- Now suppose, generate a bill and leave the Mobile number field blank. Then, keep pressing enter.
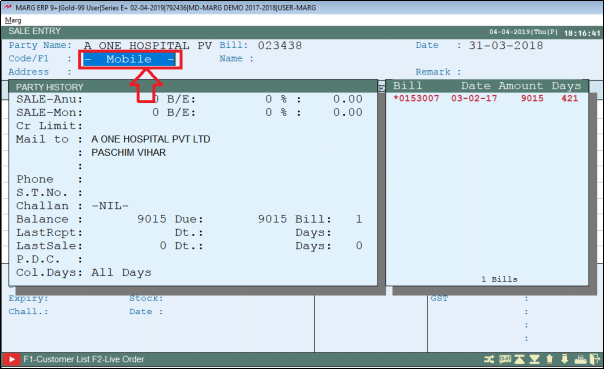
Fig 1.40 View of Sale Entry window in Marg ERP Software
- The user can view the alert message of ‘Invalid Mobile No.!!’ and has stopped the user to create the bill because the mobile field is blank.
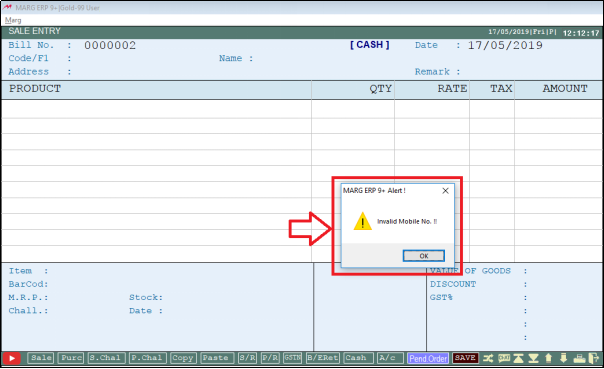
Fig 1.41 View of alert message in Marg ERP Software
- Then suppose, the user will enter the mobile number in the ‘Code/F1’ field. Press Enter.
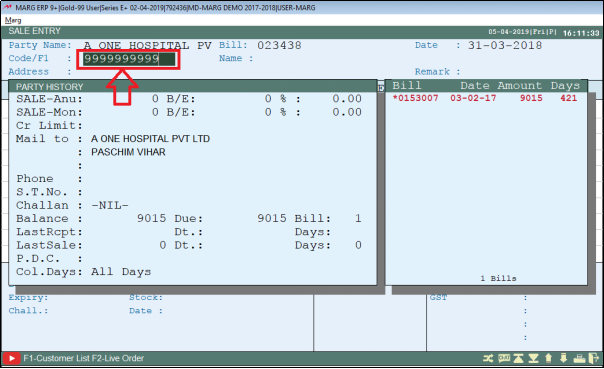
Fig 1.42 View of Sale Entry window in Marg ERP Software
- The user can now easily generate the bill.
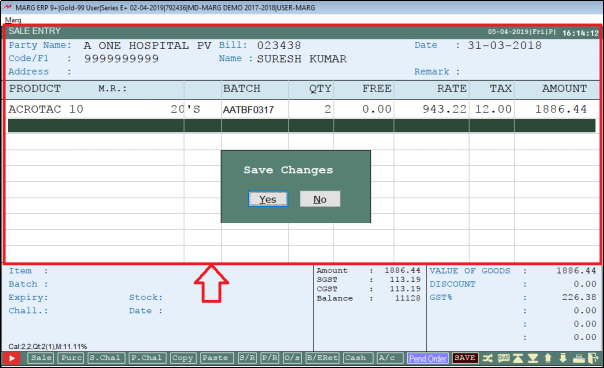
Fig 1.43 View of Sale Entry window in Marg ERP Software
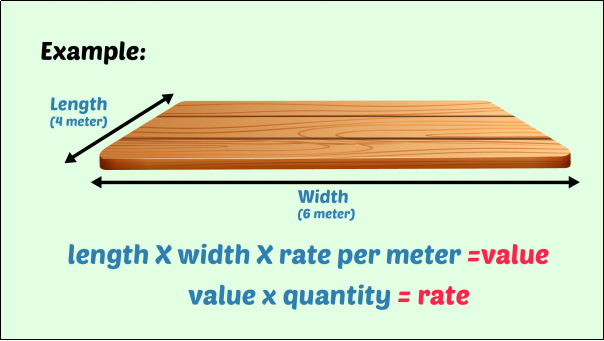
EXAMPLE 2: If the length of a ply is 4 meter and width is 6 meter and rate of 1 meter ply is Rs.30. So, if the user wants that length, width and rate of 1 meter should be multiplied and that multiplied value to be multiplied with quantity and should be displayed in Rate.
- The user will press Shift + ~ key on Rate to get the variable of Rate key.
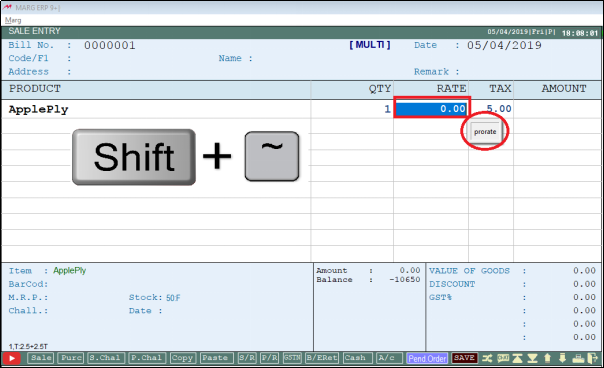
Fig 1.44 View of Sale Entry window in Marg ERP Software
- The user will apply this command in Development Hook for ITEM START because item quantity comes in the starting of item.
- Go to Masters >> Marg Setups >> Advance Features >> Self Programming Hooks >> Development Hook for ITEM START.
- Fig 1.45 Menu view to Development Hook for ITEM START in Marg ERP Software
- A Development Hook for ITEM START window will appear.
- The user will select ‘Commands’. Press Enter.
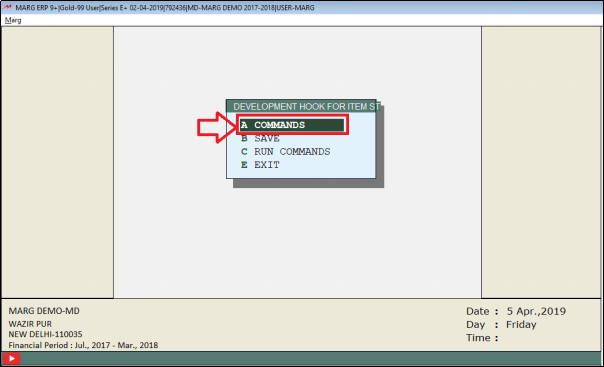
Fig 1.46 View of Development Hook for ITEM START window in Marg ERP Software
- A Commands window will appear.
- The user can view the code defined and can view that three variables are defined for length, width and rate per meter.
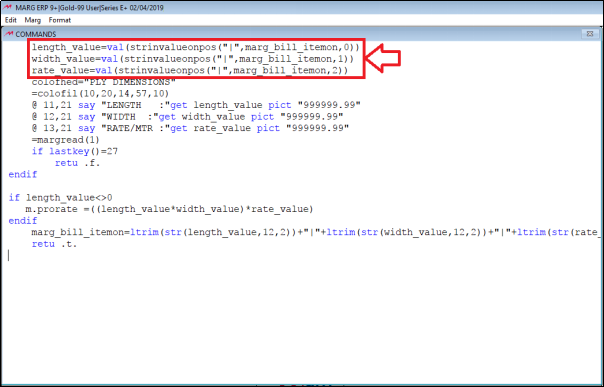
Fig 1.47 View of Commands window in Marg ERP Software
- Then, the user can view the headings defined ‘LENGTH’, ‘WIDTH’, ‘RATE/MTR’ which will be displayed in the prompt box.
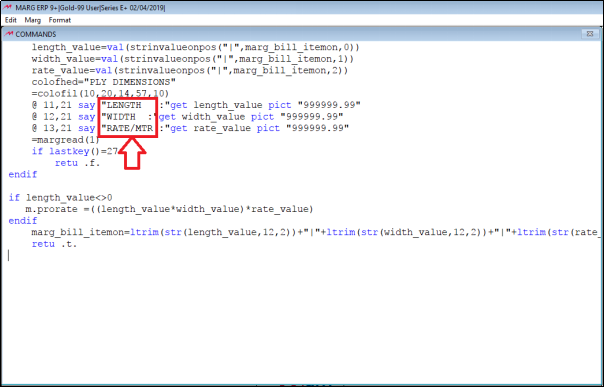
Fig 1.48 View of Commands window in Marg ERP Software
- It has also been defined that all these three fields are numeric.
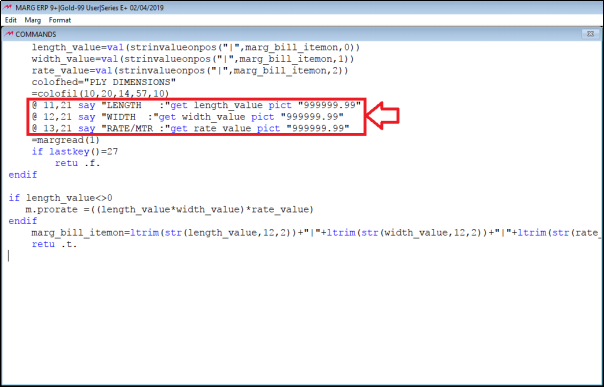
Fig 1.49 View of Commands window in Marg ERP Software
- Last key function has been defined i.e. if lastkey function is equal to 27 then it will be false return and no value will be returned.
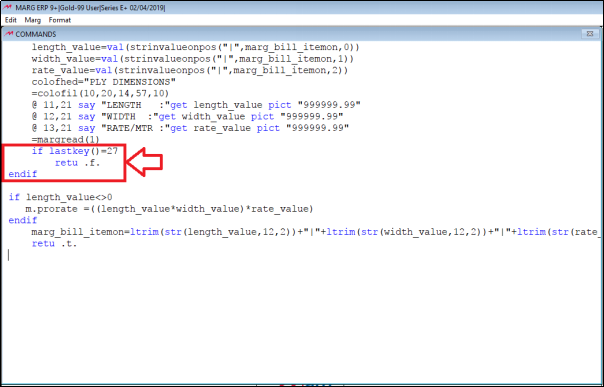
Fig 1.50 View of Commands window in Marg ERP Software
- Again, if condition has been defined i.e. if the value of length is not 0 then the value of length and width will be multiplied and then that amount will be multiplied to rate per meter.
- The value derived will be displayed in ‘m.prorate’ i.e. in rate field.
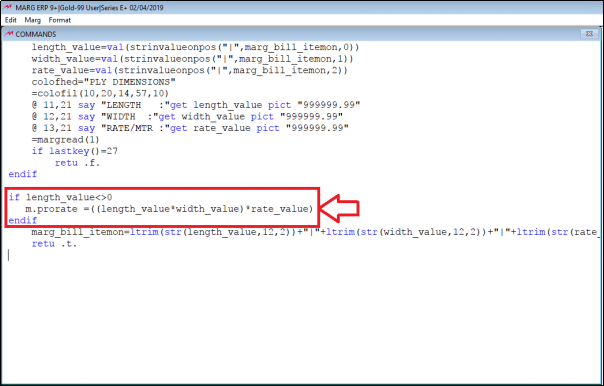
Fig 1.51 View of Commands window in Marg ERP Software
- The user will now press CTRL+W.
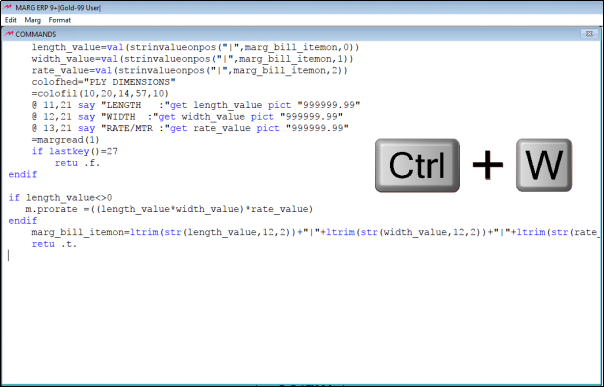
Fig 1.52 View of Commands window in Marg ERP Software
- A Development Hook for ITEM START window will appear.
- The user will select ‘Save’. Press Enter.
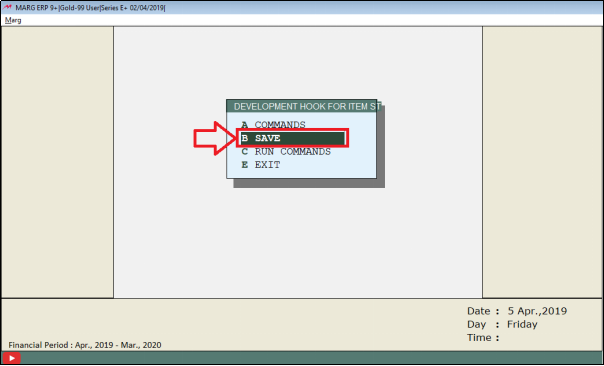
Fig 1.53 View of Development Hook for ITEM START window in Marg ERP Software
- Then, select ‘Exit’. Press Enter.
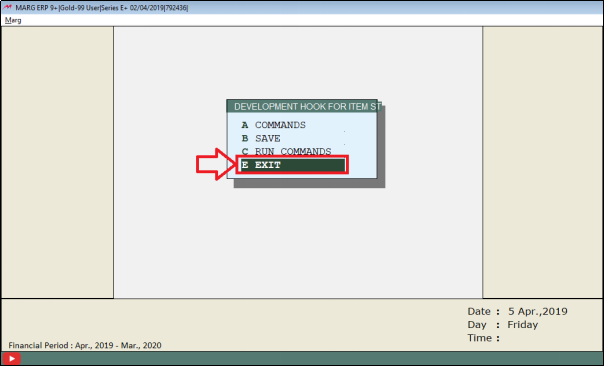
Fig 1.54 View of Development Hook for ITEM START window in Marg ERP Software
- Now, when generating the bill the user will select the item.
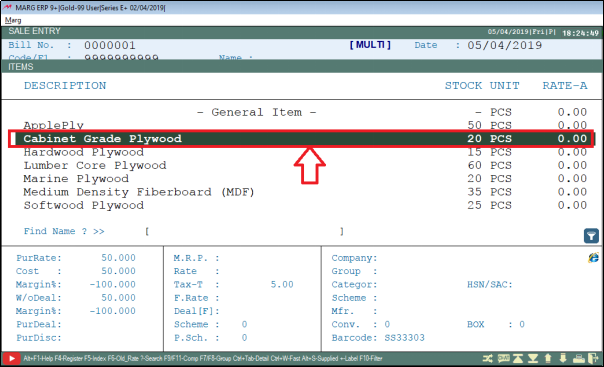
Fig 1.55 View of Items window in Marg ERP Software
- The prompt box gets displayed.
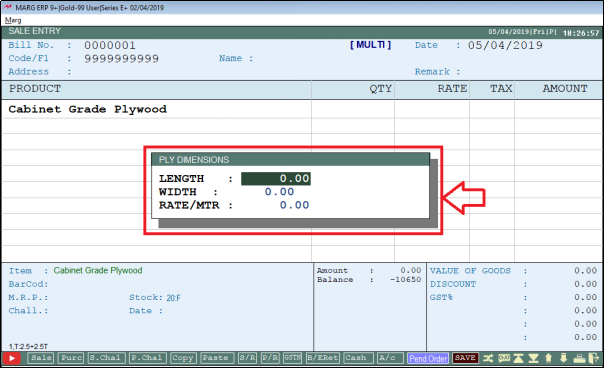
Fig 1.56 View of prompt box in Marg ERP Software
- Now, suppose enter length as “4”.
- Then enter width as “6”.
- The user will now enter the rate of 1 meter ply. Suppose, enter “30”.
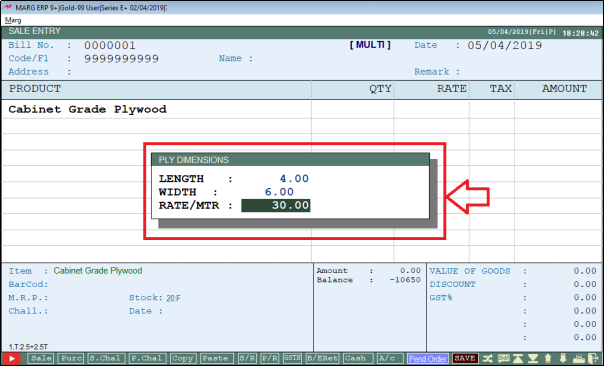
Fig 1.57 View of prompt box in Marg ERP Software
- The user can view that the value of Rate has been calculated and is displayed here as ‘720’.
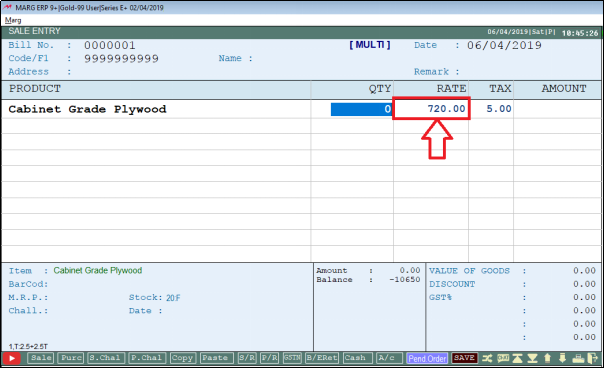
Fig 1.58 View of Sale Entry window in Marg ERP Software
- The user will now enter the quantity.
- Suppose, enter ‘2’. Press Enter.
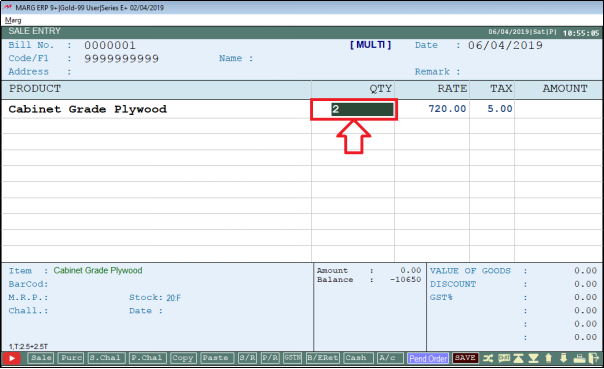
Fig 1.59 View of Sale Entry window in Marg ERP Software
- The user can view that the amount is calculated.
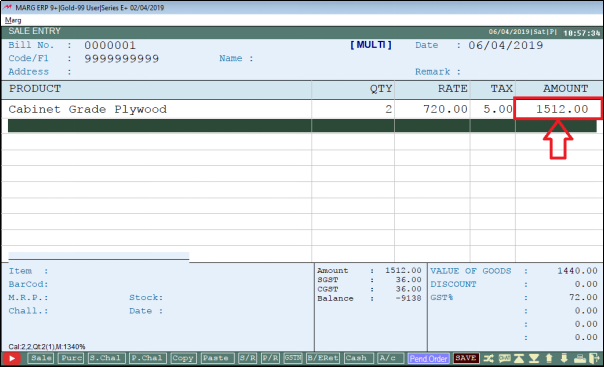
Fig 1.60 View of Sale Entry window in Marg ERP Software
- The user will now save the bill.

Fig 1.61 View to save changes in Marg ERP Software
- Suppose, the user wants that ‘Submit’ and ‘Cancel’ button should also be displayed in the prompt box.
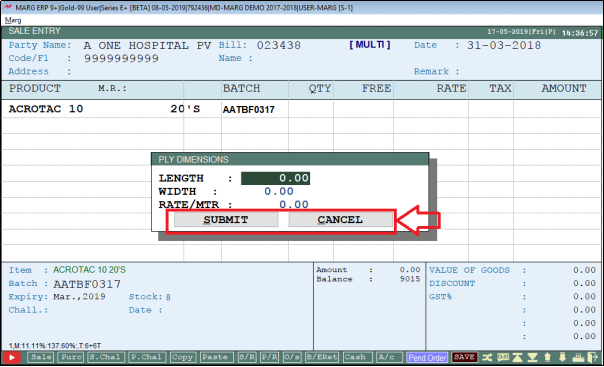
Fig 1.61 View of prompt box in Marg ERP Software
- So, the user will again go to Masters >> Marg Setups >> Advance Features >> Self Programming Hooks >> Development Hook for ITEM START.

Fig 1.62 Menu view to Development Hook for ITEM START in Marg ERP Software
- A Commands window will appear.
- The user will enter the command for button after RATE/meter command.
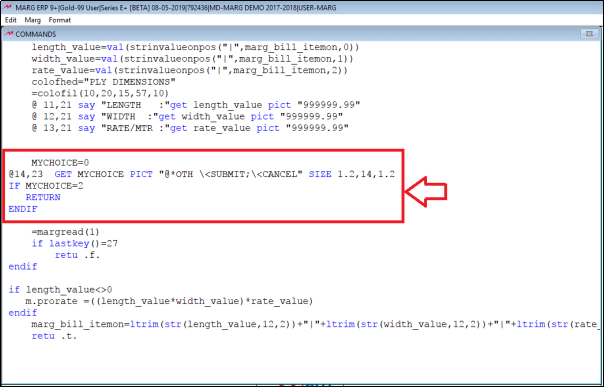
Fig 1.63 View of Commands window in Marg ERP Software
- Now press CTRL+W.
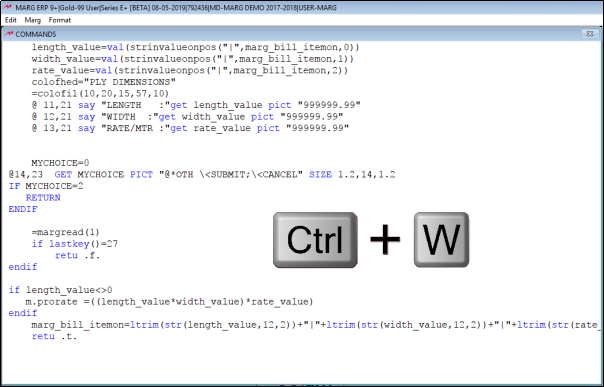
Fig 1.64 View of Commands window in Marg ERP Software
- A Development Hook for ITEM START window will appear.
- The user will select ‘Save’. Press Enter.
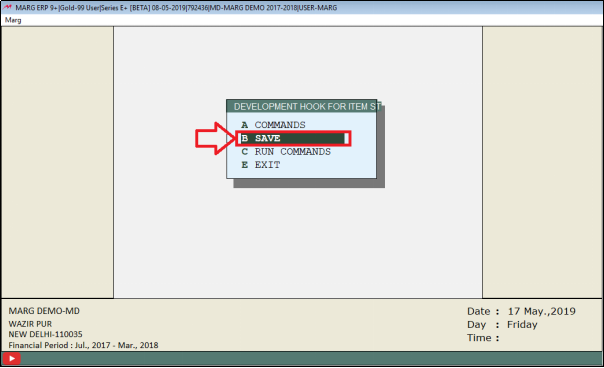
Fig 1.65 View of Development Hook for ITEM START window in Marg ERP Software
- Then, select ‘Exit’. Press Enter.
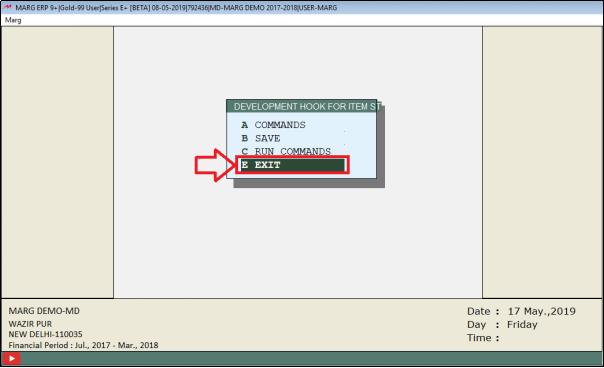
Fig 1.66 View of Development Hook for ITEM START window in Marg ERP Software
- Now, when generating the bill the user will select the item.
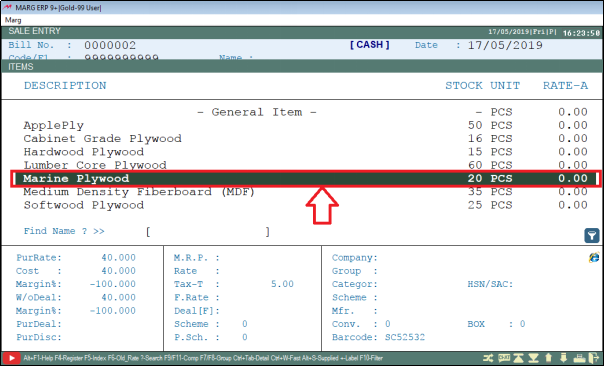
Fig 1.67 View of Items window in Marg ERP Software
- The prompt box gets displayed.
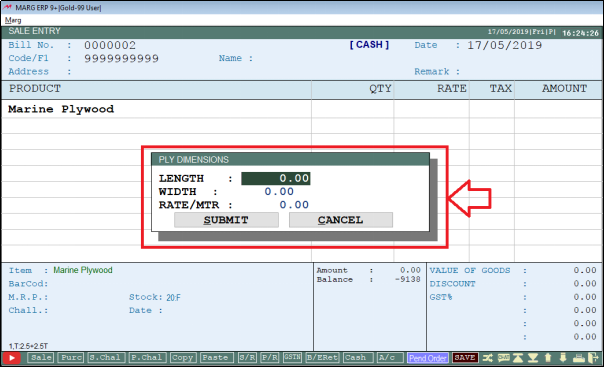
Fig 1.68 View of prompt box in Marg ERP Software
- Now, suppose enter length as “5”.
- Then enter width as “6”.
- The user will now enter the rate of 1 meter ply. Suppose, enter “30”.
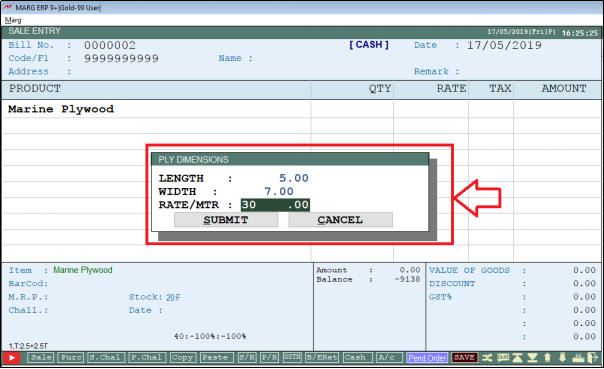
Fig 1.69 View of prompt box in Marg ERP Software
- After entering the values, the user can either submit or cancel.
- Suppose, click on ‘Submit’.
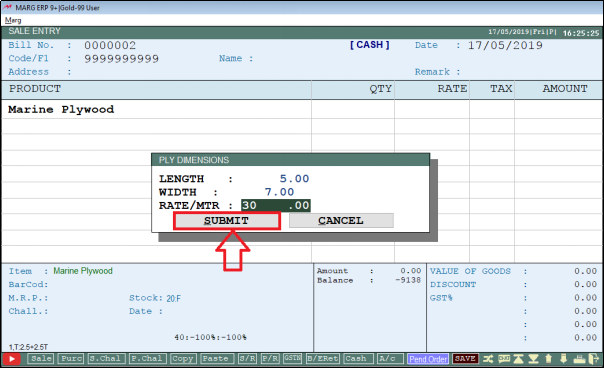
Fig 1.70 View of prompt box in Marg ERP Software
- The user can view that the value is calculated and is displayed in Rate.
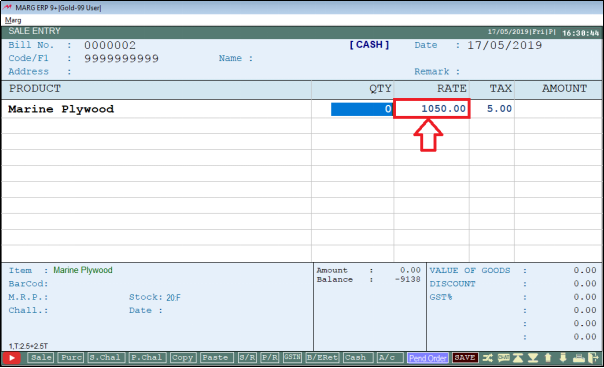
Fig 1.71 View of Sale Entry window in Marg ERP Software

In This Page


