

Welcome to  -
Marg ERP 9+
-
Marg ERP 9+
Home > Margerp > Transaction Import > How to Import Purchase Bill through PDF File in Marg Software ?
How to Import Purchase Bill through PDF File in Marg Software ?

Overview Of PDF Purchase Import in Marg Software
Process to Create Method to Import Purchase Transaction in PDF Format in Marg Software
Process to Import Purchase Transaction in PDF Format in Marg Software
OVERVIEW OF PDF PURCHASE IMPORT IN MARG SOFTWARE
- Generally, users are not aware that they can import the purchase bill which is been received in PDF Format from the suppliers without converting it into any other format. Due to which they manually enter the data of the PDF File in the software or first convert the Pdf file into some other formats like Excel, DBF, CSV etc. and then import the purchase bill which consumes a lot of time.
- Now with Marg ERP Software, the customers can easily import the purchase bill directly from PDF file same as Excel file.
PROCESS TO CREATE METHOD TO IMPORT PURCHASE TRANSACTION IN PDF FORMAT IN MARG SOFTWARE
- Firstly, Go to Masters > Marg Setups > Advanced Features > Import Purchase.
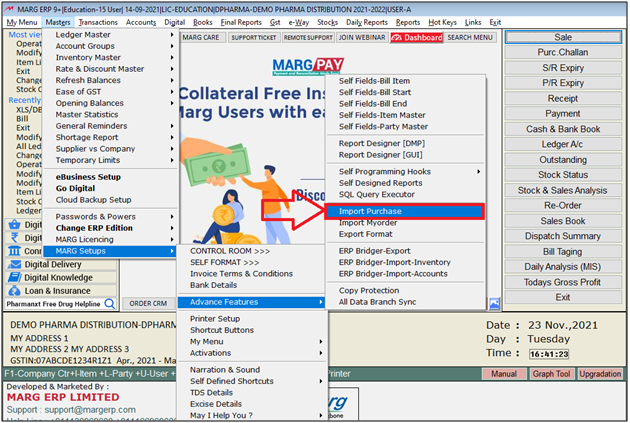
- An 'ERP to Marg ERP 9+' Inventory window will appear.
- The user will now select ‘Method’.

- An 'ERP to Marg ERP 9+ Inventory Method window will appear.
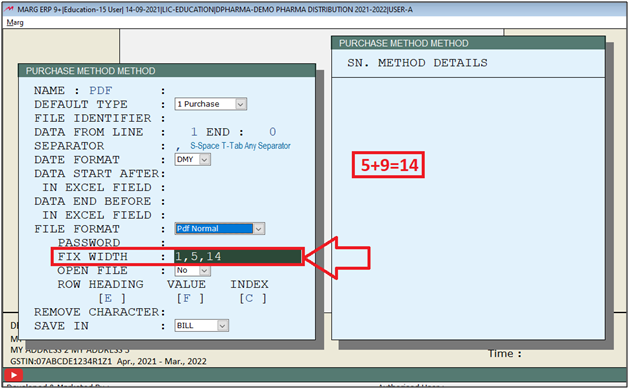
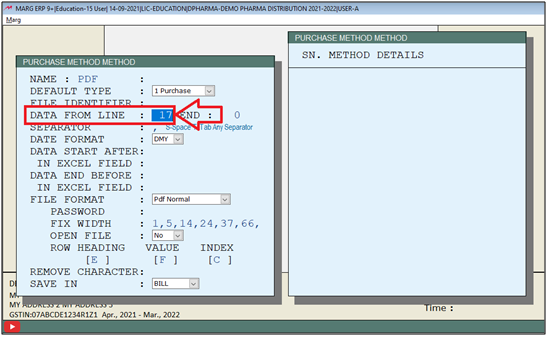
- In the Name field, the user will enter the name for this method.
- Suppose, enter ‘PDF’.

- An 'Alert' window will appear ‘Not found. Want to create’, the user will click on ‘Yes’.

- Default Type: The user will select the type for this method from the drop down.
- Suppose select ‘Purchase’.
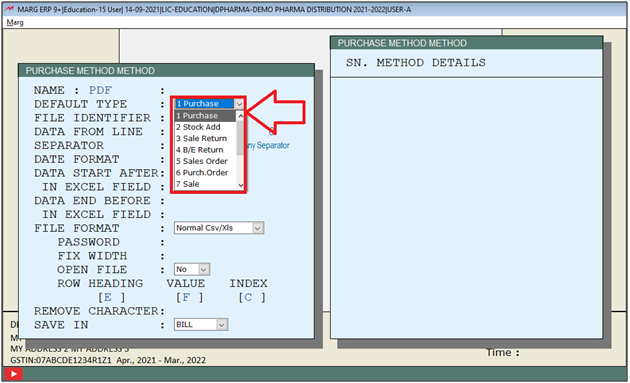
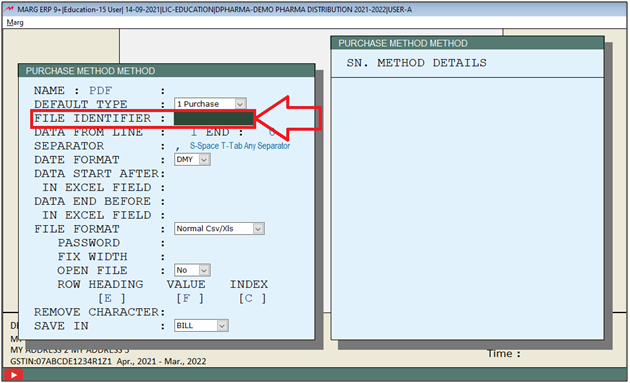
- File Identifier: If user has imported the file of the same method previously then the software will automatically picked the name of the file here.
- As we need to import below shown PDF file so needs to mention the width of each column in order to import the file properly.
- Suppose firstly we need to mention the width of the S.No. column so counted it as '4'.

- Fix Width: Firstly the user needs to mention the width as 1 (mandatory) and then mention the counted pixels (from PDF file).
- Suppose mentioned 1 & 5 respectively.
Note: The user needs to mention the next pixel by adding the previous one.
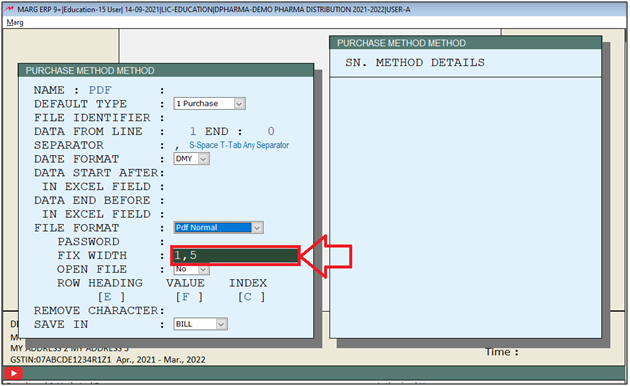
- Similarly the user needs to count the pixels of the Quantity field.
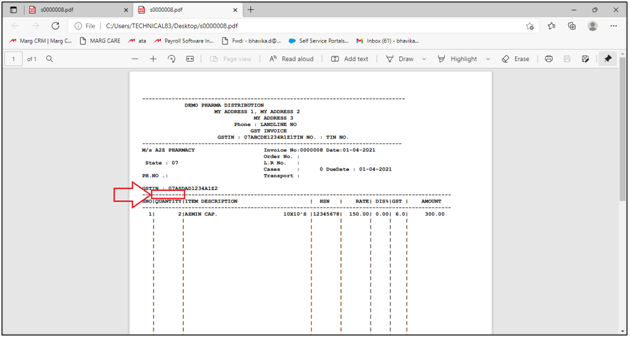
- Suppose counted 9, so needs to mention 14 (5+9).
- Similarly mention all the pixels as per the requirement.

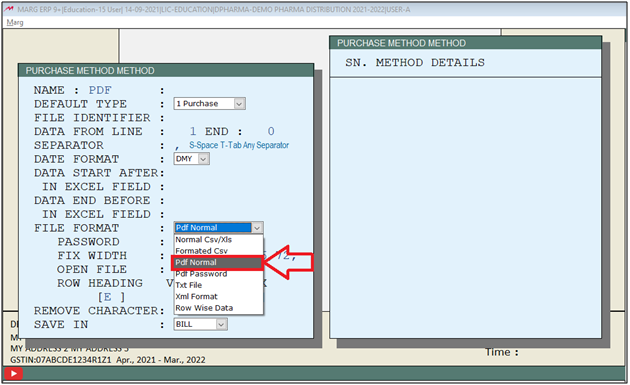
- File Format: The user will select the format of the file which needs to be imported.
- Suppose select 'PDF Normal'.
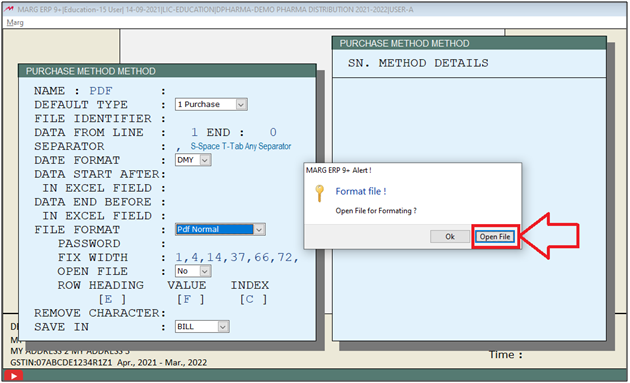
- A 'Marg ERP 9+ alert' window will appear.
- The user needs to select 'Open File'.
- A 'Copy Marg Help From' window will appear.
- Now the user will click on 'Directory'.
- Then the directory will get opened where the user needs to select the location which needs to be imported.
- Suppose selected 'Desktop'.Click on 'OK'

- Now select the file which needs to be imported.

- Now the user can view that the software has converted the PDF file into TEXT file then press 'ESC' key.

- Now the user can view that the software has converted the PDF file into CSV file then press 'ESC' key.

- Now the user can view that the column of PDF has properly been converted into separate columns of excel sheet.
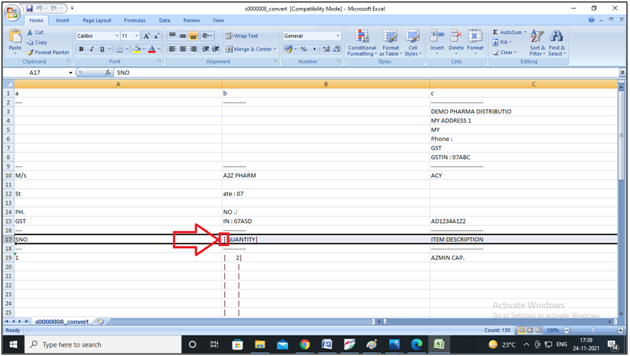
- Remove Character: If the user needs to remove any character from the excel sheet then mention it.
- Suppose we need to remove '|' so mentioned it.

- As the user can view the sign of '|' in excel sheet.
- Now to view the effect of 'Remove Character', the user again needs to select the PDF file.
- So again in 'File Format' field the user needs to select 'PDF Normal'.

- Again the user needs to press 'ESC' key on this window.

- Also, on this window the user needs to press 'ESC' key.

- As the user can view that the characters has been removed from the excel sheet.

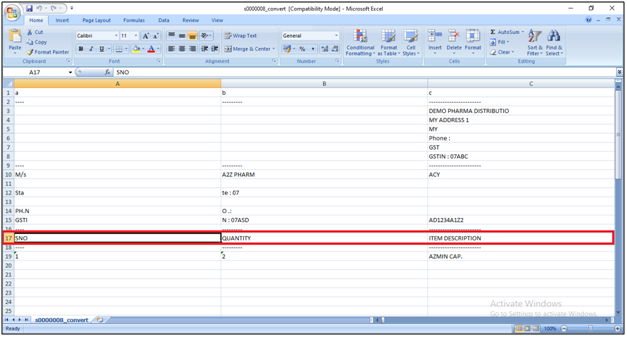
- Data From Line: The user needs to mention the row from which the data is being started in the excel sheet.
- Suppose mention '17'.
- As the user can view that the data is being started from 17th row in the excel sheet.
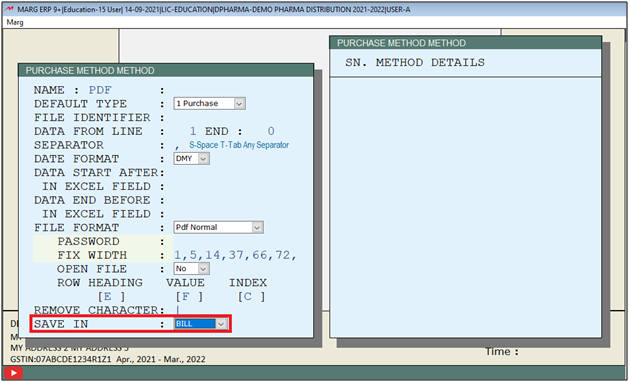
- In 'Save In', the user needs to select whether the user needs to import the transaction in bill or challan.
- Suppose select 'Bill'.
- Then press 'Enter' key.
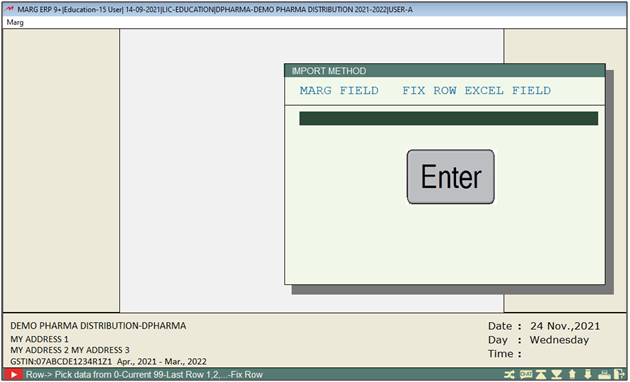
- An 'Import Method' window will appear. Press 'Enter'.
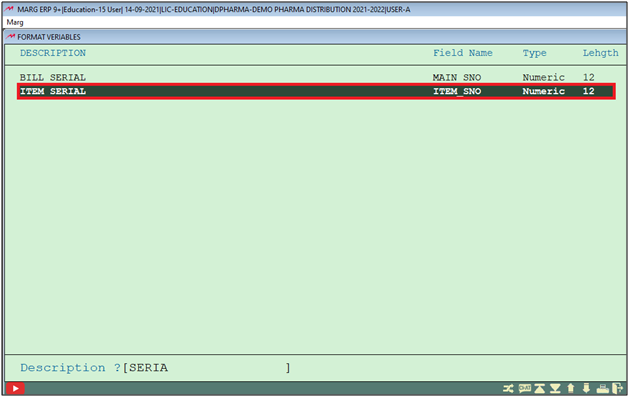
- A 'Format Variables' window will appear.
- The user will now search the heading to be imported from the Excel sheet.
- Suppose select 'Item Serial'.
- In the excel sheet, the user can view that Serial Number is in column 'A'.
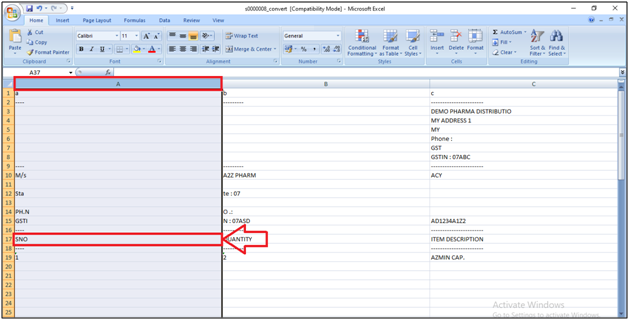
- Then, in 'Import method' window the user will enter ‘A’ in Excel field.

- Press 'Enter' twice.
- Again, 'Format Variables' window will appear.
- The user will search the heading to be imported from the Excel sheet.
- Suppose select 'Item Quantity'.

- In the excel sheet, the user can view that 'Item Quantity' is in column B.
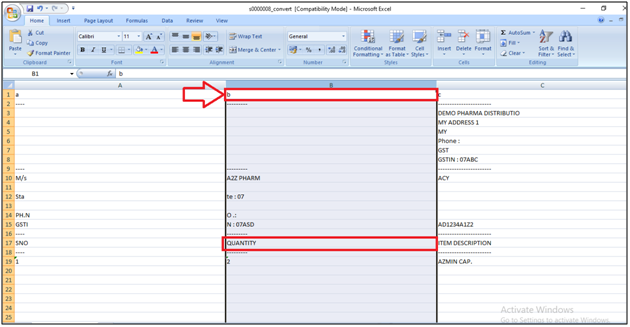
- Then, in Import method window the user will enter ‘B’ in Excel field.

- Press 'Enter' twice.
- Similarly, the user will select all the headings to be imported from the Excel sheet.

Press 'Enter' and then press 'ESC' key twice to save.
PROCESS TO IMPORT PURCHASE TRANSACTION IN PDF FORMAT IN MARG SOFTWARE
- Go to Transactions > Transaction Import > XLS/DBF/CSV/PDF Bill Import.
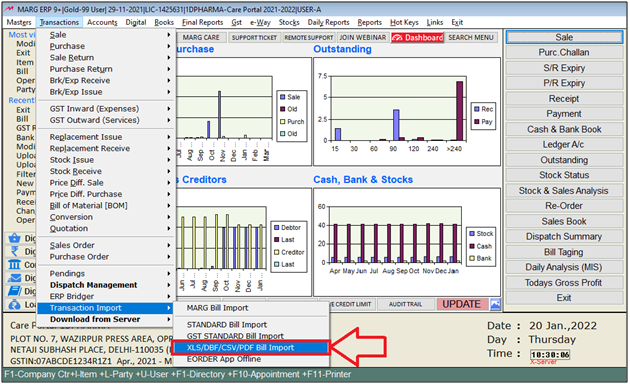
- An 'Import-Excel/DBF/TXT' window will appear.
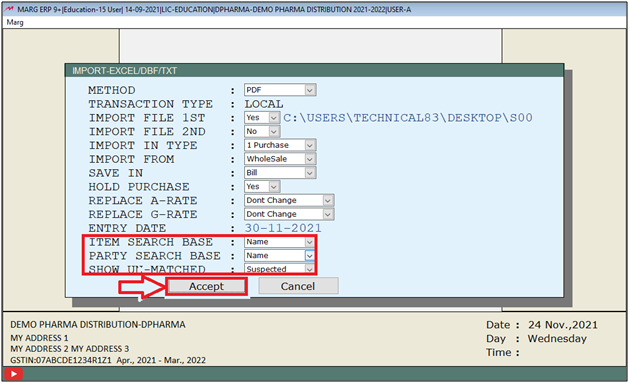
- In 'Method' field, the user will select the required method to import the inventory.
Note: If in case the user has multiple methods to import the inventory then can easily choose the required method at the time of import.

- Import File 1st: The user will to select 'No' from the drop down.
Note: If user has data in two different files then select other file in 'Import File 2nd field otherwise keep this field as 'No'.

- A 'Copy Marg Help From' window will appear.
- The user will select the location from where the transaction needs to be imported.
- Then click on 'Select'.
Note: The user may have converted txt & Csv file of the same bill but needs to select PDF only.
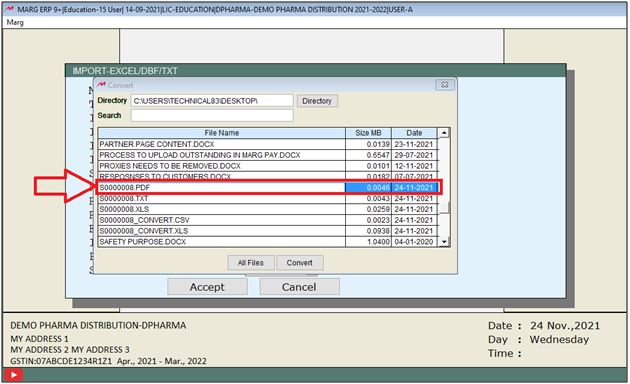
- Then the selected path will automatically get picked in this field.

- Import From:The user will select whether the import needs to be done from wholesale or Retail.
- Suppose select ‘Wholesale’.
- Save In: The user will select whether to save in Bill or in Challan.
- Suppose, select ‘Bill’.
- Replace A-Rate/Replace G-Rate: The user will select with which rate the user needs to replace A/G- Rate.
- If the user needs to replace rates then can easily select 'Don’t change' from the drop down.

- Item Search Base: the user will select the base to search the item from the drop down.
- Suppose select ‘Name.
- Party Search Base: the user will select the base to search the party from the drop down.
- Suppose select ‘Name’.
- Show un-matched: the user will select whether unmatched items must be displayed or all items that are mapped must be displayed along with the un-matched items.
- Suppose select ‘Un-matched’.
- Then click on ‘Accept’.
- A ‘Purchase Type’ window will appear.
- The user will select the Purchase type.
- Suppose select ‘Local’.
- Press 'Enter'.

- A 'Ledgers' window will appear.
- The user will now select the ledger to map.
- Suppose select ‘Narala Pharma’.

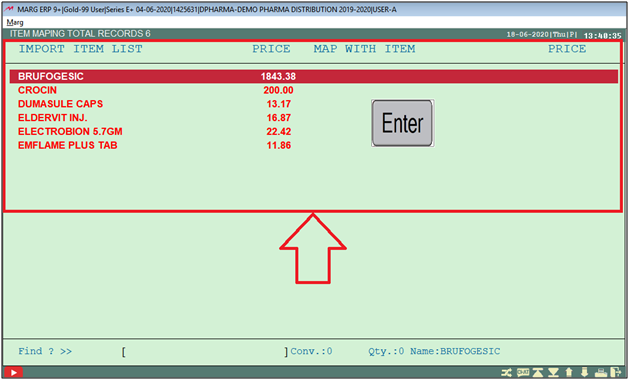
- Then an ‘Item Mapping Total Records’ window will appear.
- Here, all the items of that bill will get displayed which needs to be imported in the software.
- If an item is not been created in the software then the user will create it first by pressing (+) on this window.
- If item has already been created in the software then the software will automatically mapped the existing items but if user needs to map it with other items then can map it by pressing 'Enter' key on it.
- Suppose, the user has already created the item. So, the software has automatically mapped those items.
- Now press 'Enter'.
- A 'Map Item' window will appear.
- The user will select the item for mapping. Press 'Enter'.
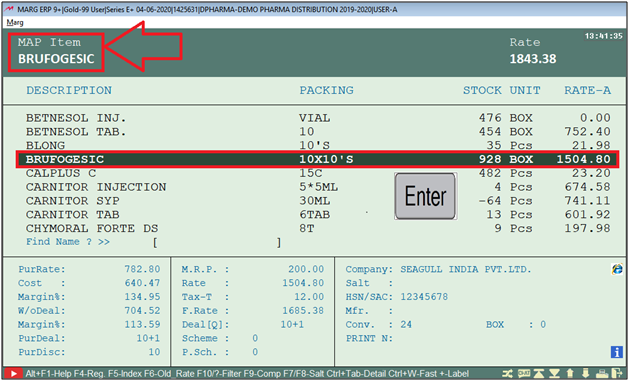
- Similarly, the user can map all the items by pressing 'Enter' key on it.
- The user will press 'ESC' key to exit from this window.
- Now a ‘Save Changes’ window will appear in which the user will select ‘Yes’.

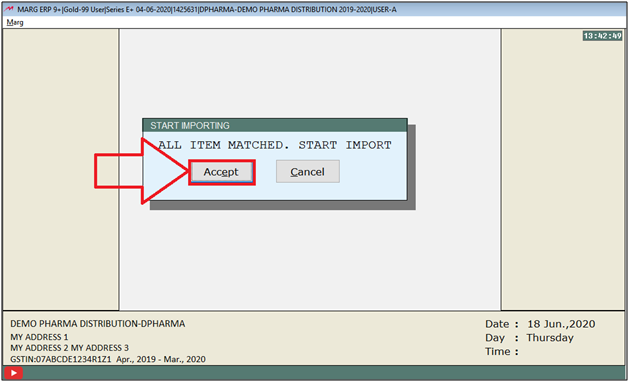
- A ‘Start Importing’ window will appear.
- The user will select ‘Accept’.
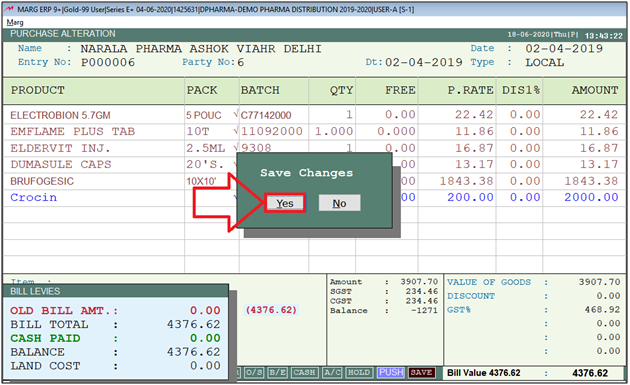
- Now the purchase bill will get imported where the user will save the transaction by pressing 'CTRL+W' key.

- Then a 'Save Changes' window will appear.
- The user will select ‘Yes’ to save the transaction.

In This Page


